Slow Cooked Cuban Style Pork

Long slow cooked dishes usually make me think of the cooler months, but using the slow cooker means the kitchen doesn’t get all hot and steamy, and I don’t get all hot and bothered. And with a little planning, if you need to use the oven,  head out for a few hours to enjoy the sunshine  and come home to a delicious meal!

edf

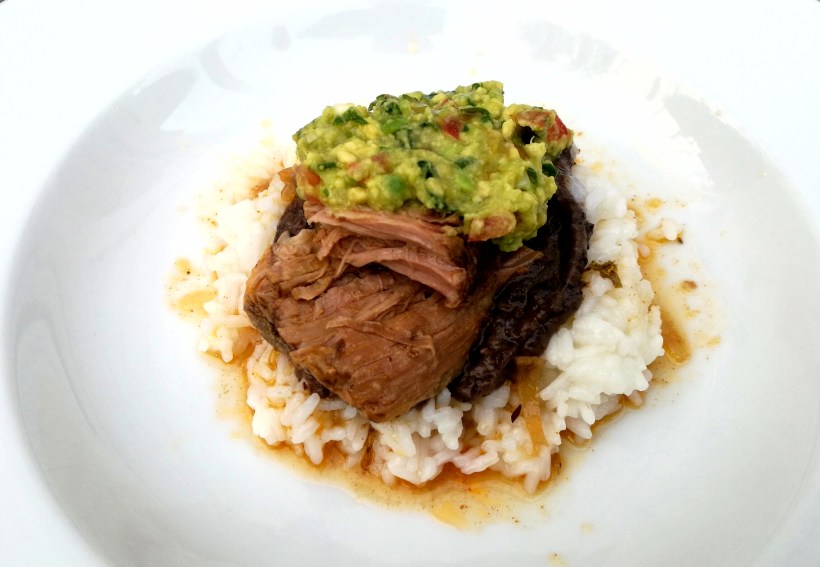
I bought a shoulder of pork the other day, a not expensive cut of meat which goes a long way with a little crowd, or it can be used for a few meals when it’s just the two of us. I’d seen a few recipes for Cuban Mojo Pork which included the juice of citrus fruits like orange , lemon and lime and the fresh flavours appealed. I also recently discovered a lovely new blog, Iowa Girl Eats. Lots of lovely gluten free recipes for those that don’t/can’t eat gluten, and for others like me who can…just a lot of lovely,  beautifully photographed recipes! This dish follows  her recipe pretty much exactly (thank you Kristin!) and I can highly recommend it. We ate the dish, as she suggested with rice, guacamole and I made some spicy Black Bean dip. Lots of lovely leftovers too, so a win-win situation.

Ingredients (to serve 6 approx)

  • Pork shoulder  (about 2kg), skin removed
  • 3/4 cup chicken stock or water
  • 1/2 cup orange juice
  • 1/4 cup each of lime and lemon juice
  • 1 red onion, finely sliced
  • 1 hot chili (cut open but left whole)
  • 1 whole head of garlic, cloves separated and peeled
  • Salt and pepper to taste
  • 1 or 2 teaspoons of dried oregano 
  • 1/2 teaspoon each of dried cumin and smoked pimentón 
  • 2 bay leaves

Put all the ingredients into the slow cooker and cook on low for about 10 hours. The meat should shred easily (like pulled pork) or you can leave it in chunks. I put the pork shoulder in whole but you can cut into  large chunks if it fits better into your pot that way.

If cooking in a conventional oven, I’d recommend cutting the pork into about four or six pieces, using a cup and a half of chicken stock and cooking on low for about 3 hours. Check the liquid half way through,  you may need to add more as you want the final dish to be juicy with some of the lovely sauce it creates to spoon over.

edf

Serve with whatever you fancy. I make my guacamole by mashing a large ripe avocado then adding in some finely chopped spring onion, a finely chopped ripe tomato,  finely chopped coriander and chili and seasoning.

If you enjoy slow cooked pork dishes, check out my Chinese Style Slow Cooked Pork.

PS. Am playing around with a “new look” on the blog. Let me know what you think, all criticism happily accepted! And if anyone knows how to add a “search” button to the top of the page, I’d love to know how…


Advertisement

Slow Cooked Chinese Style Barbecue Pork

We’re now back from Spain after a hectic month of family, friends and house repairs. Some good times and some sad times but that’s life isn’t it? Back in Bexhill for the moment and life is taking on a gentler pace for the next couple of weeks. That’s good as far as we’re concerned!

A gentler pace means time for slow cooking. I seem to have been rather enthusiastic about my passion for the slow cooker as my best pal Ria decided she wanted to give one a go, so I bought her a slow cooker for Christmas. My mum then decided that she’d join in so bought a slow cooker too. We’re all at it – slow cooking with passion and exchanging recipes. Not a bad way to enjoy food, especially when we’re able to share the results of our experimenting with each other.


DSC_0002

Here’s a great recipe which works equally well in the oven or the slow cooker. It takes very little preparation and after the required number of hours you’re rewarded with a dish which looks and tastes as though you’ve done something very cheffy and clever.

Ingredients to serve 4-6

  • 2 finely chopped or grated garlic cloves
  • 1 tbsp finely chopped ginger
  • 2 tbsp runny honey
  • 2 tbsp soy sauce
  • 2 tbsp mirin (use sweet sherry otherwise)
  • 1 tsp sesame oil
  • 1 tsp Chinese five-spice powder
  • a bones and rolled pork shoulder (about 1kg/2lb in weight)
  • Steamed or boiled rice and chopped spring onions to serve

Put the garlic, ginger, honey, soy sauce, mirin, oil and five spice powder in a large bowl and mix. Add the pork to the bowl and coat it in the sauce.

Cover and refrigerate for at least 2 hours, overnight if possible.

When you are ready to cook, bring the pork to room temperature. Put into an ovenproof dish with a lid or into a slow cooker. In a conventional oven, cook at Gas Mark 3 for about 4 hours, If you find it is drying out, add a small glass of water. In the slow cooker cook on high for 6 hours or low for 10 hours until the meat is very tender (you won’t need to add any additional liquid in the slow cooker).

Slice the meat and shred lightly to serve. Pour over any cooking juices and serve hot with the rice and spring onions.

Leftovers are wonderful cold in sandwiches.

If you’re inspired by this, why not take a look at my twice cooked melting pork?

Twice Cooked Melting Pork (8)

Puchero or Olla Andalúz – Andalucían Chick Pea Stew

Well, what a weekend of e-mails many of us have had. Thanks a bunch WordPress (not!) for inundating us all. It´s been quiet on the blog front as many of us have held off from posting or commenting for fear of drowning in a sea of unwanted e-mails. Hopefully we are all daring to put our toes back in the water…but please don´t forget to remove that tick from the box below the comments one so that you don´t receive all those messages if you´re brave enough to leave messages again!

It´s been a strange weekend here too weather wise up the mountain. Saturday was like the depths of winter, Sunday got better and this week it looks as though summer is on its way with temperatures predicted in the high twenties. Feeling grey and damp on Saturday, we indulged in a big bowl of comforting Olla (pronounced Oya) or Puchero.

The word Olla in Spanish is a big cooking pot.  Often this dish is named after the pot it is cooked in. It´s a hearty, filling winter warmer that if eaten for lunch (it´s never eaten for dinner here, probably because of the “natural effects” of chick peas) will keep you going all day . This version lists the ingredients typically used locally, but also gives options for making it outside of Spain where not all of the ingredients will be so easily available. The salted bones and fat add flavour and give the broth a cloudy or white appearance, which is the sign of a good stock in Andalucía.  Clear stock, I think I´ve mentioned it previously when talking about Chicken Soup, is considered to be lacking in flavour!

If you use the salted bones, you won´t need to add much in the way of seasoning at the end. If not, add salt after the chick peas have cooked, otherwise they will never soften.

Ingredients for 4 people

  • 2 cups of dried chick peas soaked overnight in water with a pinch of bicarbonate of soda and drained
  • 2 large chicken legs and thighs (you will see that the meat in the photo is very dark as this was one of our “old boiler” cockerels…very tasty)
  • 1 piece of pork (typically here it comes from the leg or shoulder) weighing about 250g
  • Salted pork bones (replace with 2 or three pork ribs)
  • A small piece of salted pork fat (omit if you cannot find)
  • A piece of fresh or salted pork belly (with plenty of fat)
  • Optional – a few peeled carrots and sticks of celery
  • 3 or 4 cloves
  • 2 bay leaves
  • 2 small dried chillis (optional)
  • Water

Put all the ingredients into a large stock pot, pushing the meat and bones down to the bottom.  Add water to cover everything well and bring to the boil. Skim off any froth that rises to the surface during the first 10 minutes of hard boiling then reduce the heat to a very low simmer, cover and either simmer gently for about an hour and a half until the chick peas are completely tender or cook in a very low oven for 3 to 4 hours.

Remove the bay leaves, chilli, pork skin and bones, shred the meat and chop the carrots and celery if you prefer, season if necessary and serve in deep bowls with plenty of the delicious stock poured over.

Variation. Some people also add pig´s trotters to this dish, so if you enjoy them, do feel free to add. This weekend I omitted the pork fat and added celery and carrots to make it a lighter but still filling dish. My stock is probably not up to Spanish Housewife standards this time as it´s on the verge of being clear!

This is a dish which will improve and develop flavour if prepared a day ahead.

Slow Roasted Pork Belly with a Chinese Style Sauce

We love pork belly, but here it is more traditionally used as “pancetta”, boiled in stocks and soups to add flavour or cut into tiny chunks and done on the plancha (griddle) or deep fried as a little tapas. Often it will have the skin removed.

Big Man knows that I don´t like the flowers sold in the very few florists we ever come across here (funeral meets petrol station bouquet) so I am romanced with food surprises. Cheese covered in rosemary, tangy little apples to remind me of England, bunches of wild asparagus, a freshly caught rabbit, mushrooms which have been foraged for, and yesterday a belly of pork with the skin on. Now that´s what I call love.

Today the sun is shining, time to get to work in the garden and vegetable patch, so I needed a dish that I could forget about for a while. This recipe from my old favourite, the BBC Good Food Website, seemed to fit the bill. I did change it slightly as several people commented on the sauce being very sticky and leaving them with some scary washing up. Not for me, I thought, and worked around it.

Ingredients

For the sauce

  • 2 tbsp dark soy sauce
  • 60ml vinegar (I used white wine)
  • 2 tbsp honey
  • 2 star anise, broken up slightly
  • 1 tsp Chinese five-spice powder
  • 100ml rice wine or sherry (I used a dry fino)
  • 1kg boneless pork belly

 Turn the oven on to its lowest setting.

Mix all the ingredients for the sauce together and warm gently until the honey has melted.

Line a small, deep baking tin or dish (one that will fit the meat quite snugly) with greaseproof paper making sure it comes up the sides. I used a large sheet and just placed it in the tin, scrunching it round the meat once it was placed in the tin.

Pour the sauce into the tin then place the meat on top, skin side up. Gather the paper up a little and then make a lid of aluminium foil so that the meat is sealed in the tin.

Cook slowly for about 3 hours, test the meat at the end of this time to ensure the meat is no longer pink. If it is, leave in for a little longer.

Now turn the oven up to the highest setting. Drain the sauce off the meat into a small pan and replace the meat in the baking tray, still skin side up. Continue cooking the meat until the top has turned crispy. Mine took about 45 minutes but you could always put it under a hot grill instead (not too close though or it will just burn).

Meanwhile remove any fat from the top of the sauce (I did this with a small ladle) and then fast boil the sauce until it has thickened slightly.

When the meat is done, cut into slices and serve with some of the sauce poured over. We ate ours with plain boiled basmati rice and spinach, picked only an hour before from the garden, which was simply steamed.

Now…has anyone noticed a slight improvement in my photos today? I do hope so! When I was in the UK last week I picked up my new (well, new to me) camera. It´s a Nikon D60 and I am a total photography virgin when it comes to the camera I now have. It has a couple of lenses. One of them, I am sure, will be able to pick out the hand of cards Big Man is holding when playing with the old boys in the summer if he is sat on the terrace of the bar down the road. I haven´t even read the instruction book yet, so am going to enjoy playing with it over the next few months.  Wish me luck…but don´t worry Roger, you have nothing to fear from me…

Up the Mountain Chicken in a Pot – Poule au Pot

My understanding is that King Henry IV of France hoped that, as a wealthy nation, all his people could eat stew (or a chicken) once a week.  Poule au Pot became a favourite dish, and the fact that it is so simple to produce and tasty to eat makes me understand its popularity.

I cannot attest to the authenticity of this recipe, I didn´t set out to cook the famous French dish, but when I took it to the table, wafting delicious chicken and vegetable smells, Big Man asked me what we were eating and I told him “Chicken in a Pot”. Et voilà!

Ingredients for 4-6 people depending on the size of your chicken

  • 1 free range chicken
  • 1 large potato per person, peeled and cut into quarters
  • 2 carrots, 2 sticks of celery and a leek per person (peel and roughly chop)
  • A few pieces of fresh thyme and some fresh parsley
  • 2 lemons cut into quarters
  • A large head of garlic, broken up a little but not peeled I used two small ones)
  • Olive oil
  • Seasoning
  • A glass of white wine
  • A large ovenproof pot with a lid (big enough to take all the ingredients)

Set the oven to low before assembling the dish. Rub the chicken inside and out with olive oil and season and stuff half the lemon, half the thyme and half the garlic inside.

Place into the pot, scatter the vegetables around, add the remaining garlic, lemon, parsley and thyme and season. Drizzle with a little more olive oil and pour a glass of wine over. Put the lid on and then place the dish in the oven on low for 2-3 hours depending on the size of your chicken.  Check that the juices run clear before serving. A wonderful tasting, easy meal all cooked in one pot.

For some other fantastic chicken in a pot dishes, check out Food Photography and France (it´s also a very funny read), Savoring Every Bite (for a romantic recipe) and Fired Up Cooking (if you´re planning on some outdoor entertaining) to see their delicious recipes.

Home Made Tomato Concentrate

Making the most of summer tomatoes

Tomato concentrate or purée, delicious used in pasta sauce to enrich it and a spoonful in soups and stews adds a little something special. I know it´s not very expensive to buy, but if you are dealing with a glut of tomatoes and have time on your hands, why not give this a go?

I have to say from the outset, you do need to set aside about 6 hours to make just a few jars. It´s not tricky, but you need to be around to watch the pot slowly simmering away all the water from the tomatoes and leaving you with a gorgeous, thick, sweet and intense paste.

Start by either peeling, deseeding and blending your tomatoes, or (as I do), roughly chopping and then simmering whole tomatoes for about an hour before passing them through the vegetable mouli.  Incidentally, this is another method for making preserved tomatoes.  After you have “mouli-ed” them, you can put them into sterilised jars and tuck them away for a rainy day if you don´t want to go on and make concentrate. Using the second method you may have a few stray tomato seeds in your purée, but hey, it´s homeamde!

Next you need to add about a teaspoon of salt to approx 4 kilos of tomatoes (this gave me three small-ish jars of concentrate) and put them into a wide, heavy based saucepan.  You can use a narrower pot, but it seems to take longer as I find the water evaporates more quickly from a wide pot.

Now keep them at a gentle simmer, you will need to keep them cooking for about 5 hours.  Slowly, slowly, the magic will happen.  Every so often you need to give them a stir with a wooden spoon to make sure they don´t catch on the bottom.

This slideshow requires JavaScript.

Finally, your patience will be rewarded, and just when you thought you might as well give up and turn it into pasta sauce, you have a pot of sweetly fragrant tomato concentrate.   Now you can put the hot purée into hot sterilised jars and seal. No need for a hot bath for the jars afterwards, unless it makes you feel “safer”.  I also add a thin film of olive oil, so that when I do break open the jar and start to use it, the concentrate or purée underneath will not dry out.

Delicious, rich…what other words haven´t I used?  Oh yes, you´ll also feel supremely smug when you tell people you have made it yourself!