Very Easy Chinese Style Chicken

Chinese Style Chicken (3)

My love affair with the slow cooker continues. My mum even gifted me one (thanks Mamma!) to take with me to Spain to use in the heat of the summer when I can’t (won’t) turn the oven on!

Chicken is a favourite in most households because it’s usually pretty economical (although I am very much an advocate of buying the best you can and eating it less often) and it offers so many ways to be prepared. Big Man and I are both thigh folk.  He’s a skin off, I’m a skin on and we’re both bone in! You pick what you like best and go with it, although breasts are more pricey and don’t really benefit from long slow cooking.

This dish was really simple to prepare, (although I’m sure it’s not authentically Chinese!) but the flavour was amazing. Actually, if you took the ginger and star anise out it was very similar to any meat dish in Spain prepared “al ajillo” ….with lots of garlic. Sorry about the photo…real life cooking and eating here folk….I just plated it up, took a snap and we tucked in!

Ingredients (to serve 4)

  • 2 tsp grated ginger
  • 4-6 crushed garlic cloves
  • 2 star anise
  • 150ml Chinese rice wine (or use dry sherry)
  • 2 tbsp dark soy sauce
  • 1 tsp sesame oil
  • 5 tbs water
  • 8 chicken thighs or drumsticks (skin off is better for this dish unless you want to brown them first with the skin on)
  • Shredded spring onion to garnish (clearly I forgot this bit!)
  • Plain boiled rice to serve

Mix together the ginger, garlic, star anise, rice wine, soy sauce, sesame oil and water and pour over the chicken. Leave to marinate for a few hours or overnight if you have time.  Place everthing into a saucepan and bring the chicken and marinade to the boil.

Transfer to the slow cooker (or an ovenproof dish with a lid) and cook on low for about 4 hours (or 2-3 hours in a low oven) until cooked through and tender.

When done, remove the star anise. If the sauce is too liquid, reduce for a few minutes in a saucepan and pour over the chicken to serve.

(Tastes even better the next day)

Moroccan Spiced Chickpea Stew

Regular readers will know that in our house, pulses rule supreme and we often bring supplies of chickpeas and lentils grown locally in Spain, over to England. In a tidying up frenzy the other day (family are visiting from Spain soon!) we came across further supplies that we had forgotten about. Result.

I decided to try something different from our regular Puchero and came across various recipes using Moroccan inspired spices which I adapted to suit us. I included chicken in this version, but I feel sure that you could quite happily leave it out which would give you an amazing vegan main course dish.

????????????????????????????????????

Feel free to play with the spices, next time I’ll double the harissa to give more of a kick. I used my slow cooker but this could easily be cooked (covered) in a low oven, braised gently on the hob or even in a pressure cooker (although I don’t own one so can’t offer any advice on cooking times). If you prefer to use ready cooked, canned beans just skip the soaking stage and use double the volume in the ingredients list which will give you roughly the same quantity as the dried ones after soaking.

Ingredients (to serve 4 as a main course)

  • Approx 400ml of dried chickpeas (measure by volume) soaked overnight in plenty of cold water with a pinch of bicarbonate then drained
  • 4 chicken thighs or drumsticks (optional)
  • Approx 3 tbsp olive oil
  • 1 large onion, chopped
  • 3 cloves of peeled and crushed or chopped garlic
  • 1 level tablespoon of harissa (or chili powder to taste). Use more if you like a little tickle (and who doesn’t?!)
  • 1 teaspoon each of paprika, turmeric and ground ginger
  • 2 teaspoons each of ground cumin and cinnamon
  • 1 can of chopped tomatoes (mine was 390g)
  • 2 tablespoons of tomato paste
  • About 220 ml of water (If using a slow cooker, make sure everything is covered by about 2cm of liquid).  You may need to top up with more liquid if cooking in the oven or on the stovetop. Just keep an eye on it and add more hot liquid if necessary.
  • Salt (season after the dish is cooked to help the chickpeas soften when cooking)
  • To serve – a drizzle of extra virgin olive oil and some finely chopped radish, coriander and red onion.

Heat the oil gently ad add the onion and garlic. Cover and soften then add the spices and cook (uncovered) until the spices release their aroma.

????????????????????????????????????

Add the chicken (if using) and the tomatoes, tomato puree and liquid. Bring to a boil and cook on high for 10 minutes. Now put everything into whatever you use to cook (casserole dish, slow cooker etc) and cover. I cooked mine on slow in the slow cooker for 6 hours and the chickpeas were soft and creamy with the chicken cooked through and still holding to the bone. Stovetop should take about 2 hours and a slow oven about 4 hours. Add salt to taste once the dish is cooked.

????????????????????????????????????
Arlington Bluebell Wood

When you’re ready to serve (and it’s even better the next day), ladle into deep bowls and serve with the garnish and your favourite bread. Enjoy!

Bluebells (6)

PS. Because the photos of the stew weren’t great (although the stew was…photo quality is due to a desire to eat quickly!), I have included some gratuitous shots of a recent walk we took in a Bluebell Wood nearby, do hope you enjoy a little burst of English springtime.

If you enjoy chick peas and North African inspired spices, why not try this soup?

Leche Frita…or Fried Milk

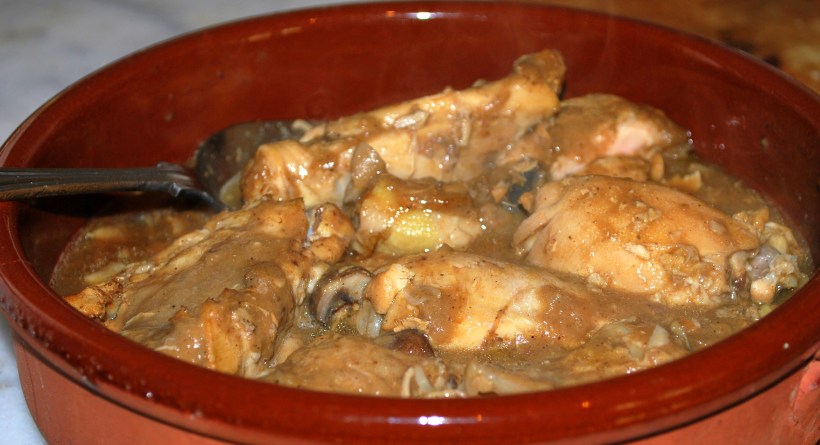
We recently had a lovely Spanish Sunday lunch with family and friends. Lunch on Sunday in Spain, especially when the weather is good and you can cook outside, often means paella. Although it wasn’t warm enough to eat in the garden, we did manage some pre-lunch drinks in the sunshine and we fired up the paella burner to cook outside.

20160416_172943

Starters were typical. Plates of jamón and cheese,  lettuce with anchovies, croquetas and prawns to peel and dip in alioli.

Dessert caused me a little stress.  Not making it, you understand.  Just deciding what to make. Where we come from in Spain doesn’t claim to have the most exciting desserts in the world. Pretty much every restaurant will offer the same selection. Flan (which we know better as creme caramel ). Natilla (a little portion of cold custard with a biscuit similar to what is called a Rich Tea biscuit on top). Arroz con leche (cold rice pudding cooked with cinnamon and sprinkled with cinnamon). Fruit or ice cream. Hmmmm.  Ok, but nothing to get over excited about.  The fruit is usually pretty good and depending on the season you can enjoy figs, melons, peaches, custard fruit, pomegranate and strawberries.  

FB_IMG_1460914788915

Folk seem to get their sugar fix from turrón and the little cakes, pastries and doughnuts served after a meal with coffee. I asked Big Man for advice and he requested Leche Frita which is something his family used to enjoy when he was young. The ingredients are few and cheap. It’s not a sophisticated dish and I was a little unsure as to how my lunch guests would react. I was amazed at how well it went down. They enjoyed the lightness and simplicity of the dish and the delicate flavour of the custard (which is what you make from your milk). If you’re a person who finds stirring risotto therapeutic,  this one’s for you as you can’t make it in a hurry.

Ingredients to serve six to eight people

  • 800ml full fat milk
  • A large slice of lemon zest
  • A stick of cinnamon
  • 80g cornflour
  • 80-100g sugar (this doesn’t need to be very sweet)
  • 2 eggs, beaten
  • Vegetable oil for frying
  • Icing sugar and cinnamon to dust the finished slices of Leche Frita

Pour the milk (reserving about 100 ml and return this to the fridge) into a saucepan with the sugar, lemon zest and cinnamon. Bring almost to boiling point, stirring to dissolve the sugar, remove from the heat then cover and leave to stand for 15 minutes.

20160417_150659

Add the cornflour to the cold milk and dissolve.  Remove the lemon zest and cinnamon from the infused milk and pour in the milk and cornflour. Heat very, very gently, whisking or stirring for about 20-30 minutes. You don’t want the milk to catch and burn while you thicken the milk. It’s ready when it has become very thick.  Run a spoon through the middle of the mixture and if it doesn’t return quickly to the middle of the pan, you’re done!

Lightly oil a shallow square or rectangular dish with some vegetable oil and pour in the thickened milk. Smooth the surface and leave to cool in the fridge for an hour or so. Ideally it will be about 2cm thick.

Prepare a large frying pan with vegetable oil to a depth of about 2cm and heat the oil. Not quite as hot as for cooking chips, but a good medium heat. Have a tray lined with kitchen paper ready and in a bowl put about 4 tablespoons of icing sugar mixed with about half a tablespoon of cinnamon.

20160417_150714

Tip the leche/custard out onto a tray or flat board and cut it into portions (I made triangles) and dip as many will fit into your frying pan in one go into the beaten egg. Make sure the pieces are well coated and put them onto a plate until you are ready to fry your first batch.

Put the egg coated pieces of leche into the hot oil and fry on each side (a couple of minutes) until golden brown. Place onto the kitchen towel and allow to cool while you cook the next batch.

When it’s cool enough to handle, dip each piece in the icing sugar and cinnamon mix. It can be served warm or cold and keeps well in the fridge (covered) for about 48 hours. Don’t expect it to be crispy, this is meant to be soft inside and out.  You can reheat gently in the oven or microwave and sprinkle a little extra icing sugar over to serve. If you want to be a bit grand, make a fruit coulis to dip the pieces into. Lovely as a dessert or teatime treat and very typical of Andalucía.


Slow Cooked Chinese Style Barbecue Pork

We’re now back from Spain after a hectic month of family, friends and house repairs. Some good times and some sad times but that’s life isn’t it? Back in Bexhill for the moment and life is taking on a gentler pace for the next couple of weeks. That’s good as far as we’re concerned!

A gentler pace means time for slow cooking. I seem to have been rather enthusiastic about my passion for the slow cooker as my best pal Ria decided she wanted to give one a go, so I bought her a slow cooker for Christmas. My mum then decided that she’d join in so bought a slow cooker too. We’re all at it – slow cooking with passion and exchanging recipes. Not a bad way to enjoy food, especially when we’re able to share the results of our experimenting with each other.


DSC_0002

Here’s a great recipe which works equally well in the oven or the slow cooker. It takes very little preparation and after the required number of hours you’re rewarded with a dish which looks and tastes as though you’ve done something very cheffy and clever.

Ingredients to serve 4-6

  • 2 finely chopped or grated garlic cloves
  • 1 tbsp finely chopped ginger
  • 2 tbsp runny honey
  • 2 tbsp soy sauce
  • 2 tbsp mirin (use sweet sherry otherwise)
  • 1 tsp sesame oil
  • 1 tsp Chinese five-spice powder
  • a bones and rolled pork shoulder (about 1kg/2lb in weight)
  • Steamed or boiled rice and chopped spring onions to serve

Put the garlic, ginger, honey, soy sauce, mirin, oil and five spice powder in a large bowl and mix. Add the pork to the bowl and coat it in the sauce.

Cover and refrigerate for at least 2 hours, overnight if possible.

When you are ready to cook, bring the pork to room temperature. Put into an ovenproof dish with a lid or into a slow cooker. In a conventional oven, cook at Gas Mark 3 for about 4 hours, If you find it is drying out, add a small glass of water. In the slow cooker cook on high for 6 hours or low for 10 hours until the meat is very tender (you won’t need to add any additional liquid in the slow cooker).

Slice the meat and shred lightly to serve. Pour over any cooking juices and serve hot with the rice and spring onions.

Leftovers are wonderful cold in sandwiches.

If you’re inspired by this, why not take a look at my twice cooked melting pork?

Twice Cooked Melting Pork (8)

Crackling and Stripping

That’ll be the crackling on a pork belly, and the stripping of a Victorian Fireplace. Not some traditional pre Christmas party games, sorry to disappoint!

First, the food…for who can work on an empty stomach? Inspired by a recipe in Hugh Fearnley-Whittingstall’s book “River Cottage Everyday” (his crackling was made with coriander and fennel seeds), I gave a thick piece of pork belly a few minutes of love before popping it into the oven with some whole sweet potatoes and ended up with a fabulous lunch and lots of lovely cold pork for leftovers.

Cumin & Anis Pork Belly 009

Ingredients (to serve 4)

  • 3 heaped teaspoons of cumin seeds (coriander in the original recipe)
  • 2 heaped teaspoons of fennel seeds
  • 1 piece of thick-end pork belly (scored, if possible) mine contained 4 ribs
  • sea salt and freshly ground pepper

Preheat the oven to 220C/Gas 7

Put the seeds into a mortar and crush them lightly. Rub the pork skin with the salt and pepper and just over half the seeds. Scatter the remaining seeds into a roasting tray and lay the meat on top. Cook on high for 30 minutes, turn the heat down to 180C/Gas 4 and continue to cook for 1 ½ hours.

If your crackling hasn’t fully crackled, turn the oven back up to high and check every few minutes until it is done to your liking. Remove the meat from the oven and leave it to rest in a warm placed (but uncovered) for about 15 minutes. It will stay warm and keeping it uncovered will keep the crackling “crackly”. If you need to leave it for longer before eating, remove the skin and keep that to one side, wrap the meat in foil and keep warm until serving.

Serve with your favourite veggies and be sure to make enough to enjoy leftovers another day!

Meanwhile, all other sensible folk are starting to get their homes in order for Christmas. We, on the other hand, pulled up some horrible carpet which will soon be gone permanently, then the floorboards in the dining room. This was to find the source of the mysterious bouncing floor. A rotten joist awaited us so Big Man set to repairing the damage.

Rotten Joist

Not wanting to be left out of the DIY session, I decided to start stripping the first of the three cast iron fireplaces which were fortunately not ripped out upstairs.

Little Bed Fireplace (1)

We have one in each of the bedrooms and one in the bathroom.

Little Bed Fireplace (3)Little Bed Fireplace (4)

As you can see, I think this may be a long job, but I have a lot of patience for jobs like this, and I love a challenge!

Down By The Sea Soda Bread

It’s been years (really, it has!) since I gave you a soda bread recipe. It doesn’t mean I’ve stopped baking soda bread, but mostly we’re a sourdough household right now.

Best friend Ria baked herself a loaf recently, so jumping on her soda bread bandwagon, I baked one too. I used the whey from curd cheese making, once again, but the recipe usually calls for buttermilk. This recipe is different from my Up The Mountain Soda Bread as it does not include oats or butter. Try both and see which one you prefer!

Soda Bread Sliced 002

Ingredients to make one loaf (keeps well for about 4 days)

  • 250g plain flour
  • 250 wholemeal or granary flour (I used granary which gives it a slightly sweeter, nuttier taste and a slightly chewy texture)
  • About 400ml of buttermilk or whey (if you don’t have either, squeeze half a tablespoon of lemon juice into milk, stir and leave it to stand for 30 minutes at room temperature and then it will be ready to use)
  • 1 teaspoon of Bicarbonate of Soda
  • 1 teaspoon of salt

Mix the flours together with the salt and bicarbonate. Gradually stir in the liquid with a wooden spoon or your fingers. You may find you don’t need it all, but you want to end up with a slightly sticky mixture.

Dust your worktop with flour and shape the mix into a round. Try not to knead too much, it just needs to come together.

Place the loaf onto a baking tin lined with greaseproof (or baking) paper. Cut a deep cross into the loaf, almost all the way through. This will allow the heat to penetrate and the alkaline of the bicarbonate and the acid of the buttermilk will work together to make your loaf rise. I’m afraid I’m no great scientist, so apologies if my explanation of the bread magic is somewhat simple!

Dust the loaf with flour, cover with a clean tea towel and leave, if possible, for 30 minutes, You can bake immediately if you choose but this extra 30 minutes really seems to allow the acid and alkaline to start doing their thing so that the loaf is raring to go when it reaches the heat of the oven. Don’t expect it to rise before baking like a regular loaf.

Soda Bread 002

Heat your oven to 200 degrees and when you are ready, bake the loaf for about 30 minutes. It should be browned on the top and sound hollow when tapped on the bottom.

Leave to cool, if you can resist, and enjoy in the same way as a regular bread.

Apple Roses

This summer I have been lucky enough to have been invited to two very lovely tea parties. I’m talking about the real deal here with smoked salmon sandwiches, cucumber sandwiches, lots of lovely cakes and scones, a choice of beautiful teas and a couple of cheeky glasses of champagne.  Afternoon tea is a lovely tradition, not one I have the opportunity to indulge in too often, but a lovely way to get together with friends and loved ones for a proper catch up and to enjoy some delicious food.

Apple Roses (13)

The first tea party was hosted by a very dear friend Barbara as an opportunity to get together with some of her girlfriends. It was a beautiful, sunny afternoon and she really pushed the boat out for us. I was particularly impressed by some little apple pies that she made which looked like beautiful, icing sugar dusted roses. She confessed they were pretty straightforward to make, so when my mum hosted a tea party too, I decided to make some for us all to share.

This post is photo heavy, and not such great photos at that, but if you decide you’d like to make these, it’s a useful “how to”.

Ingredients (to make 12 mini or 6 large pies)

  • 1 pack of all butter puff pastry (ready rolled is easier)
  • 2 large red apples
  • water
  • 2 teaspoons of apricot jam
  • a little lemon juice
  • a teaspoonful of honey or a heaped teaspoon of sugar
  • icing sugar

Preheat your oven to 200 degrees C and you will need some cupcake cases to support the pies while they are baking

Start by cutting the apples in half and removing the cores. Slice fairly thinly and put all the slices into a bowl with 3 tablespoons of water, the sugar or honey and about a tablespoon of lemon juice. Mixx, cover the bowl and microwave on high for 3 minutes. You can also do this in a saucepan if you don’t want to use the microwave, simply boil the apples gently in the water, lemon and honey for about 3 minutes.

Apple Roses (3)

Whichever method you use, drain the apples and leave them to cool down slightly.

Next, roll out your pastry (if it is not prerolled) into a large rectangle and cut into 6 strips (lengthways). Dust your work surface with a little icing sugar to prevent the pastry from sticking.

Apple Roses (1)

Melt the jam with a teaspoon of water (microwave or saucepan).

Working with one strip of pastry at a time, brush the pastry with the melted apricot jam and lay overlapping slices of apple along the edge. Allow a little of the top of the apple slice to come over the top of the pastry strip.

Apple Roses (4)

Fold the bottom half of the pastry strip upwards and press down gently.

Apple Roses (7)

For large pies, roll up the whole slice (like a snail shell!), for smaller pies, cut the appe and pastry slices in two and roll up into two smaller rolls.

Put them into a cupcake case to support them and bake for about 45 minutes until the pastry is golden.

Apple Roses (9)

Apple Roses (11)

Allow to cool and dust with icing sugar before admiring your bouquet of apples roses!

Gigantes Plakis – Greek Style Giant Baked Beans

So, as you probably can guess, Gigantes refers to the size of the beans! And Plaki (I think) means that it’s something cooked in the oven or baked. Now, I’m not claiming that my version of this dish is authentically Greek. I’ve seen several versions, some which involved a few extra steps in the process, but here’s my interpretation of a delicious vegetarian dish which can be served as is, or as part of a meze. And you don’t even have to stress about it being served piping hot, Greek food is often dished up at room temperature!

Gigantes Plakis (4)

Ingredients (to serve 4)

  • 500g of large white beans (I used butter beans but others that can be used are lima beans) soaked overnight in water with a small pinch of bicarbonate of soda
  • About 500g of a simple tomato sauce made with tomatoes, garlic, some finely chopped celery (if you have it) and some chopped fresh parsley

Rinse the beans, cover with cold water and bring to the boil. Fast boil for 10 minutes, skim off any scum and reduce to a simmer for about an hour – you want them almost cooked but not quite.

Heat the oven to medium (about 160 degrees) and make sure your tomato sauce is hot. Drain the beans.

Gigantes Plakis (1)

Stir the beans and the tomato sauce together and put into an ovenproof dish. Bake for about 1 ½ – 2 hours until the beans are tender and a little dry/crispy on top. You may need to add a little water during cooking. Check for seasoning and adjust if necessary, add a little extra chopped parsley if you like and sit back and wait for them to cool down a little. Or just eat them piping hot and hope that no one reports you….

Beef Pot Roast with Ale

I’m a great fan of cooking with alcohol. A glass of wine in my hand, another for the pot is good. Usually I use wine, but on this occasion I used beer, a dark beer called Hobgoblin (don’t you just love the names of some of the Ales produced in England!).

The recipe was another of my beloved slow cooked dishes, a pot roast this time, and it’s a perfect all in one dish that just needs some boiled potatoes or creamy mash to soak up all those delicious juices. Any leftovers make a perfect topping for pasta.

Dark Beer, Beef & Vegetable Pot Roast (1)

The steam in the photos must be the Hobgoblin escaping from the finished dish….

Ingredients (to serve 6 people)

  • 2 onions peeled and cut into quarters
  • 8 small carrots peeled and cut into large wedges
  • 3 celery sticks cut into pieces about the same size as the carrots
  • 2 leeks, cut into large chunks (or substitute any of your favourite root vegetables)
  • A piece of brisket, about 1.5kg
  • About 300ml of dark beer (don’t use Guinness though, it will be too bitter in the final dish)
  • About 100ml of beef stock
  • A little olive oil and flour

Dust the joint of meat with flour and in a deep frying pan with a little oil, brown the meat all over. Season the joint, remove and put into the cooking pot or slow cooker. Add the vegetables to the frying pan and cook until the onion starts to turn brown at the edges, then put them into the slow cooker (or oven dish if you are cooking in a conventional oven).

Pour the beer and stock into the frying pan and scrape up the juices from the beef. Sprinkle in a level tablespoon of flour and stir as you heat the liquid. It will start to thicken slightly. Bring the liquid to a boil and pour over the meat.

Dark Beer, Beef & Vegetable Pot Roast (4)

Cook in the slow cooker for an hour on high and then for about a further 7 hours on low until the meat is really tender. In a conventional oven it will need about 4 hours on low. You will need to turn the meat over 2 or 3 times during the cooking period as it will not be covered entirely by the liquid in the pot.

When it is cooked, remove the meat and vegetables from the sauce. If the sauce looks too thin, put it into a pan and either fast boil it to reduce or make a beurre manié .  It’s made with equal parts of butter and flour mixed together and stirred into the hot liquid – about a tablespoon of each for this dish. Add it to the liquid and cook until thickened. Check for seasoning and adjust if necessary, pour over the meat and vegetables and enjoy.

Split Mung Bean Curry

I do enjoy curries made with pulses, they’re so good for you, economical and wonderfully tasty. I had bought a packet of split mung beans in a local shop and wanted to try them out. I came across a recipe online which inspired my own version, but of course, didn’t keep track of the original source. Apologies to the owner of the original recipe, I’d be happy to credit you.

Mung Bean Dhal (4)

The quantity I made filled 4 plastic tubs, so I shared the curry love with my mum and my best pal. Feel free to scoff it all yourself or make less! This gives a gentle tasting curry, you may want to increase the quantities of the spices (I think I will next time) for a little more punch!

Ingredients to serve 4-6

  • 400g yellow split mung beans (yellow moong dal), well rinsed
  • Water, to cover the beans
  • ½ teaspoon turmeric powder
  • Approx 4 tablespoons vegetable oil
  • 1/2 teaspoon cumin powder
  • 2 small red onions, finely chopped
  • 1 level teaspoon chilli powder or to taste
  • 1 level teaspoon of coriander powder
  • 1 teaspoon grated ginger
  • 2 cloves of garlic, peeled and crushed
  • 1 tomato, peeled and finely chopped
  • 200g frozen spinach (or 400g fresh, finely chopped)
  • Salt, to taste
  • Some finely chopped coriander

In a deep pot, combine about 4 cups of water, the turmeric, and 1 tablespoon of the vegetable oil. Bring to the boil, then add the mung beans. Add more water if necessary, you want about 5cm of water above the beans.

Reduce the heat to medium-low and cook, uncovered and stirring occasionally, for 30 minutes or until the lentils are very soft. If the water starts to dry up, add another ½ cup of water. Remove from heat and set aside.

In a medium-sized frying, heat the rest of the vegetable oil and add the red onions. Sauté for 7 to 8 minutes or until the onions are browned.

Mung Bean Dhal (9)

Add the ginger, garlic, cumin, chilli powder, frozen spinach and tomatoes. Continue cooking gently until the tomatoes are soft. If using fresh spinach, add once the tomatoes have softened. Mix in the cooked beans.

Add the salt (it needs a fair amount, keep tasting) and coriander and mix well. Delicious served hot, but makes a fantastic dip served cold as it thickens as it cools.

If you enjoy curries like this, take a look at my Split Pea and Squash Curry or my Green Lentil Curry.