Honey, Ginger, Sultana and Orange Welcome Home Cake

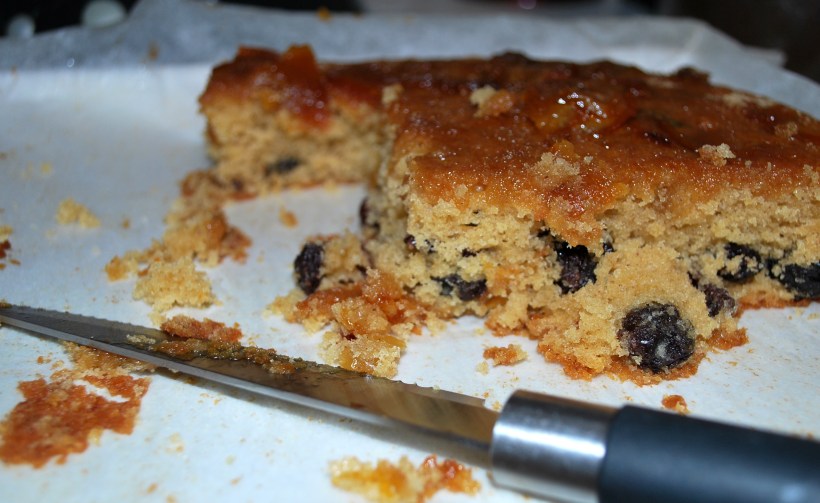
Big Man has been in Spain for a couple of weeks so the day before he returned I cooked some dishes he would enjoy to welcome him home. This included a cake, as a special treat, and it was perfect for sitting around the next day (which was cold and snowy) with some good strong coffee while we had a good old catch up.

IMG_20180301_085500
Where there’s cake, there’s usually a dog…

Regular readers of the blog will know that I don’t make many cakes, and when I do I mostly go down the “all in one” route and tend to use olive oil rather than butter. Not for health reasons, but because when I first started living in Spain it was more difficult for me to get hold of good quality butter (and getting it home before it melted in the summer was an adventure in itself). As we produce our own wonderful olive oil each year, it made sense to substitute this for the butter and I soon found that it produced light and delicious cakes…so I simply kept on using it.

This is more of a tea loaf than a sponge cake and would be delicious spread with butter (the best of both worlds! ) although it’s delicious as it is. I baked this in a 23cm x 13cm loaf tin and it cuts into about 12 slices.

Ingredients

  • 100g of sultanas soaked in your favourite tea (I used a ginger tea but Earl Grey would also be fantastic) then drained and cooled
  • 100g chopped candied peel
  • Approx 1 tablespoon of fresh grated ginger
  • 175g self raising flour mixed with ½ teaspoon of salt
  • 60ml olive oil
  • 2 large eggs
  • 150g of runny honey

Preheat the oven to 185° fan oven or 195° regular oven and line a loaf tin with greaseproof paper.

Beat the oil and honey together then add the eggs one by one. Mix in the drained sultanas,  candied peel and fresh ginger then mix in the flour and salt. This cake mix is as forgiving as  most of my others, so you don’t need to fold things together or be particularly gentle.

Pour the mix into the prepared loaf tin and bake for approx 45 minutes. Check if it’s done by inserting a skewer and if it comes out clean, you’re done. If it needs a few minutes longer and is beginning to brown, cover with some aluminium foil and give it another five minutes before checking again.

Cool for 5 minutes in the tin before turning out and cooling completely on a rack. Will keep for about 3 days in an airtight container.

If you enjoy citrus flavours, take a look at this Sticky Citrus and Marmalade cake.

Sticky Citrus and Marmalade Tray Bake (4)
Going, going….nearly gone!


Vanilla Scented Apple and Sultana Cake


I’m a lazy cake baker. Probably because I’d generally prefer to eat something savoury or spicy. Even for dessert! But there are times when the cake baking urge takes over and I give in. Usually with very little grace and I bake something wonderfully simple like Banana Bread. Recently I came across a small portion of stewed apple in one of my periodic freezer tidy ups (Christmas is looming and I need to make space!). It was 150ml and I  suspect I had put it aside to eat with porridge over a couple of mornings.

20161206_181823

I guessed that the 4 small mashed ripe bananas in the banana bread recipe were probably about the same volume as the stewed apples, and ignoring all the Mary Berry warnings about fruit adding liquid to cakes and causing all sorts of potential hazards, I ploughed ahead regardless. I made a few small changes to the original recipe, cooked it at a slightly higher temperature, and voila,  a lovely light and fragrant cake. Sometimes you just have to push the rules to their limits.

The cake has the same moist and slightly dense texture of banana bread, very filling!

Ingredients (to fit a 9″ × 5″ lined loaf tin)

  • 100g of sultanas soaked in your favourite tea (I used a lovely rooibus with vanilla gifted to me by the even lovelier Mandy over at The Complete Book), then drained and cooled
  • 175g self raising flour mixed with ½ teaspoon salt
  • 60ml olive oil (or use vegetable oil)
  • 150g sugar
  • 2 large eggs
  • 150g stewed apples
  • 1 teaspoon vanilla extract

Preheat the oven to 190 degrees (fan) or 200 conventional oven

Mix the oil with the sugar then add the eggs one by one. Next stir in the apple followed by the sultanas and vanilla extract.

Mix in the flour and salt (you don’t need to be too gentle, it’s a very resilient cake mix) and pour into a lined loaf tin.

Bake for about an hour, covering with foil towards the end if it’s browning too quickly. It should be gently browned on top and a skewer  or sharp knife inserted into the middle should come out clean.  Cool for about 10 minutes in the tin then remove to a cooling rack and resist for as long as you can then enjoy with a cup of your favourite tea or coffee!

Down By The Sea Soda Bread

It’s been years (really, it has!) since I gave you a soda bread recipe. It doesn’t mean I’ve stopped baking soda bread, but mostly we’re a sourdough household right now.

Best friend Ria baked herself a loaf recently, so jumping on her soda bread bandwagon, I baked one too. I used the whey from curd cheese making, once again, but the recipe usually calls for buttermilk. This recipe is different from my Up The Mountain Soda Bread as it does not include oats or butter. Try both and see which one you prefer!

Soda Bread Sliced 002

Ingredients to make one loaf (keeps well for about 4 days)

  • 250g plain flour
  • 250 wholemeal or granary flour (I used granary which gives it a slightly sweeter, nuttier taste and a slightly chewy texture)
  • About 400ml of buttermilk or whey (if you don’t have either, squeeze half a tablespoon of lemon juice into milk, stir and leave it to stand for 30 minutes at room temperature and then it will be ready to use)
  • 1 teaspoon of Bicarbonate of Soda
  • 1 teaspoon of salt

Mix the flours together with the salt and bicarbonate. Gradually stir in the liquid with a wooden spoon or your fingers. You may find you don’t need it all, but you want to end up with a slightly sticky mixture.

Dust your worktop with flour and shape the mix into a round. Try not to knead too much, it just needs to come together.

Place the loaf onto a baking tin lined with greaseproof (or baking) paper. Cut a deep cross into the loaf, almost all the way through. This will allow the heat to penetrate and the alkaline of the bicarbonate and the acid of the buttermilk will work together to make your loaf rise. I’m afraid I’m no great scientist, so apologies if my explanation of the bread magic is somewhat simple!

Dust the loaf with flour, cover with a clean tea towel and leave, if possible, for 30 minutes, You can bake immediately if you choose but this extra 30 minutes really seems to allow the acid and alkaline to start doing their thing so that the loaf is raring to go when it reaches the heat of the oven. Don’t expect it to rise before baking like a regular loaf.

Soda Bread 002

Heat your oven to 200 degrees and when you are ready, bake the loaf for about 30 minutes. It should be browned on the top and sound hollow when tapped on the bottom.

Leave to cool, if you can resist, and enjoy in the same way as a regular bread.

Apple Roses

This summer I have been lucky enough to have been invited to two very lovely tea parties. I’m talking about the real deal here with smoked salmon sandwiches, cucumber sandwiches, lots of lovely cakes and scones, a choice of beautiful teas and a couple of cheeky glasses of champagne.  Afternoon tea is a lovely tradition, not one I have the opportunity to indulge in too often, but a lovely way to get together with friends and loved ones for a proper catch up and to enjoy some delicious food.

Apple Roses (13)

The first tea party was hosted by a very dear friend Barbara as an opportunity to get together with some of her girlfriends. It was a beautiful, sunny afternoon and she really pushed the boat out for us. I was particularly impressed by some little apple pies that she made which looked like beautiful, icing sugar dusted roses. She confessed they were pretty straightforward to make, so when my mum hosted a tea party too, I decided to make some for us all to share.

This post is photo heavy, and not such great photos at that, but if you decide you’d like to make these, it’s a useful “how to”.

Ingredients (to make 12 mini or 6 large pies)

  • 1 pack of all butter puff pastry (ready rolled is easier)
  • 2 large red apples
  • water
  • 2 teaspoons of apricot jam
  • a little lemon juice
  • a teaspoonful of honey or a heaped teaspoon of sugar
  • icing sugar

Preheat your oven to 200 degrees C and you will need some cupcake cases to support the pies while they are baking

Start by cutting the apples in half and removing the cores. Slice fairly thinly and put all the slices into a bowl with 3 tablespoons of water, the sugar or honey and about a tablespoon of lemon juice. Mixx, cover the bowl and microwave on high for 3 minutes. You can also do this in a saucepan if you don’t want to use the microwave, simply boil the apples gently in the water, lemon and honey for about 3 minutes.

Apple Roses (3)

Whichever method you use, drain the apples and leave them to cool down slightly.

Next, roll out your pastry (if it is not prerolled) into a large rectangle and cut into 6 strips (lengthways). Dust your work surface with a little icing sugar to prevent the pastry from sticking.

Apple Roses (1)

Melt the jam with a teaspoon of water (microwave or saucepan).

Working with one strip of pastry at a time, brush the pastry with the melted apricot jam and lay overlapping slices of apple along the edge. Allow a little of the top of the apple slice to come over the top of the pastry strip.

Apple Roses (4)

Fold the bottom half of the pastry strip upwards and press down gently.

Apple Roses (7)

For large pies, roll up the whole slice (like a snail shell!), for smaller pies, cut the appe and pastry slices in two and roll up into two smaller rolls.

Put them into a cupcake case to support them and bake for about 45 minutes until the pastry is golden.

Apple Roses (9)

Apple Roses (11)

Allow to cool and dust with icing sugar before admiring your bouquet of apples roses!

Gigantes Plakis – Greek Style Giant Baked Beans

So, as you probably can guess, Gigantes refers to the size of the beans! And Plaki (I think) means that it’s something cooked in the oven or baked. Now, I’m not claiming that my version of this dish is authentically Greek. I’ve seen several versions, some which involved a few extra steps in the process, but here’s my interpretation of a delicious vegetarian dish which can be served as is, or as part of a meze. And you don’t even have to stress about it being served piping hot, Greek food is often dished up at room temperature!

Gigantes Plakis (4)

Ingredients (to serve 4)

  • 500g of large white beans (I used butter beans but others that can be used are lima beans) soaked overnight in water with a small pinch of bicarbonate of soda
  • About 500g of a simple tomato sauce made with tomatoes, garlic, some finely chopped celery (if you have it) and some chopped fresh parsley

Rinse the beans, cover with cold water and bring to the boil. Fast boil for 10 minutes, skim off any scum and reduce to a simmer for about an hour – you want them almost cooked but not quite.

Heat the oven to medium (about 160 degrees) and make sure your tomato sauce is hot. Drain the beans.

Gigantes Plakis (1)

Stir the beans and the tomato sauce together and put into an ovenproof dish. Bake for about 1 ½ – 2 hours until the beans are tender and a little dry/crispy on top. You may need to add a little water during cooking. Check for seasoning and adjust if necessary, add a little extra chopped parsley if you like and sit back and wait for them to cool down a little. Or just eat them piping hot and hope that no one reports you….

Molletes de Antequera – Soft Bread Rolls from Antequera

It’s funny that when you are away from home, apart from missing loved ones, food seems to feature highly on the list of things people miss. Or is that just us? We love good bread and are lucky to have relative success making our own as we don’t have any spectacular bakers close to our home in England and Bread Man from Spain just won’t deliver to us this far away!

Finished Molletes (1)

About 30km from our home in Spain is a town called Antequera. One of its main claims to fame is the delicious soft white bread rolls it produces and which are typically served for breakfast or “merienda” (afternoon tea). Usually they are just split, drizzled with olive oil and perhaps a sprinkle of salt. You could be more adventurous and spread them with fresh crushed tomatoes (my favourite Spanish breakfast), or go the whole hog (excuse the pun) and add some delicious slices of Jamon Serrano.

In England you can buy soft white breakfast rolls which are very good, but not quite the same. Time to see if we could recreate a favourite breakfast bread. It’s rather an unusual method, at least I thought it was, as it involved dropping a piece of dough into a bowl of warm water and waiting for it to bob to the surface like a supersized gnocchi. Stay with me, all will be revealed…

Ingredients to make 6-8 large rolls (these rolls are typically about 30cm in diameter and quite flat, they are also lightly baked so that they don’t take on any colour)

For the “Masa Madre” – the starter, or “mother dough”

100g strong bread flour

1x 7g sachet of easy blend yeast (or you can use 15g of fresh yeast)

50ml warm water

For the second dough

500g strong bread flour

320ml warm water

1x 7g sachet of easy blend yeast (or you can use 15g of fresh yeast)

50ml olive oil

Up to 20g salt (I used less, about 12g)

To make the Masa Madre – mix the easy blend yeast into the flour then add the water and mix to a dough. If using fresh yeast, add the yeast to the water, allow it to ferment then add to the flour. Form the dough into a ball, cut a cross into the top of it and put it into a bowl of hand warm water.

Molletes 001

The dough will start to release small bubbles into the water (it’s all quite entertaining to watch!) and will rise to the surface within about 10 minutes (or less). Pour away the water and use the dough immediately.

Molletes 003

To make the second dough. Mix the easy blend yeast into the flour then add the salt. In a separate bowl add the oil to the water then add half the flour, yeast and salt. If using fresh yeast, add the yeast to the water, allow it to ferment and add the oil. Then add half the flour with the salt.

Add the masa madre to the dough (which will be very wet at this stage, I used a mixer with a dough hook) and knead for a few minutes then add the rest of the flour. Continue to knead for about 10 minutes until the dough is silky, smooth and elastic. Place the dough into a bowl which has been floured or rubbed lightly with olive oil, cover with a damp tea towel and allow to rise until doubled in size. Mine took about an hour and a half.

Molletes 004

Knock back the dough and divide into 6 or 8 equal portions. Roll into balls which should be placed onto a flat baking sheet lined with baking paper. Flatten them with the plan of your hand, cover with a damp tea towel and leave to rise again. You don’t want a massive rise on the rolls, they should still retain a fairly flat surface.

Dust with flour before baking for an authentic finish. Preheat the oven to 250 C/475 F/Gas 9 and place a bowl of hot water at the bottom of the oven. Place the tray (or trays) into the oven and reduce the temperature to 200 C/400 F/Gas 6. Bake for around 20 minutes. I left mine in for a few minutes too long and they started to take on some colour which didn’t affect the flavour but is not typical for Molletes.

Molletes 009

Eat within 24 hours as they tend to dry out a little after this (but are delicious toasted or griddled). They freeze and defrost really well and are great used as picnic rolls. Now, to work out how to incorporate Hercules, Son of Priscilla, my sourdough starter into the next batch….


Give us this day our daily bread…

I make our bread several times a week. I enjoy the process and now that I’m using my starter Hercules, Son of Priscilla (thanks Celia!), my loaves are going from strength to strength. I confess that most of the time I make my usual sourdough loaf, starting the process the night before and baking early evening of the next day.

DSC_0032

Other times I use Celia’s overnight sourdough recipe which gives fantastic results and I took on board her tip of dusting the loaf in semolina flour for a crunchy crust. Clearly, as she’s my bread making heroine/guru and I am her keen student/bread making stalker, I also made some teeny tiny loaves (like she did) using some small loaf tins I had bought to make cakes in but had never used. They turned out wonderfully and were the perfect size for a hugely filling lunch roll.

Bread 001

The last few weeks have given me time too to do a little experimenting and for Easter Sunday my father requested a loaf with whole eggs baked into the top of the dough, as this is what his mother used to make when he was a boy. I Googled Calabrian Easter bread and most of the recipes led me to make a slightly sweet bread, gently flavoured with anis and made using eggs and milk. The least said about the egg dyeing the better, but everyone enjoyed it. We all felt that it was like milk bread or pan de leche as it’s called in Spain and would probably prefer to eat it as a breakfast or tea time bread. I’m going to experiment making it again in small rolls so once I’ve perfected it, I’ll post the recipe.

Italian Easter Bread 001

The most recent experiment was to use my sourdough starter to make a whole grain loaf. I wasn’t really sure what sort of results I’d get as wholemeal flour tends to rise more slowly than white flour and give a heavier bread. Combined with a slow rising, heavy sourdough loaf I was a little concerned I’d end up baking the cornerstone of our next building project, but using a mix of a flour which contained wholemeal, wheat flakes and bran with a strong white bread flour, I got fantastic results. The bread was malty, tangy and chewy and delicious spread with butter or drizzled with olive oil. I followed the same process as my usual loaf, but didn’t add olive oil. I added an extra knead and a slightly longer bake.

Ingredients

For the sponge

  • 100ml of unfed sourdough starter (mine is fed with the same volume of flour and water)
  • 250g wholemeal flour with flakes and grains
  • 300ml water

For the dough

  • 300g strong white bread flour
  • 10g salt

The night before you want to bake (or fit this into your usual baking routine), mix the ingredients for the sponge, cover and leave overnight or for about 8 hours. Don’t forget to feed your original starter to replace what you took out!

Bread 006

The next day, add the remaining flour and salt and in a mixer with a dough hook (this is quite a wet dough) knead for 10-12 minutes until the dough looks stretchy and elastic.

Turn it into a large, oiled bowl and cover with oiled cling film. Leave it to double in size, mine took about 5 hours, but it will be different for everyone. Turn out of the bowl onto an oiled surface, knock it back, form it into a ball and put it back into the oiled bowl and cover again. Leave to rise again, this should only take a couple of hours, and turn out onto a lightly floured surface. I didn’t use semolina but feel free to use whatever you like best.

Knock back and shape either onto a round or put into a floured banneton (which is what I did). Cover with a tea towel and leave to double in size.

Bread 004

Just before you are about to bake, turn your oven on to heat at top “volume” with an oven tray inside if you are going to turn out from a banneton. Once the oven has reached its temperature, carefully take the tray out and turn your loaf onto it. Slash with a very sharp or serrated knife, put it in the oven and turn the temperature down to 150C (Fan) and bake for about 55 minutes until nicely browned and it sounds hollow when tapped on it’s lovely wholemeal bottom.

Drive yourself crazy for a few hours while it cools with the wonderful smell of your freshly baked loaf and enjoy whichever way you most enjoy bread!

Asparagus and Sour Cream Tart

There’s something about asparagus that makes me happy. Well, a few things really. It tastes wonderful, it looks pretty and has an amazing colour which screams “spring”! It also feels like a luxury ingredient, which it most certainly used to be, but in reality is one which is now readily available and easily affordable. Mind you, in a few weeks when we have the start of the wonderful English asparagus season, we may pay a little more but oh it will be worth it for the flavour!

Asparagus & Sour Cream Tart (4)

Blogging too makes me happy, it allows me to keep a record of dishes I enjoy cooking and eating, it allows me to share my passions with like-minded folk and it has introduced me to new pals around the globe. New cuisines are available at the click of my mouse and one such cuisine which I am gradually learning more about comes from Germany. A wonderful blogger, Ginger, shares her recipes and memories over at Ginger and Bread. A German, with a Chilean partner living in London. Do pop over if you get the chance. She recently shared a recipe for a traditional onion quiche and I was intrigued by the use of sour cream in there with the rest of the more familiar ingredients. Time to buy a carton of sour cream and give this style of quiche a go!

Ingredients (to serve 6)

  • 1 packet of puff pastry (I used puff as this is what I had to hand, use short crust, or make your own – you decide)
  • 1 bunch of Asparagus
  • 3 eggs
  • 300ml of sour cream
  • 100ml milk
  • About 50g grated cheese (I used smoked gouda)
  • Salt & Pepper

Start by snapping off the woody ends of the asparagus and blanching the spears in lightly salted boiling water for about 3 minutes. If you don’t have a wide enough saucepan to take the spears whole, use a deep frying pan filled with water. Drain, rinse in cold water and put to one side.

Turn the oven on to medium (180C in my fan oven)

Line a tin with greaseproof paper (optional) and lay the pastry inside. If you use a flan tin with a loose bottom you don’t need to line – it just makes life easier when it comes to lifting the tart out when it’s cooked if your tin does not have a loose bottom.

Trim the pastry to fit and prick lightly with a fork.

Beat the remaining ingredients (except the asparagus) together and season. Pour into the pastry case then lay the spears gently on top.  Bake for about 45 minutes until lightly puffed up and just starting to turn golden.

Delicious hot or cold, but leave it to cool down slightly for at least 5 minutes before cutting. The addition of sour cream gives you a soft, fluffy filling, almost mousse like. Lovely with a simple dressed salad and great too for picnics.

Tartiflette – a dish to warm the soul (but only if you’re not counting the calories)

Reblochon is a delicious soft French cheese which is wonderful eaten “as is” but when cooked in a typical dish of Tartiflette, reaches another level of gorgeousness. Well, if you love soft creamy melted cheese it does!

The weather in England taunted us with its spring like warmth and Big Man decided that it was perfect weather to start painting the outside of our seaside house. Of course, day one was perfect as we prepared. We covered what felt like miles of guttering with newspaper and masking tape. We bought paint and thinner and got our brushes and rollers ready. Day two the painting commenced. And the clouds moved in, the temperature dropped and rain looked ominous. We were working at the back of the house which gets the sun, so at least when there was a break in the clouds we could enjoy a little of its warmth.

Tartiflette (3)

Day three, second coat of paint. The clouds were there to stay. The odd splash of rain (or was it a passing seagull?…I prefer not to dwell on it). But we persevered. Luckily the paint was made for British Weather (oh yes, the word Weather deserves a Capital Letter) and dries in 20 minutes.

Job done but we were chilled through. Time for some hearty Alpine food, and to hell with the calories!

Ingredients (to serve 3-4 people)

  • ½ Reblochon cheese (the original recipe calls for a whole one but we found half to be plenty)
  • About 700g small or medium potatoes in their skins
  • 2 cloves of garlic, peeled and sliced thinly
  • 4 shallots, peeled and sliced thinly
  • 6 rashers of smoked streaky bacon, cut into small strips (or use a packet of lardons)
  • About half a glass of dry white wine
  • 100ml cream
  • Black pepper

Boil the potatoes in their skins until just cooked (timing will depend on their size but probably 15-20 mins). Drain and leave to cool slightly before peeling them. These can also be prepared ahead and left to go cold before peeling and slicing not too thinly.

In a frying pan with a little oil, add the bacon, garlic and onions and fry until the bacon starts to go crispy and the onions brown a little at the edges. Pour in the wine and cook until about half the wine has evaporated.

In an ovenproof dish put about half the potatoes, then the bacon and onion mix and then the rest of the potatoes. Now slice your cheese in half so that you have two half moon shapes and lay these on top of the potatoes. Keep the skin on the cheese and if it helps to distribute over the top more evenly, cut into triangles.

Tartiflette (6)

Pour the cream over the whole thing and season with black pepper. Bake at about 200C for around 30 minutes or until the cheese is starting to become golden and the cream is bubbling. Delicious with a simple salad.

And don’t forget to wash your paint brushes or you won’t be able to use them again….

For a vegetarian version of this dish, pop over to Promenade Planting and see Claire’s great version!