Honey, Ginger, Sultana and Orange Welcome Home Cake

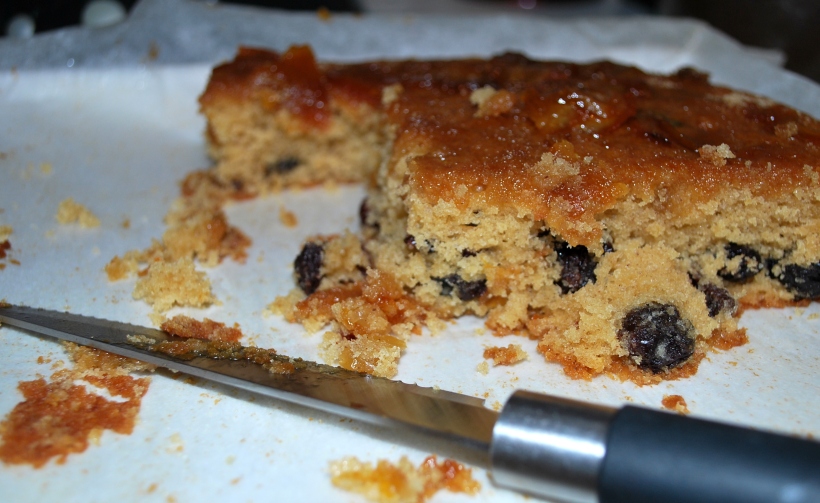
Big Man has been in Spain for a couple of weeks so the day before he returned I cooked some dishes he would enjoy to welcome him home. This included a cake, as a special treat, and it was perfect for sitting around the next day (which was cold and snowy) with some good strong coffee while we had a good old catch up.

IMG_20180301_085500
Where there’s cake, there’s usually a dog…

Regular readers of the blog will know that I don’t make many cakes, and when I do I mostly go down the “all in one” route and tend to use olive oil rather than butter. Not for health reasons, but because when I first started living in Spain it was more difficult for me to get hold of good quality butter (and getting it home before it melted in the summer was an adventure in itself). As we produce our own wonderful olive oil each year, it made sense to substitute this for the butter and I soon found that it produced light and delicious cakes…so I simply kept on using it.

This is more of a tea loaf than a sponge cake and would be delicious spread with butter (the best of both worlds! ) although it’s delicious as it is. I baked this in a 23cm x 13cm loaf tin and it cuts into about 12 slices.

Ingredients

  • 100g of sultanas soaked in your favourite tea (I used a ginger tea but Earl Grey would also be fantastic) then drained and cooled
  • 100g chopped candied peel
  • Approx 1 tablespoon of fresh grated ginger
  • 175g self raising flour mixed with ½ teaspoon of salt
  • 60ml olive oil
  • 2 large eggs
  • 150g of runny honey

Preheat the oven to 185° fan oven or 195° regular oven and line a loaf tin with greaseproof paper.

Beat the oil and honey together then add the eggs one by one. Mix in the drained sultanas,  candied peel and fresh ginger then mix in the flour and salt. This cake mix is as forgiving as  most of my others, so you don’t need to fold things together or be particularly gentle.

Pour the mix into the prepared loaf tin and bake for approx 45 minutes. Check if it’s done by inserting a skewer and if it comes out clean, you’re done. If it needs a few minutes longer and is beginning to brown, cover with some aluminium foil and give it another five minutes before checking again.

Cool for 5 minutes in the tin before turning out and cooling completely on a rack. Will keep for about 3 days in an airtight container.

If you enjoy citrus flavours, take a look at this Sticky Citrus and Marmalade cake.
Sticky Citrus and Marmalade Tray Bake (4)
Going, going….nearly gone!


Melting Spiced Pork with Aubergine

Not quite a curry, but with just a few fragrant spices and a gentle cook in the oven, you’ll be rewarded with a pot of melting meat and aubergine which will make you oh so happy! And for non meat eaters, read on to the end for a vegetarian alternative.

20161112_201643

Ingredients, to serve four with rice

  • 3 tbsp oil
  • 750g pork cut into bite sized chunks (I used skinless pork belly strips)
  • 2 aubergines cut into bite sized chunks
  • 2 tbsp brown sugar
  • 5 star anise
  • 1 cinnamon stick
  • 2 onions, peeled and very finely diced
  • 1 tbsp grated ginger
  • 1 red chili, finely chopped
  • 1 bunch fresh coriander (separate stems and leaves and finely chop both)
  • 1 tbsp fish sauce
  • Juice of a lime

Heat oven to 200C/180C Fan Oven/Gas 6. Heat the oil in an ovenproof pan that has a lid and fry the meat until browned (you may need to do this in batches), remove from the pan.

Add the aubergine and brown (you may need a little extra oil), remove from the pan and put with the pork.

Now add the sugar to the pan and allow to caramelise slightly, then return  the meat and aubergine to the pan with the cinnamon and star anise.

Put the onions, ginger, most of the chili (reserving a little for garnishing) and the chopped coriander stalks into the pan and cook for a couple of minutes. Add the fish sauce and enough water to cover the mixture completely.

Cover and place in the oven for an hour. Remove, stir in most of the coriander and adjust the seasoning if necessary. Garnish with any remaining coriander and chili and serve with boiled rice and vegetables.

For a vegetarian version, omit the pork, and replace with a mixture of robust mushrooms such as brown chestnut and shitake. Substitute the fish sauce with a light soy sauce.

 
Inspired by a BBC Good Food recipe

Vegetarian Hot and Sour Soup

Much as I enjoy a blue fillet steak or a bacon sandwich,  there are times when it feels good to lay off the meat and enjoy meals without. This doesn’t mean you have to sacrifice flavour though.  Hot and Sour Soup is perfect for days like these. Filling, warming, and full of exciting flavours. If you want to add cooked chicken or prawns though,  go ahead. Extra vegetables? Go for it!

20161109_202020

This version was inspired by a recipe from a much used and favoured cookbook, Gok Cooks Chinese. Although my predictive text called him God. He’s good, but not quite THAT good!

Ingredients (to serve 4 generously)

  • 1.5 litres of light, unsalted vegetable stock or use water
  • 50g approx of mushrooms, sliced  (I used chestnut with a few shitake)
  • 1-2 fresh red chillis, finely sliced (or a teaspoon of dried chilli flakes) depending on  how hot you like your soup
  • 50ml light soy sauce
  • Approx 3 heaped tablespoons of thinly sliced bamboo shoots (I used tinned, drained bamboo)
  • 1 large carrot, peeled and very finely sliced then diced
  • 5cm piece of fresh ginger peeled and grated (or use frozen chopped ginger)
  • 3 cloves fresh garlic, peeled and grated or crushed
  • 1 tablespoon of sugar
  • 4-6 tablespoons of rice vinegar  (to taste)
  • Optional 2 heaped teaspoons of cornflour dissolved in a little cold water
  • 2 eggs, beaten
  • Finely chopped spring onion or chives to serve

Bring the stock to a gentle boil and add the carrot. Simmer for about 5 minutes then add all the ingredients except the cornflour, vinegar,  egg and spring onion.

Simmer for about 10 minutes then gradually add the vinegar, tasting as you go until it reaches a level of sourness you enjoy.

If you prefer a slightly thickened soup, add two heaped teaspoons of cornflour to about 50mls of cold water and add to the simmering soup. Allow to thicken (this will take a minute or two).

Turn off the heat and add the egg, whisking as you do to create fine ribbons of cooked egg. Serve garnished with the finely sliced spring onion and marvel that it was quicker to prepare than ordering and waiting for a takeaway delivery.

(For a gluten free option use tamari instead of soy sauce and omit the cornflour).

Moroccan Spiced Chickpea Stew

Regular readers will know that in our house, pulses rule supreme and we often bring supplies of chickpeas and lentils grown locally in Spain, over to England. In a tidying up frenzy the other day (family are visiting from Spain soon!) we came across further supplies that we had forgotten about. Result.

I decided to try something different from our regular Puchero and came across various recipes using Moroccan inspired spices which I adapted to suit us. I included chicken in this version, but I feel sure that you could quite happily leave it out which would give you an amazing vegan main course dish.

????????????????????????????????????

Feel free to play with the spices, next time I’ll double the harissa to give more of a kick. I used my slow cooker but this could easily be cooked (covered) in a low oven, braised gently on the hob or even in a pressure cooker (although I don’t own one so can’t offer any advice on cooking times). If you prefer to use ready cooked, canned beans just skip the soaking stage and use double the volume in the ingredients list which will give you roughly the same quantity as the dried ones after soaking.

Ingredients (to serve 4 as a main course)

  • Approx 400ml of dried chickpeas (measure by volume) soaked overnight in plenty of cold water with a pinch of bicarbonate then drained
  • 4 chicken thighs or drumsticks (optional)
  • Approx 3 tbsp olive oil
  • 1 large onion, chopped
  • 3 cloves of peeled and crushed or chopped garlic
  • 1 level tablespoon of harissa (or chili powder to taste). Use more if you like a little tickle (and who doesn’t?!)
  • 1 teaspoon each of paprika, turmeric and ground ginger
  • 2 teaspoons each of ground cumin and cinnamon
  • 1 can of chopped tomatoes (mine was 390g)
  • 2 tablespoons of tomato paste
  • About 220 ml of water (If using a slow cooker, make sure everything is covered by about 2cm of liquid).  You may need to top up with more liquid if cooking in the oven or on the stovetop. Just keep an eye on it and add more hot liquid if necessary.
  • Salt (season after the dish is cooked to help the chickpeas soften when cooking)
  • To serve – a drizzle of extra virgin olive oil and some finely chopped radish, coriander and red onion.

Heat the oil gently ad add the onion and garlic. Cover and soften then add the spices and cook (uncovered) until the spices release their aroma.

????????????????????????????????????

Add the chicken (if using) and the tomatoes, tomato puree and liquid. Bring to a boil and cook on high for 10 minutes. Now put everything into whatever you use to cook (casserole dish, slow cooker etc) and cover. I cooked mine on slow in the slow cooker for 6 hours and the chickpeas were soft and creamy with the chicken cooked through and still holding to the bone. Stovetop should take about 2 hours and a slow oven about 4 hours. Add salt to taste once the dish is cooked.

????????????????????????????????????
Arlington Bluebell Wood

When you’re ready to serve (and it’s even better the next day), ladle into deep bowls and serve with the garnish and your favourite bread. Enjoy!

Bluebells (6)

PS. Because the photos of the stew weren’t great (although the stew was…photo quality is due to a desire to eat quickly!), I have included some gratuitous shots of a recent walk we took in a Bluebell Wood nearby, do hope you enjoy a little burst of English springtime.

If you enjoy chick peas and North African inspired spices, why not try this soup?

Summer Runner Beans With Tomatoes

I’m a person who thinks that most vegetables, especially those which have just been picked from the garden, don’t need too much messing around with. There are few vegetables that don’t respond well to blanching or steaming, a drizzle of olive oil and a squeeze of lemons. But let’s be honest, sometimes we fancy a change.

Lentejas y Judias Verdes 012

Any of you who grow your own vegetables will be faced at some point with a glut. While we are in England we are only managing to grow a few things. The tomatoes are STILL green and with only 3 runner bean plants, we’re not exactly dealing with kilos of them.

Runner Beans (1)

However, lovely fresh and sweet tomatoes from the next door county of Kent are being devoured daily and I decided to make a quick and fresh summer vegetable dish. Delicious as a side dish, or serve it at room temperature with some cheese and salamis, plenty of crusty bread and (of course) a chilled glass of wine.

Ingredients

  • About 200g runner beans, shredded or cut into chunks and blanched in salted, boiling water for about 3 minutes
  • 2 fat cloves of garlic, peeled and finely chopped or crushed
  • A few generous glugs of olive oil
  • About 4 ripe tomatoes (peeled or not, you decide), finely chopped, puréed or grated
  • Sea salt and freshly ground pepper
  • Half a teaspoon of smoked pimentón
  • A sprig of fresh rosemary (optional)

Slowly warm your olive oil in a small deep pan (if you have an earthenware cazuela, even better) into which you have put the chopped garlic. Once the garlic has softened, but not browned, and your kitchen is filled with wonderful warm garlicky smells, add the tomato, a little seasoning, the rosemary and the pimentón.

Continue to cook gently for two or three minutes until it all starts to come together, then add the blanched beans. Cook for a further couple of minutes to allow the beans to soften a little more, but not lose their colour.

Leave to cool down slightly, best served at room temperature.

And now a cloud shot from the other day – I just thought it was so weird and beautiful. I’m sure there is a special name for this kind of cloud formation, please do enlighten me if you know!

Clouds (2)

If you enjoy runner beans, why not try runner beans with garlic and bacon or perhaps with prawns and potatoes?

Gigantes Plakis – Greek Style Giant Baked Beans

So, as you probably can guess, Gigantes refers to the size of the beans! And Plaki (I think) means that it’s something cooked in the oven or baked. Now, I’m not claiming that my version of this dish is authentically Greek. I’ve seen several versions, some which involved a few extra steps in the process, but here’s my interpretation of a delicious vegetarian dish which can be served as is, or as part of a meze. And you don’t even have to stress about it being served piping hot, Greek food is often dished up at room temperature!

Gigantes Plakis (4)

Ingredients (to serve 4)

  • 500g of large white beans (I used butter beans but others that can be used are lima beans) soaked overnight in water with a small pinch of bicarbonate of soda
  • About 500g of a simple tomato sauce made with tomatoes, garlic, some finely chopped celery (if you have it) and some chopped fresh parsley

Rinse the beans, cover with cold water and bring to the boil. Fast boil for 10 minutes, skim off any scum and reduce to a simmer for about an hour – you want them almost cooked but not quite.

Heat the oven to medium (about 160 degrees) and make sure your tomato sauce is hot. Drain the beans.

Gigantes Plakis (1)

Stir the beans and the tomato sauce together and put into an ovenproof dish. Bake for about 1 ½ – 2 hours until the beans are tender and a little dry/crispy on top. You may need to add a little water during cooking. Check for seasoning and adjust if necessary, add a little extra chopped parsley if you like and sit back and wait for them to cool down a little. Or just eat them piping hot and hope that no one reports you….

Griddled Aubergines with Salsa Verde and Tomatoes

Our recent month in Spain was less of a holiday and more of a race to get through a list of household chores and maintenance, family visits and dealing with banks, bills and bureaucracy. Still, it had to be done, and there were of course a few special times of relaxation and fun with family and friends. Sometimes, though, it was nice just to have a couple of hours at our little cortijo (that’s a house in the country in Spain) and relax with a meal and a bottle of wine.

Berenjenas y Limones 001

The weather was all rather unpredictable going from an initial 40 degrees which knocked us sideways, to down below 20 degrees.  Then it jumped around from lovely to grey and cloudy, rainy and windy, then back to lovely. Honestly, we could have been in England! When we did have a comfortably warm day, we fired up the barbecue and cooked and ate outside. Some days we ate meat, but after a few weeks of a meat heavy diet, we craved vegetables. Luckily we were gifted an awful lot of salad so made a local gazpacho. Sounds weird but it works, trust me!

Big Man is not a fan of aubergines, but he did give this dish a go and grudgingly agreed that it was “comestible” – that’s Spanish for edible! Luckily we also had salmorejo (another variation of the more traditional gazpacho) my very favourite summer soup, to save him from fading away and I feasted on most of the absolutely delicious aubergine.

Ingredients (to serve 2 as a main course)

  • 1 large aubergine sliced into ½ cm slices lengthways and brushed lightly with olive oil on both sides
  • Some salsa verde (Spanish style) or just make up a mix of fresh olive oil with some finely chopped garlic, herbs and a pinch of salt
  • A large tomato, finely chopped
  • A finely chopped chilli (optional)

Fire up the barbecue if the weather permits or heat up a griddle pan. I never salt my aubergines as I really don’t find them bitter. Feel free to do this if you like, but don’t, of course, brush them with oil until you’ve rinsed them.

Berenjenas y Limones 004

Grill lightly on both sides and drizzle over some salsa verde. Cover tightly with foil or cling film so that they sweat slightly, and absorb the dressing at they cool down. Serve at room temperature with the tomato and chilli sprinkled over. That’s it, easy eh?!

For another grilled aubergine dish, take a look here.

Give us this day our daily bread…

I make our bread several times a week. I enjoy the process and now that I’m using my starter Hercules, Son of Priscilla (thanks Celia!), my loaves are going from strength to strength. I confess that most of the time I make my usual sourdough loaf, starting the process the night before and baking early evening of the next day.

DSC_0032

Other times I use Celia’s overnight sourdough recipe which gives fantastic results and I took on board her tip of dusting the loaf in semolina flour for a crunchy crust. Clearly, as she’s my bread making heroine/guru and I am her keen student/bread making stalker, I also made some teeny tiny loaves (like she did) using some small loaf tins I had bought to make cakes in but had never used. They turned out wonderfully and were the perfect size for a hugely filling lunch roll.

Bread 001

The last few weeks have given me time too to do a little experimenting and for Easter Sunday my father requested a loaf with whole eggs baked into the top of the dough, as this is what his mother used to make when he was a boy. I Googled Calabrian Easter bread and most of the recipes led me to make a slightly sweet bread, gently flavoured with anis and made using eggs and milk. The least said about the egg dyeing the better, but everyone enjoyed it. We all felt that it was like milk bread or pan de leche as it’s called in Spain and would probably prefer to eat it as a breakfast or tea time bread. I’m going to experiment making it again in small rolls so once I’ve perfected it, I’ll post the recipe.

Italian Easter Bread 001

The most recent experiment was to use my sourdough starter to make a whole grain loaf. I wasn’t really sure what sort of results I’d get as wholemeal flour tends to rise more slowly than white flour and give a heavier bread. Combined with a slow rising, heavy sourdough loaf I was a little concerned I’d end up baking the cornerstone of our next building project, but using a mix of a flour which contained wholemeal, wheat flakes and bran with a strong white bread flour, I got fantastic results. The bread was malty, tangy and chewy and delicious spread with butter or drizzled with olive oil. I followed the same process as my usual loaf, but didn’t add olive oil. I added an extra knead and a slightly longer bake.

Ingredients

For the sponge

  • 100ml of unfed sourdough starter (mine is fed with the same volume of flour and water)
  • 250g wholemeal flour with flakes and grains
  • 300ml water

For the dough

  • 300g strong white bread flour
  • 10g salt

The night before you want to bake (or fit this into your usual baking routine), mix the ingredients for the sponge, cover and leave overnight or for about 8 hours. Don’t forget to feed your original starter to replace what you took out!

Bread 006

The next day, add the remaining flour and salt and in a mixer with a dough hook (this is quite a wet dough) knead for 10-12 minutes until the dough looks stretchy and elastic.

Turn it into a large, oiled bowl and cover with oiled cling film. Leave it to double in size, mine took about 5 hours, but it will be different for everyone. Turn out of the bowl onto an oiled surface, knock it back, form it into a ball and put it back into the oiled bowl and cover again. Leave to rise again, this should only take a couple of hours, and turn out onto a lightly floured surface. I didn’t use semolina but feel free to use whatever you like best.

Knock back and shape either onto a round or put into a floured banneton (which is what I did). Cover with a tea towel and leave to double in size.

Bread 004

Just before you are about to bake, turn your oven on to heat at top “volume” with an oven tray inside if you are going to turn out from a banneton. Once the oven has reached its temperature, carefully take the tray out and turn your loaf onto it. Slash with a very sharp or serrated knife, put it in the oven and turn the temperature down to 150C (Fan) and bake for about 55 minutes until nicely browned and it sounds hollow when tapped on it’s lovely wholemeal bottom.

Drive yourself crazy for a few hours while it cools with the wonderful smell of your freshly baked loaf and enjoy whichever way you most enjoy bread!

Asparagus and Sour Cream Tart

There’s something about asparagus that makes me happy. Well, a few things really. It tastes wonderful, it looks pretty and has an amazing colour which screams “spring”! It also feels like a luxury ingredient, which it most certainly used to be, but in reality is one which is now readily available and easily affordable. Mind you, in a few weeks when we have the start of the wonderful English asparagus season, we may pay a little more but oh it will be worth it for the flavour!

Asparagus & Sour Cream Tart (4)

Blogging too makes me happy, it allows me to keep a record of dishes I enjoy cooking and eating, it allows me to share my passions with like-minded folk and it has introduced me to new pals around the globe. New cuisines are available at the click of my mouse and one such cuisine which I am gradually learning more about comes from Germany. A wonderful blogger, Ginger, shares her recipes and memories over at Ginger and Bread. A German, with a Chilean partner living in London. Do pop over if you get the chance. She recently shared a recipe for a traditional onion quiche and I was intrigued by the use of sour cream in there with the rest of the more familiar ingredients. Time to buy a carton of sour cream and give this style of quiche a go!

Ingredients (to serve 6)

  • 1 packet of puff pastry (I used puff as this is what I had to hand, use short crust, or make your own – you decide)
  • 1 bunch of Asparagus
  • 3 eggs
  • 300ml of sour cream
  • 100ml milk
  • About 50g grated cheese (I used smoked gouda)
  • Salt & Pepper

Start by snapping off the woody ends of the asparagus and blanching the spears in lightly salted boiling water for about 3 minutes. If you don’t have a wide enough saucepan to take the spears whole, use a deep frying pan filled with water. Drain, rinse in cold water and put to one side.

Turn the oven on to medium (180C in my fan oven)

Line a tin with greaseproof paper (optional) and lay the pastry inside. If you use a flan tin with a loose bottom you don’t need to line – it just makes life easier when it comes to lifting the tart out when it’s cooked if your tin does not have a loose bottom.

Trim the pastry to fit and prick lightly with a fork.

Beat the remaining ingredients (except the asparagus) together and season. Pour into the pastry case then lay the spears gently on top.  Bake for about 45 minutes until lightly puffed up and just starting to turn golden.

Delicious hot or cold, but leave it to cool down slightly for at least 5 minutes before cutting. The addition of sour cream gives you a soft, fluffy filling, almost mousse like. Lovely with a simple dressed salad and great too for picnics.

Spicy Cucumber Salad

We recently celebrated Mother’s Day in England and for my mother I cooked a Chinese inspired meal with lots of different dishes. Some I’ve cooked before, like Stir Fried Beef with Ginger. Alongside the meat and fish dishes, I made a fresh and crunchy salad, inspired by one in my Gok Wan Cooks book. Sadly, there were very few leftovers the next day, and none at all of the salad!

Chinese Feast 003

Ingredients to serve 4-6

  • 1 cucumber, partly peeled
  • ½ fresh chilli, finely sliced
  • 3 spring onions, finely sliced
  • A few handfuls of bean sprouts
  • 3 tablespoons rice vinegar
  • 1 teaspoon sesame oil
  • 1 teaspoon fish sauce
  • 1 teaspoon soy sauce
  • 1 teaspoon caster sugar
  • A pinch of salt

Slice off the ends of the cucumber then slice it in half lengthways. Scoop out the seeds with a teaspoon and then cut the cucumber into chunks about .5cm wide.

Mix the cucumber with the chilli, beansprouts and spring onions. Mix the rest of the ingredients together to make the dressing and pour over the salad a couple of minutes before serving.