Moroccan Spiced Chickpea Stew

Regular readers will know that in our house, pulses rule supreme and we often bring supplies of chickpeas and lentils grown locally in Spain, over to England. In a tidying up frenzy the other day (family are visiting from Spain soon!) we came across further supplies that we had forgotten about. Result.

I decided to try something different from our regular Puchero and came across various recipes using Moroccan inspired spices which I adapted to suit us. I included chicken in this version, but I feel sure that you could quite happily leave it out which would give you an amazing vegan main course dish.

????????????????????????????????????

Feel free to play with the spices, next time I’ll double the harissa to give more of a kick. I used my slow cooker but this could easily be cooked (covered) in a low oven, braised gently on the hob or even in a pressure cooker (although I don’t own one so can’t offer any advice on cooking times). If you prefer to use ready cooked, canned beans just skip the soaking stage and use double the volume in the ingredients list which will give you roughly the same quantity as the dried ones after soaking.

Ingredients (to serve 4 as a main course)

  • Approx 400ml of dried chickpeas (measure by volume) soaked overnight in plenty of cold water with a pinch of bicarbonate then drained
  • 4 chicken thighs or drumsticks (optional)
  • Approx 3 tbsp olive oil
  • 1 large onion, chopped
  • 3 cloves of peeled and crushed or chopped garlic
  • 1 level tablespoon of harissa (or chili powder to taste). Use more if you like a little tickle (and who doesn’t?!)
  • 1 teaspoon each of paprika, turmeric and ground ginger
  • 2 teaspoons each of ground cumin and cinnamon
  • 1 can of chopped tomatoes (mine was 390g)
  • 2 tablespoons of tomato paste
  • About 220 ml of water (If using a slow cooker, make sure everything is covered by about 2cm of liquid).  You may need to top up with more liquid if cooking in the oven or on the stovetop. Just keep an eye on it and add more hot liquid if necessary.
  • Salt (season after the dish is cooked to help the chickpeas soften when cooking)
  • To serve – a drizzle of extra virgin olive oil and some finely chopped radish, coriander and red onion.

Heat the oil gently ad add the onion and garlic. Cover and soften then add the spices and cook (uncovered) until the spices release their aroma.

????????????????????????????????????

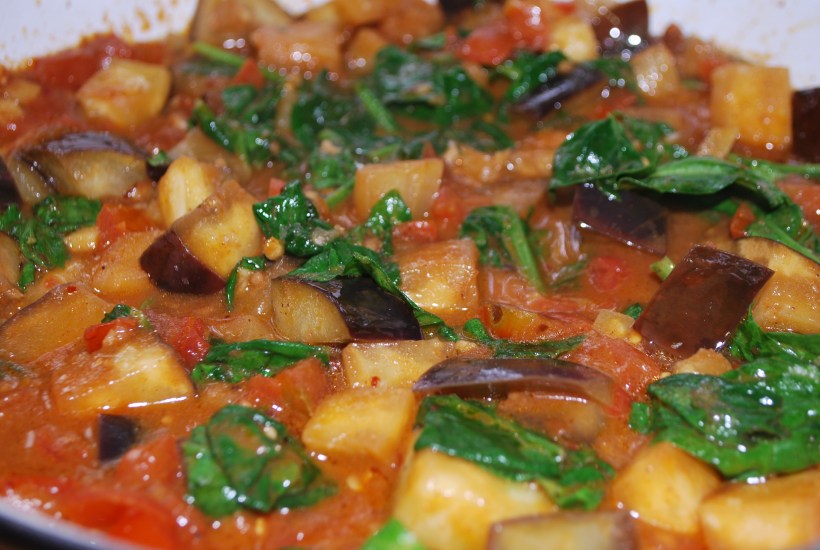
Add the chicken (if using) and the tomatoes, tomato puree and liquid. Bring to a boil and cook on high for 10 minutes. Now put everything into whatever you use to cook (casserole dish, slow cooker etc) and cover. I cooked mine on slow in the slow cooker for 6 hours and the chickpeas were soft and creamy with the chicken cooked through and still holding to the bone. Stovetop should take about 2 hours and a slow oven about 4 hours. Add salt to taste once the dish is cooked.

????????????????????????????????????
Arlington Bluebell Wood

When you’re ready to serve (and it’s even better the next day), ladle into deep bowls and serve with the garnish and your favourite bread. Enjoy!

Bluebells (6)

PS. Because the photos of the stew weren’t great (although the stew was…photo quality is due to a desire to eat quickly!), I have included some gratuitous shots of a recent walk we took in a Bluebell Wood nearby, do hope you enjoy a little burst of English springtime.

If you enjoy chick peas and North African inspired spices, why not try this soup?

Advertisement

Griddled Aubergines with Salsa Verde and Tomatoes

Our recent month in Spain was less of a holiday and more of a race to get through a list of household chores and maintenance, family visits and dealing with banks, bills and bureaucracy. Still, it had to be done, and there were of course a few special times of relaxation and fun with family and friends. Sometimes, though, it was nice just to have a couple of hours at our little cortijo (that’s a house in the country in Spain) and relax with a meal and a bottle of wine.

Berenjenas y Limones 001

The weather was all rather unpredictable going from an initial 40 degrees which knocked us sideways, to down below 20 degrees.  Then it jumped around from lovely to grey and cloudy, rainy and windy, then back to lovely. Honestly, we could have been in England! When we did have a comfortably warm day, we fired up the barbecue and cooked and ate outside. Some days we ate meat, but after a few weeks of a meat heavy diet, we craved vegetables. Luckily we were gifted an awful lot of salad so made a local gazpacho. Sounds weird but it works, trust me!

Big Man is not a fan of aubergines, but he did give this dish a go and grudgingly agreed that it was “comestible” – that’s Spanish for edible! Luckily we also had salmorejo (another variation of the more traditional gazpacho) my very favourite summer soup, to save him from fading away and I feasted on most of the absolutely delicious aubergine.

Ingredients (to serve 2 as a main course)

  • 1 large aubergine sliced into ½ cm slices lengthways and brushed lightly with olive oil on both sides
  • Some salsa verde (Spanish style) or just make up a mix of fresh olive oil with some finely chopped garlic, herbs and a pinch of salt
  • A large tomato, finely chopped
  • A finely chopped chilli (optional)

Fire up the barbecue if the weather permits or heat up a griddle pan. I never salt my aubergines as I really don’t find them bitter. Feel free to do this if you like, but don’t, of course, brush them with oil until you’ve rinsed them.

Berenjenas y Limones 004

Grill lightly on both sides and drizzle over some salsa verde. Cover tightly with foil or cling film so that they sweat slightly, and absorb the dressing at they cool down. Serve at room temperature with the tomato and chilli sprinkled over. That’s it, easy eh?!

For another grilled aubergine dish, take a look here.

Split Mung Bean Curry

I do enjoy curries made with pulses, they’re so good for you, economical and wonderfully tasty. I had bought a packet of split mung beans in a local shop and wanted to try them out. I came across a recipe online which inspired my own version, but of course, didn’t keep track of the original source. Apologies to the owner of the original recipe, I’d be happy to credit you.

Mung Bean Dhal (4)

The quantity I made filled 4 plastic tubs, so I shared the curry love with my mum and my best pal. Feel free to scoff it all yourself or make less! This gives a gentle tasting curry, you may want to increase the quantities of the spices (I think I will next time) for a little more punch!

Ingredients to serve 4-6

  • 400g yellow split mung beans (yellow moong dal), well rinsed
  • Water, to cover the beans
  • ½ teaspoon turmeric powder
  • Approx 4 tablespoons vegetable oil
  • 1/2 teaspoon cumin powder
  • 2 small red onions, finely chopped
  • 1 level teaspoon chilli powder or to taste
  • 1 level teaspoon of coriander powder
  • 1 teaspoon grated ginger
  • 2 cloves of garlic, peeled and crushed
  • 1 tomato, peeled and finely chopped
  • 200g frozen spinach (or 400g fresh, finely chopped)
  • Salt, to taste
  • Some finely chopped coriander

In a deep pot, combine about 4 cups of water, the turmeric, and 1 tablespoon of the vegetable oil. Bring to the boil, then add the mung beans. Add more water if necessary, you want about 5cm of water above the beans.

Reduce the heat to medium-low and cook, uncovered and stirring occasionally, for 30 minutes or until the lentils are very soft. If the water starts to dry up, add another ½ cup of water. Remove from heat and set aside.

In a medium-sized frying, heat the rest of the vegetable oil and add the red onions. Sauté for 7 to 8 minutes or until the onions are browned.

Mung Bean Dhal (9)

Add the ginger, garlic, cumin, chilli powder, frozen spinach and tomatoes. Continue cooking gently until the tomatoes are soft. If using fresh spinach, add once the tomatoes have softened. Mix in the cooked beans.

Add the salt (it needs a fair amount, keep tasting) and coriander and mix well. Delicious served hot, but makes a fantastic dip served cold as it thickens as it cools.

If you enjoy curries like this, take a look at my Split Pea and Squash Curry or my Green Lentil Curry.

Sticky Citrus and Marmalade Tray Bake

My mum had a bit of a marmalade making session last week and gave us several jars of her delicious marmalade to enjoy. Thanks Mamma! Putting the marmalade in the cupboard, I came across a jar of my own marmalade from last year which I decided to use up quickly so that I could get onto enjoying the fresh batch more quickly. I decided to make a quick cake and at the same time try out a new baking tin I had just bought – well…why not?!

Going, going....nearly gone!
Going, going….nearly gone!

A BBC Good Food recipe caught my eye, I substituted a mild olive oil for the butter which (I think) makes this cake suitable for vegans as it contains no egg. The vinegar in the recipe sounds odd, but don’t leave it out as it helps the cake to rise and it won’t taste of vinegar, I promise!

Ingredients (to fit a baking tray approx 28 x 23 cm)

  • 200g self raising four
  • ½ teaspoon each of ground ginger and cinnamon (original recipe uses 1 teaspoon of mixed spice which I didn’t have)
  • 100g golden caster sugar
  • Zest of 1 orange and ½ lemon
  • 100g mixed dried fruits
  • A pinch of salt
  • 100g of olive oil (original recipe calls for 140g butter which is then melted), weigh the oil as you add it to the mix
  • 5 tablespoons of marmalade
  • 125ml milk
  • 1 teaspoon of white wine vinegar
  • 2 tablespoons of icing sugar
  • 1 tablespoon of brown sugar

Heat the oven to 160c/140c (fan)/gas 3 and line your baking tray. The original recipe uses a 900g/2lb loaf tin and cooks it for 60 minutes.

Place the flour, spices, sugar, zests, dried fruits and a pinch of salt into a bowl and mix. Put the oil (or butter) into a saucepan with 2 tbsp of the marmalade and melt. Mix well, add the milk and then pour over the dry ingredients. Add the vinegar and mix well.

Pour the mixture into your prepared baking tin and bake for about 45 minutes, or until an inserted skewer comes out clean.

Sticky Citrus and Marmalade Tray Bake (3)

While the cake is baking heat the remaining marmalade with 2 tablespoons of water and the icing sugar. Pour this over the cake when it comes out of the oven then sprinkle it with brown sugar and leave to cool in the tin. You’ll end up with a delicious, citrusy, sticky cake which best pal Ria suggested would also be great served warm with custard. Now you’re talking….

Pasta with Kale (in the absence of Cavolo Nero)

January is a dark, gloomy month for those of us in the Northern Hemisphere. For many of us it is a month of tightening the financial belt and loosening the trouser belt (whilst making plans to get fit) after the excesses of Christmas.

This is a dish which ticks all those resolution boxes – healthy, economical and it looks like Spring in a bowl, which is no bad thing. The garlic will ward away germs (or so my old Italian aunties always told me), it’s quick to prepare and you’ll feel comfortably full but without the feelings of guilt after eating this. Sounds good to me!

Even looking at it fills you with vitamins!

This dish was food for the poor folk…simple ingredients (although if you can afford to use your best olive oil, I’d highly recommend it) and no fuss to make.

Quantities are easily halved or doubled, I used regular kale as I didn’t have cavolo nero (also known as black leaf kale), and it was delicious. The colour was a more vibrant green than the almost black-green you get with cavolo nero.

Ingredients (to serve 2 people very generously)

  • 200g of kale leaves
  • Approx 100ml of extra virgin olive oil
  • 3 cloves of garlic, peeled
  • Maldon (or coarse) sea salt and black pepper
  • Grated parmesan to serve (optional)

Bring a large pot of salted water to boil and cook the kale and 2 of the garlic cloves for about 5 minutes until soft. It needs to be slightly more than wilted, but not soggy. Drain and put into a food processor.

As you start processing the kale, add slugs of olive oil to the mix until you have a slightly sloppy paste – rather like pesto.

Pasta with Cavolo Nero (1)

Crush the remaining clove of garlic with a teaspoon of rough salt and add 2 teaspoons of olive oil then stir this into the kale mixture. Taste and season with extra salt and black pepper if necessary and then stir into your favourite pasta, making sure you keep a little of the cooking water to loosen up the pasta if necessary once you have added the kale.

To serve, add grated parmesan if liked and some folk even add a little extra drizzle of olive oil. Go on, I won’t tell anyone!

If you’d like to see how we make our olive oil in Spain, click here.

Vaguely Vietnamese Summer Rolls

I know, I know…late for the train again. I seem to be a few steps behind at the moment when it comes to food fashion, but I get there in the end. And then, like the woman who still thinks shoulder pads should come with t-shirts (what…me with the sloping shoulders?!) I’ll keep trotting out my “new food discovery” for years to come!

Vietnamese Summer Rolls 005

Summer, even in England this year, makes us want lighter more refreshing foods and a trip round the local Caribbean/Asian store rummaging for new foodstuffs resulted in the purchase of some rice paper wrappers. Summer Rolls – enjoyed from time to time in restaurants but never made – it seemed like an obvious choice.

When I decide to make something, I behave in the same way as I do if I have made the purchase of a new gadget or a pair of shoes. I have to use/wear them straight away. All the recipes for Vietnamese Summer rolls seemed to call for minced pork or prawns. Which would have been lovely if I’d had them, but I had avocado so I went for an (almost) vegetarian/vegan version. They would have been properly veggie/vegan if I’d left out the fish sauce.

Most of the recipes did seem to agree that you can pretty much do what you like and were rather loose on quantities. I just boiled up some fine rice noodles, finely sliced an avocado and made up a batch of finely sliced vegetables then kept rolling until I ran out – 9 rolls later.

Ingredients

  • Rice paper wrappers
  • Finely sliced vegetables (I used a piece of red pepper, half a large carrot, one spring onion, 2 leaves of Chinese cabbage and about a third of a courgette) mixed with some finely chopped mint, coriander and basil and a splash of fish sauce and the juice of half a lime
  • Rice noodles soaked in hot water until soft (I used one block which gave me about a cup and a half)

For the peanut dipping sauce

  • 2 heaped teaspoons of smooth peanut butter
  • 2 teaspoons of warm water
  • 1 teaspoon of soy sauce
  • 1 teaspoon of fish sauce
  • The juice of half a lime
  • A pinch of sugar

Get a little production line ready with a bowl of warm water big enough to hold your rice wrappers, a plate with a folded tea towel on top, your various filling ingredients, a clean plate to put the finished rolls onto and a few pieces of wet kitchen paper (or a damp cloth) to cover the rolls with to stop them drying out.

Dip a wrapper in the water and gently rub until it is transparent and soft (mine took less than 30 seconds). They are fragile but not overly so. Lay the wrapper on the plate with the clean tea towel.

Vietnamese Summer Rolls 001

Place your various fillings in the centre of the wrapper, piled on top of each other) then roll the top of the wrapper over the fillings, fold in the sides to seal and then roll the bottom half of the wrapper up. As the wrapper is still wet it will seal and keep the filling in. Place the completed roll on the serving plate and cover with a damp cloth or kitchen paper.

To make the dipping sauce, simply mix all the ingredients together. I also served the rolls with some sweet chilli dipping sauce.

Fiddly, but not too challenging, and fun to make. Healthy, delicious and surprisingly filling. Result all round!

Tamarind Spiced Aubergines and Spinach

The Veggie Garden, although planted sparsely and late this year, continues to reward us with a bounty of aubergines. Always on the lookout for new ways to prepare old favourites, and in the midst of spring autumn cleaning, I came across a packet of tamarind paste from one of my UK trips. Perfect!

Tamarind Spiced Abergine (9)

Internet searches came up with curry recipes, so thinking of a curry type base as inspiration, I made it up as a I went along, and oh my goodness…what beautiful flavours emerged from a few very simple ingredients.

Ingredients (to serve two as a main course with rice or four as a side dish)

  • 1 large aubergine cut into small dice
  • 1 large tomato, diced
  • 1 medium onion, finely chopped
  • About 1 heaped tablespoon of fresh garlic and ginger paste (make this by finely chopping or mincing equal quantities of garlic and ginger, it can be stored in the freezer, and you can scrape off what you need)
  • About 2 cups of chopped fresh spinach
  • 2 teaspoons of tamarind paste soaked in a little hot water
  • 1 teaspoon of brown sugar
  • Salt to season
  • Water or vegetable stock
  • Half a teaspoon of hot chili powder (or to taste)
  • 1 teaspoon of garam masala
  • Oil for shallow frying

Fry the aubergines until lightly browned and remove from pan. You can omit this step if you like but will need to cook the dish when all the ingredients have been added for about 10 minutes longer. Both methods are good.  Add a little more oil if necessary and fry the garlic and ginger paste and onions until the onions are soft but not browned.

Add the tomatoes and cook until softened then add the chili powder and garam masala. After a further minute, add the aubergines, sugar and tamarind, season and pour over enough water or stock to cover the vegetables.

Tamarind Spiced Abergine (4)

Simmer gently until the aubergines are completely tender (about 15 minutes) and just before serving add the spinach and cook until wilted.

Serve with a little chopped coriander and some plain boiled rice. Observant readers will note, however, that in the first photo I picked parsley by mistake!

Spiced Carrot Soup

Soup is generally enjoyed by most people. But there are a few funny folk out there, and I can say this, as the ones I’m going to talk about I love dearly. I have one friend who will only eat blended soup. She says if it’s chunky she doesn’t know whether to eat it or drink it. Big Man, on the other hand, will tolerate blended soup, but prefers chunks in a hearty soup. Maybe it’s a Boy Thing. I, being contrary to everyone, love soup in all forms and think it should be served for breakfast along with all things savoury. Am still working on curry flavoured yogurt (seriously!) but in the meantime, let’s get back to soup.

Spiced Carrot Soup (2)

Big Man had to head back to Spain for a few days, so in addition to catching up on a pile of paperwork, I indulged in curries (not the curry flavoured yogurt though) and blended soups.  A favourite of many people, with everyone giving it their own little twist, here’s my carrot soup recipe.

To serve 2 as a main course

  • 1 litre of water or vegetable stock
  • 8-10 medium carrots, peeled and finely diced
  • 1 teaspoon of cumin seeds
  • 1 teaspoon of ground coriander
  • A bunch of fresh coriander, finely chopped (including the stalks)
  • ½ teaspoon of chili powder
  • 3 cloves of crushed garlic
  • 1 chopped onion

Fry the cumin seeds and coriander powder for a minute in a little olive oil. Now put all the ingredients including the spices and their scented oil (reserving some of the fresh coriander for serving) into a large saucepan, bring to the boil then cover and reduce to a simmer for about 30 minutes until the  carrots are cooked.  Check and season to taste if necessary then purée with an immersion stick blender or in your regular blender.  Also good with a dollop of creamy natural yogurt.  Serve piping hot, wearing comfy slippers with two pups at your feet (optional).

And do check out another version of this soup I make with split peas. Yum!

It’s is carrot soup time of year I think, as here too are some beautiful recipes posted recently by fellow bloggers Frugal Feeding and Natalie at Cook Eat Live Vegetarian…yum!

And now for some gratuitous house renovation shots (House No 2)

Before

DSC_0009

After (Luna thinks the carpet was put there expressly for her as a back scratcher)

DSC_0081

Veggie Garden Eggs

Well, we´ve been home a week and, as expected, it´s been a week of running around seeing folk, catching up with all that awaits you after a 2 month absence and lots of eating and drinking!

Veggie Garden Eggs (10)

When I first used to visit Big Man before I lived in Spain, he was puzzled as to why I used to complain at the lack of vegetables in our diet. Spain has beautiful vegetables pretty much all year round. The problem is, when you live in the mountains and are eating in restaurants, the focus is on heavy mountain dishes – predominantly meat. Of course, this week, he´s come to understand what I was talking about and started groaning that he couldn´t face another meat heavy meal.

No problem, the little bit of veggie gardening we managed to do this year was tucked happily in our freezer and our lovely hens were happy to oblige with delicious free range eggs.  The result? A delicious, home cooked, not too heavy, but satisfying meal made entirely from home grown ingredients.

It´s similar to a Spanish dish called Huevos a la Flamenca, which I´ll show you another time, but today it was less about the jamon and the chorizo, and all about the vegetables. Leave out the eggs and you have a vegan meal, add them in and it´s vegetarian.

Ingredients for 2 people as a main course

  • 1 sweet onion, halved and thinly sliced
  • 4 cloves of garlic, peeled and thinly sliced
  • 1 cup of crushed tomatoes
  • 3 mixed peppers, cut into thick slices
  • About a cup of a favourite green vegetables (I used our runner beans, thinly sliced)
  • 2 tablespoons of tomato purée
  • A sprig each of oregano and rosemary
  • A glass of wine (or water) Salt & Pepper
  • Olive oil

Start by gently frying the onions and garlic in a little oil until they start to soften then add in the peppers. Cover with a lid and when the peppers start to soften add the rest of the ingredients. Cover with a lid and allow to simmer gently for about 20-30 minutes until the peppers have broken down and are very soft.  Taste and adjust the seasoning and if too liquid, cook for a minute or two to reduce the sauce and remove the herbs.

Veggie Garden Eggs (2)

Transfer into individual (heat proof) serving dishes if you like, then crack two eggs into each portion. You can either pop the dishes into the oven on a medium heat for about 10 minutes until the eggs are set, or continue to cook on the stove top (this is what I did). If you like a soft yolk, using a chop stick or the “wrong” end of a spoon, gently stir the white into the vegetables as it cooks, avoiding the yolk. The white will “scramble” into the vegetables and the yolk will stay soft.

A foggy morning Up the Mountain

Eat with plenty of crusty bread and listen to your body thanking you for giving it a welcome hit of Vitamin C. A glass of wine also helps, but then it´s made of grapes and grapes are fruit…right?!