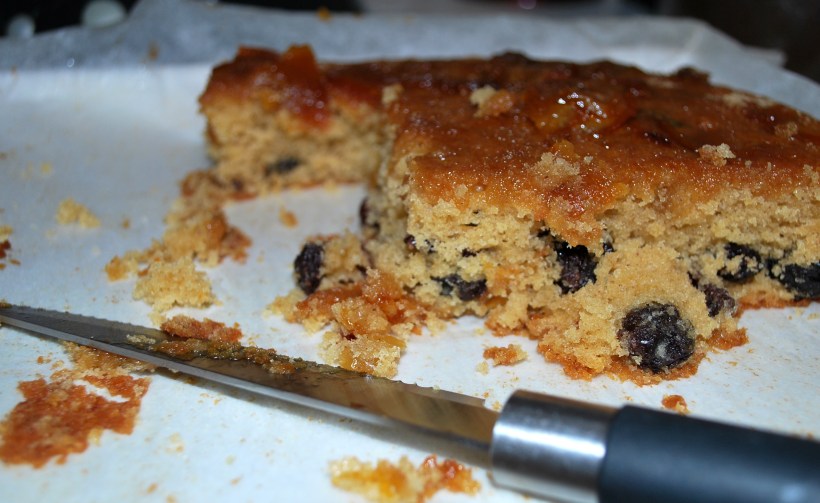
My mum had a bit of a marmalade making session last week and gave us several jars of her delicious marmalade to enjoy. Thanks Mamma! Putting the marmalade in the cupboard, I came across a jar of my own marmalade from last year which I decided to use up quickly so that I could get onto enjoying the fresh batch more quickly. I decided to make a quick cake and at the same time try out a new baking tin I had just bought – well…why not?!
Going, going….nearly gone!
A BBC Good Food recipe caught my eye, I substituted a mild olive oil for the butter which (I think) makes this cake suitable for vegans as it contains no egg. The vinegar in the recipe sounds odd, but don’t leave it out as it helps the cake to rise and it won’t taste of vinegar, I promise!
Ingredients (to fit a baking tray approx 28 x 23 cm)
200g self raising four
½ teaspoon each of ground ginger and cinnamon (original recipe uses 1 teaspoon of mixed spice which I didn’t have)
100g of olive oil (original recipe calls for 140g butter which is then melted), weigh the oil as you add it to the mix
5 tablespoons of marmalade
125ml milk
1 teaspoon of white wine vinegar
2 tablespoons of icing sugar
1 tablespoon of brown sugar
Heat the oven to 160c/140c (fan)/gas 3 and line your baking tray. The original recipe uses a 900g/2lb loaf tin and cooks it for 60 minutes.
Place the flour, spices, sugar, zests, dried fruits and a pinch of salt into a bowl and mix. Put the oil (or butter) into a saucepan with 2 tbsp of the marmalade and melt. Mix well, add the milk and then pour over the dry ingredients. Add the vinegar and mix well.
Pour the mixture into your prepared baking tin and bake for about 45 minutes, or until an inserted skewer comes out clean.
While the cake is baking heat the remaining marmalade with 2 tablespoons of water and the icing sugar. Pour this over the cake when it comes out of the oven then sprinkle it with brown sugar and leave to cool in the tin. You’ll end up with a delicious, citrusy, sticky cake which best pal Ria suggested would also be great served warm with custard. Now you’re talking….
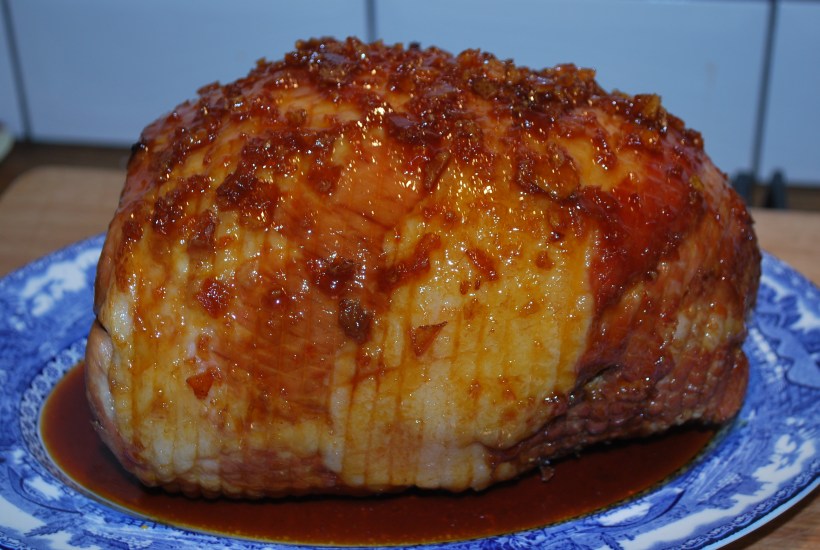
So, here we are in 2014 and a very happy and healthy New Year to you all and thank you for all your good wishes! This is a dish I made over Christmas, but it was so good I’ve just bought another smoked ham joint to make it again.
Perfect hot or cold, great as a main course with chips, mashed potatoes or jackets or in sandwiches or as a sneaky midnight feast….
I was inspired by this recipe I found over on the BBC Good Food site, but of course I changed it a little. Well, life would be dull without a few twists and turns! Big Man and I were back to work today at the house renovation and tonight the limbs are aching. A few days off have turned me into a useless Lady Builder. Or maybe it was the food and alcohol…
Is it just me or does my ham look like a grumpy face?!
Ingredients for a 3.5kg ham joint (but they’re flexible)
3.5kg cured ham or gammon (smoked or unsmoked, the choice is yours)
2 litres of ginger ale (plus you may need extra water to cover the meat)
Put the meat into a large pot and add all the first set of ingredients (and extra water if needed to cover the joint). Bring to a boil, skimming off any scum then simmer, partly covered for about 3 ½ hours. Leave to cool in the stock and use the stock to cook lentils with or make soup – it’s amazing!
If you want to glaze your ham (you don’t have to but it’s worth doing), warm the molasses and marmalade together in a small saucepan until melted. Peel the skin off you ham if it has skin on and score the skin. Pour the glaze over your ham (which you will need to put into a heavy oven tray lined with greaseproof paper to save ruining your oven tray) and bake at about 220 degrees C for 30-40 minutes until the glaze starts to brown. Baste it every 10 minutes while it is cooking.
Serve hot or cold – it will keep for about 10 days (in theory) but I bet you won’t be able to resist scoffing the lot before then.
And if you have any leftovers…well, I’ll tell you what to do with them another day.
February is traditionally marmalade making month. I´m a little behind this year, and hope this recipe doesn´t reach those of you, who want to give it a try, too late.
First of all though, I´d like to say a big thank you to two fellow bloggers who very kindly nominated me for awards. Waterfalls and Caribous chronicles the adventures of a young couple travelling the world. They´re currently in South Korea, and if, like me, you have never been to a Love Motel (it´s not rude, I promise!), click here. Thanks guys for the Versatile Blogger Award, and here´s my previous post on that if you want to check it out.
The lovely Alli over at Pease Pudding very kindly awarded me the Liebster Blog Award. If you haven´t visited this great blog yet, do pop over, it´s written by a lass from Northern England now living in beautiful New Zealand. Thanks Alli, and if you missed it, here´s where I share the love.
Last year I posted a more traditional way of making it, this year I´m using a slightly quicker method (no hand chopping and a quicker set), although marmalade making from scratch is a fairly lengthy, but rewarding process.
For every kilo (or just over) of oranges, two kilos of sugar and 1.25 litres of water and one lemon
The biggest, heavy based, saucepan you have
A wooden spoon
A couple of large jugs or bowls and a fine sieve
About 6 regular sized jams jars and lids per kilo of oranges
Start by washing and drying the oranges, and lemons and putting them in the biggest saucepan you have and covering them with water. You will now bring to the boil and cook gently until softened. Unless they are tightly packed they will probably float, so just turn them around in the water every so often. This will take about an hour and they are ready when you can easily pierce them with a skewer.
Remove the oranges from the liquid (don´t discard it) and when they are cool enough to handle, cut them in half and scoop out the flesh, pips and pith and place into the reserved liquid. You will also probably need to cuts the skins into quarters and with a knife or spoon, scrape off as much of the white pith which still clings to it. This is important as it will give you that precious pectin which will make your jam set. Put the two halves of each lemon in with the pulp.
Now bring the liquid with all the pulp and pith to a boil and using a potato masher, press down on the pulp as it boils. Leave it boiling gently for about 10 minutes and press the pulp a couple of times during this period.
As this is boiling you can process the skin – either by hand into fine shreds, or in a food processor into tiny chunks.
Now strain the liquid from the pulp and keep pressing as you pass it through the sieve to get any last drops of pectin out.
Put the liquid back into the pot, add the sugar and the chopped orange skin and cook gently until the sugar has dissolved. Now bring up to a quicker boil until it reaches setting point. You´ll find this happens quite quickly with this method, and if you like a thicker set marmalade, cook for a few minutes longer. Personally I like a softer texture – the choice is yours.
Once it is ready, leave to cool slightly for about 10-15 minutes and to allow the shreds to settle, then pour into sterilised jars, seal and wait for them to cool before labeling (if you do this). Now enjoy the wonderful smells of oranges which will still fill your house and cut yourself a lovely slice of bread to enjoy the fruits of your labours.
Spree has also made the most of the lovely oranges around at this time of year. Check out her beautiful rhubarb and orange jam.
We love our citrus fruit here in Andalucía. Our lemon tree, after 3 years, now keeps us well provided in lemons all year round. We have planted 3 orange trees too, so in a year or two, we´ll be enjoying our own oranges.
In the meantime, we rely on the kindness of friends and neighbours who keep us well supplied in oranges from about November to March, which is when Andalucía is lit up in the colour orange. Fields of orange trees are a delight to the eye, and so too are the city streets lined with the trees of bitter oranges which are destined for England and its world famous Orange Marmalade. But more of marmalade another day.
I was inspired by a stunning recipe from Sawsan over at Chef in Disguise for a beautiful orange and avocado salad. Grilled fish was on the menu for lunch, but sadly I have no idea what it is called in English. As it´s a fairly oily fish, I thought that the tangy flavours of a citrus salad would complement the fish perfectly. I was right!
Ingredients for 2 people
1 large pink grapefruit and 1 large orange peeled and cut into bite sized chunks
1 ripe avocado peeled and cubed
Radish – our radishes here are HUGE so I only used one finely sliced, but use however much you like (or not)
Dressing: any juices that run off the fruit as you peel them plus a teaspoon of lemon juice, the juice of an orange and twice the volume (of the citrus juices) of olive oil, a pinch of sugar if your orange is sour, half a teaspoon of mustard powder, a grind of pepper and a pinch of salt.
Mix up the salad ingredients gently or layer onto a plate. Mix the dressing ingredients in a jar, taste and adjust seasoning if necessary and pour over the salad. Any remaining dressing can be stored in the fridge for use another time.
February normally brings cold and rain here. What it also brings is trees heavy with beautiful, juicy oranges. Now, those lovely bitter Seville Oranges do exist. You see them lining the streets of that stunning city and pretty much every other city in Andalucía. What happens next is that they get picked and sent off to England where excited cooks turn them into delicious marmalade. We can´t buy them here!
Fortunately, our lovely friend Felix the Baker, grows oranges, lemons and avocadoes behind the old flour mill. He grows so many that he´s always giving them away. Luckily for me, I´m one of the lucky recipients and February oranges mean Orange Marmalade. I don´t think my recipe is any different from standard ones. How it turns out depends on how juicy the oranges are, how much pith (and therefore pectin, which is what makes the marmalade set) they have, how much “shred” you want to have or if you prefer a “jelly”.
What you´ll need if you want to give it a go
For every kilo (or just over) of oranges, two kilos of sugar and 2.25 litres of water
The biggest, heavy based, saucepan you have
A wooden spoon
A large square of muslin (or a clean, large, cotton handkerchief)
String (not coloured, or you´ll end up with rainbow coloured marmalade!)
About 6 regular sized jams jars and lids per kilo of oranges
Making marmalade is a labour of love if you are going to do it by hand. Even if you take a short cut and mince the peel in the food processor, you´ll only cut the time down by a little. I made marmalade with 2 kilos of oranges, and on and off it took me the whole day. The rewards? My house smelt wonderful, and still does the next day, and 11 jars of delicious homemade, organic orange marmalade.
You´ll start by washing and drying the oranges, cutting them in half and juicing them. If you have a gadget to help you do this, so much the better. The juice goes into your super size pot. Any pips or pith that start to clog up the juicer will go onto your square of muslin, or piece of cloth. It´s a good idea to line a sieve with the cloth and rest it over a bowl to catch any precious juice that may still drip out.
It will be worth the effort!
The half shells are now cut into four slices, for ease of handling, and with a sharp knife (I use a small serrated one) you need to cut away more of the pith that remains. This is done rather like cutting melon flesh from the skin. The pith also goes onto the cloth. Don´t worry too much if you can´t pare it right back as any pith that still remains on the skin will boil away, whilst doing it´s magic, with the skin. The oranges I used had lots of pith, so I saved half and will use it to make an orange jelly later in the week.
The orange skins now need to be cut into shreds. How thick or thin is down to you. One year I did this in the food processor, which leaves you with small chunks rather than shreds, but the taste was still wonderful. This year I patiently sliced, and sliced…and then sliced some more to end up with beautifully thin shreds of orange. You can relax a little now as the hardest part is over. You may find that getting to this stage takes you a few hours. Ignore cookery books that tell you it takes 45 minutes. All lies!
Now, take the cloth square and tie it up. I usually leave the string quite long, put the bag into the pot and then tie the other end of the string to the pot handle. This helps you to press on it gently now and then to remove the pectin which will be forming, and then to remove the bag easily at the end.
The Magic Begins…
Put the shreds of orange and your water in to the pot and bring to a simmer. You will leave this simmering for about 2 hours, pressing the cloth bag occasionally with a wooden spoon whilst enjoying the wonderful smell that fills your house.
Once the two hours are up and you´ve recovered from all that juicing and shredding, it´s time to start boiling. Remove the bag from the pot, put it into a bowl to cool down a little and when you can handle it comfortably (I recommend rubber gloves for this) squeeze it as dry as possible, putting all the juice that comes out into your pot.
At this point, put a couple of saucers in the freezer…all will be explained.
Add your sugar to the pot and gently dissolve it. You need to think now about sterilizing your jam jars. At this point I normally put them into my dishwasher with the lids. Otherwise you need to wash them in hot soapy water, rinse them and put them, upside down, into a very low oven.
Back to the marmalade. Once no sugar crystals remain, turn the heat up and get that jam boiling. This is why you now understand the rationale behind such a huge pot. When jam boils fast, it rises, so you do need to keep an eye on it. I let mine boil over yesterday which meant taking it off the heat, cleaning the caramelized jam off the stove, and losing about a jar of marmalade. Damn! Real life cooking. If you have a sugar thermometer, check that the jam has reached the correct temperature (which I´ve just checked and it´s 105°C or 220°F). Fear not if you don´t have a thermometer. I didn´t until earlier this year, and it´s never been a great problem. Boil the jam until it starts to rise (the froth will look white) and keep it at a boil for a few minutes, lower the heat and put a teaspoon full (be careful, boiling jam really does hurt) onto one of those saucers you put into the freezer. Leave it to cool for a minute then push the jam gently with your finger and the surface should wrinkle – that´s setting point.
If it´s not ready, then boil for another five minutes and repeat. Getting to this point can take about 45 minutes, it depends on the quantity you´re making. I´d recommend doing the saucer test even if you have a jam thermometer. I, being an impatient sort of person, didn´t do this when I made my most recent batch of marmalade, and had to unpot and reboil it the next morning as the marmalade had not set and the shreds of orange had all floated to the top of the jars leaving me with pots half full of jelly and half full of marmalade. Lesson learnt.
Once the marmalade has reached setting point, remove from the heat and leave to stand for about 20 minutes. If there is any scum remaining, skim it off. Take your jam jars out of the dishwasher or oven, they should still be warm, and get ready to fill them. I find it easiest to ladle the marmalade into a large jug and then pour into the jars. If you have a waxed disk to put onto the surface of the marmalade before screwing the lid on tightly, then fine. If not, don´t worry! Make sure those lids are tight and as the marmalade cools down, a seal will be formed and you can keep that marmalade (if you can resist) until you make next year´s batch.
If you want to label the jars, and why wouldn´t you, wait until the next day when they have cooled down. Right, I´m off to see Felix and give him a jar of marmalade.
So in 2016 I turned 50. I was in Italy for my 21st, 30th and 40th. To keep this birthday tradition going I always knew I'd be in Italy for my 50! This blog starts with my 5 week adventure in Puglia but my love affair with Italy continues.....