Solomillo Asado con Champiñones y Beicon – Roast Pork Fillet with Mushrooms and Bacon

Finally, back to the cooking. An easy recipe which looks like you´ve put lots of effort in and hours of work! This would also work well with pork loin or chicken breast.

You´ll need for 2 people (with leftovers which is always a good thing)

  • 1 pork fillet
  • A sprig of rosemary (discard after cooking)
  • About 10 mushrooms thinly sliced
  • 2 rashers of bacon finely chopped
  • ½ a medium onion finely chopped
  • 2 cloves of crushed garlic
  • Small glass of dry white wine or sherry
  • Seasoning
  • Olive Oil
  • Set the oven to about 180ºC (medium)

Put the pork fillet on a sheet of aluminium and rub in about 2 tablespoons of olive oil, and season all over with pepper and salt.  Tuck the rosemary spring under the meat and bring the aluminium up to create a basket for the meat, but don´t cover it completely.  This basket will save the cooking juices.

Put the meat onto a baking tray and into the oven and cook for about 30-40 minutes until the juices run clear when you put a skewer into the thickest part.  Remove from the oven, remove the rosemary, wrap the foil tightly round it and keep it warm for about 5 minutes to let it rest a little.

While the meat is cooking, put a few tablespoons of oil into a deep frying pan and cook the onion, garlic and bacon together gently until the onions are soft.  Add the mushrooms and a grind of pepper, stir over the heat until the mushrooms have all absorbed a little oil then add the wine and a few grinds of black pepper (no salt usually needed because of the saltiness of the bacon).  Put a lid on the pan and simmer gently for about 10 minutes or until the mushrooms are cooked and the liquid has reduced by about half.

Now pour in the meat juices and stir in.  At this point you could add a dash of cream if you fancy a creamy sauce.  Slice the meat and either pour the bacon and mushroom sauce over or serve separately.

Any leftovers of meat can be finely chopped, mixed with the mushrooms and bacon with a little cream and are delicious on pasta!

Apologies to my veggie pals and readers (you know who you are 🙂 ) this is an unashamedly porky plate with little room for adaptation but I hope you will understand and forgive….


Ham, Cheese and Mustard Pasties

One of the lovely things about Street Food in England is that you can eat your way around the world in the space of 100m. From Asia to America, around the Med and back to Blighty – it’s all there for you to enjoy.

Ham Cheese & Mustard Pasties (13)

A dish which has been cooked for hundreds of years in England is the Cornish Pasty, and whilst purists will tell you exactly what should and should not go into one, I think most people agree that when made well, they are delicious, filling and portable. Great picnic or street food.

This is by no means a Cornish Pasty – it was made from the leftovers of some spiced ham. And as we move further into January, I am sure many of you will have cooked a ham for the Christmas table so it’s great for using up leftovers.  This recipe is a great one to prepare to take with you on a winter walk to burn off some of the excesses of the festive season. God forbid you should get hungry! If you don’t have ham, this would be great with leftover vegetables or any roasted meats.

This was my first ever attempt at making Rough Puff Pastry and I’m so glad I went for it. It was easy to make and the flavour was far superior to shop bought puff pastry. Do give it a go!

Ham Cheese & Mustard Pasties (5)

This makes about 8 medium (but filling) pasties

Rough Puff Pastry

  • 300g room temperature (but not soft) butter
  • 300g plain flour
  • ¾ teaspoon fine salt
  • Up to about 200ml cold water

Mix the salt into the sieved flour and cut the butter into small chunks (about 1cm) and into the flour. Rub the flour and butter together gently but not to a fine texture – you still want to see chunks of butter.  Gradually add the water (how much you need will depend on your flour), mixing with your hands as you go until it comes together to form a dough.

Wrap in cling film and leave to rest in the fridge for 20 mins. After this time (when you can be getting on with the filling), take it out and roll it gently into a long rectangle. Fold it into thirds, roll again, fold again and put it back (wrapped) into the fridge until you are ready to use it.

Ham Cheese & Mustard Pasties (8)

Pasty Filling

  • 400ml of your boiling stock from the ham (or any stock, or milk)
  • 3tbs plain flour
  • 1 tbs olive oil
  • About a cup of grated hard cheese (I used a strong cheddar)
  • 1 tbs English mustard
  • Black pepper
  • 200g approx. of chopped cold ham
  • About a cup of finely chopped left over cooked vegetables
  • A beaten egg

Put the stock (or milk) into a pan with the flour and oil and heat gently whilst whisking. It will start to thicken to the texture of a pouring custard. Continue to cook for a couple of minutes then add the cheese, mustard and pepper and then stir in the meat and vegetables. Put into the fridge to chill and thicken slightly.

When you are ready to assemble the pasties, heat the oven to 180 degrees Celsius, divide the dough into about 8 pieces (or less if you want bigger pasties), and roll each piece into a circle. Fill one side with the filling (do not over fill), fold over the pastry and press both sides together. You can either crimp the edges or press with the tines of a fork. I have a handy Empanada maker that I use.

Brush the tops of the pasties with beaten egg and place them on a baking sheet lined with greaseproof paper. Bake for 20 minutes and enjoy when then are golden brown. These are great both hot and cold – take care not to burn yourself if you can’t resist sampling them straight out of the oven!

Spiced Ham

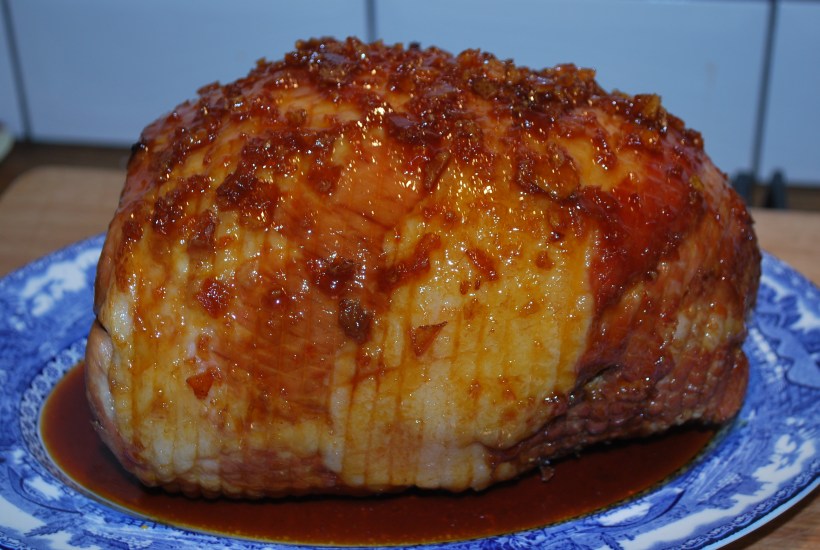
So, here we are in 2014 and a very happy and healthy New Year to you all and thank you for all your good wishes! This is a dish I made over Christmas, but it was so good I’ve just bought another smoked ham joint to make it again.

Spiced Ham (2)

Perfect hot or cold, great as a main course with chips, mashed potatoes or jackets or in sandwiches or as a sneaky midnight feast….

I was inspired by this recipe I found over on the BBC Good Food site, but of course I changed it a little. Well, life would be dull without a few twists and turns! Big Man and I were back to work today at the house renovation and tonight the limbs are aching. A few days off have turned me into a useless Lady Builder. Or maybe it was the food and alcohol…

Is it just me or does my ham look like a grumpy face?!

Ingredients for a 3.5kg ham joint (but they’re flexible)

  • 3.5kg cured ham or gammon (smoked or unsmoked, the choice is yours)
  • 2 litres of ginger ale (plus you may need extra water to cover the meat)
  • The zest and juice of 2 tangerines and one orange
  • 2 bay leaves
  • 1 onion
  • 6 cloves
  • 1 cinnamon stick
  • 10 peppercorns
  • 1 dried chili

For the glaze

  • 3 tbsp molasses or treacle
  • 3 tbsp thick cut marmalade

Put the meat into a large pot and add all the first set of ingredients (and extra water if needed to cover the joint). Bring to a boil, skimming off any scum then simmer, partly covered for about 3 ½ hours. Leave to cool in the stock and use the stock to cook lentils with or make soup –  it’s amazing!

Spiced Ham (6)

If you want to glaze your ham (you don’t have to but it’s worth doing), warm the molasses and marmalade together in a small saucepan until melted.  Peel the skin off you ham if it has skin on and score the skin. Pour the glaze over your ham (which you will need to put into a heavy oven tray lined with greaseproof paper to save ruining your oven tray) and bake at about 220 degrees C for 30-40 minutes until the glaze starts to brown. Baste it every 10 minutes while it is cooking.

Serve hot or cold – it will keep for about 10 days (in theory) but I bet you won’t be able to resist scoffing the lot before then.

And if you have any leftovers…well, I’ll tell you what to do with them another day.

Little Piggies and Potato Cakes

Near our village in Spain is another village with a restarant run by a lovely lady called Belén. Belén means Bethlehem in English, so although a bit unusual for English speakers, her name is quite apt as we creep up towards the Christmas season. Sorry, I promised myself I wouldn’t mention the C word until well into December and it’s only the 2nd today.

Belén runs a good bar and restaurant with all the usual offerings plus a few slightly different ones. An item on her menu is called “Guarrito” which translated means “little wild boar”. I don’t know if this is a typical dish, we’ve certainly never seen it anywhere else, so of course had to order it. And once ordered, we loved it and often go back for a little tapas of this with a glass of wine. So, what is “guarrito”? It’s simply thick slices of jamón cooked in a little olive oil (and Belén serves them on fried bread which makes them extra naughty and extra nice).

Guarrito (2)

We always said that these little morsels would be fantastic with a fried egg and baked beans, in a Full English Breakfast style. Or as a supper dish. Or any time really. So of course, now we make guarrito at home in England until we can get back to visit Belén again.

To accompany the guarrito I was inspired by Frugal’s Gluten Free Potato Cakes. He uses gram (chick pea) flour instead of regular flour and I pretty much followed his recipe with the addition of some roasted red peppers.

Being the sort of Chica who always cooks army rations instead of regular sized portions, I still had a little mashed potato left the following day, so I made another potato cake to go with some grilled meat and salad.

Ingredients to serve 2

  • About a cup of mashed potato
  • One beaten egg
  • Half a roasted pepper
  • A tablespoon of crème fraiche
  • Salt and pepper

Mix all the ingredients together and then blend with a hand blender or mash thoroughly – the mixture will be quite runny. Don’t panic!

Using a heavy based frying pan, pour in a little oil and get it quite hot. Now pour in the potato mix and turn the heat down. Cook slowly for about 10-15 minutes until it starts to get crispy. If you’re feeling brave slide it out onto a plate and then flip it back into the pan to cook the other side in the same way. For the fainter hearted, pop it under the grill until it starts to brown a little then flip and continue to fry.

Potato Cake (2)

Slide it out into a serving plate and enjoy your potato (pan) cake sliced into portions. Crispy on the outside, creamy soft in the middle. Now how economical and delicious is that?!

When life gives you cold rice…you make Arancini

So…look away now if you fear deep frying, or just don´t do it for health reasons. I understand, really I do. It´s just that I do deep fry from time to time. Once, in a little experiment to see just how much oil is used when making “proper” chips, I measured the oil (half vegetable, half olive oil) before and after making them and was pleasantly surprised to find that just a couple of tablespoons had been used in the whole process. So now, whilst I don´t advocate eating deep fried food daily, or even weekly, I don´t feel guilty when I do make chips, or deep fried peppers, or croquetas…I do it with joy in the anticipation of how good they´ll taste when they´re hot out the pan.

However, if you do want a healthier, and non fried version, check out this great baked recipe from Natalie at Cook Eat Live Vegetarian.

So, on with the deep frying. Ingredients are few for delicious arancini, but you do need to have some leftover risotto from the day before. Don´t even think about making it fresh to use the same day. Magic happens overnight in your fridge and those little grains of rice continue to absorb any liquid as they cool down and become extra stodgy sticky and perfect for molding into those little balls of ricey, cheesey goodness.

Arancini, as I am sure many of you know, are named after the Italian word for “Little Oranges” because of their shape and beautiful colour. When I was a child on holiday in Southern Italy with my family, sometimes the aunties would agree to a night off of cooking. This meant either a visit to a local restaurant or a trip to the local shop which provided all sorts of delicious “ready meals” to take home and heat up. Nothing like fast food of today, of course. Proper food, made by the Mamma or Papá of the shop – pasta, roasted peppers, hot and cold meats…well, a whole menu full of delicious food to take home and enjoy. I would always offer to go along with the uncles to collect this as I was rewarded with a piping hot “arancino” to eat on the way home. God forbid I should pass out with hunger on the way.

Just in case you fancy doing something different, arancini can also be made with minced meat as a filling – it´s up to you.

Ingredients

  • Leftover, cold risotto, at room temperature
  • Mozzarella cut into small cubes
  • Dried breadcrumbs (I used panko, as I have just “discovered” them in the UK – have never come across them in Spain – but use whatever kind you like)
  • Oil for deep frying

Take about a tablespoon of cold risotto and put it into the palm of your hand (wet your hands first, this stops things from getting too messy. Place a little cube of cheese into the centre and mold the rice into a ball then roll it in the breadrcumbs.

Deep fry the arancini in very hot oil for about 2 minutes or until they are a beautiful deep golden colour.

Drain on kitchen roll and have a cold glass of wine to hand because you will probably need to taste one to check it´s done, burn your lips and need to cool them down.

Croquetas de Jamon – Spanish Ham Croquettes

Love ´em or hate ´em – my friends and family seem to be divided in their opinion of croquettes.  I´m most definitely in the “Love” camp, as is one of my god daughters who can eat them non stop.  Big Man sits in the other camp and every now and then I try a new batch on him to see if I can convert him.  He loved the Falafel I made recently, which are pretty “croquettey” in my view, so I haven´t given up hope.

Love, love, love ´em!

Croquettes in Spain are generally made with a béchamel base to hold them together, rather than potato, which is the way I´ve always done them.  I´ve never tried to make them Spanish style, but after making a fish pie the other day I had a small bowl of béchamel sauce left over and I thought I´d give them a go.  What with having dogs and chickens, it´s unusual now for me to have many leftovers in the fridge.  The chickies get the sad vegetables, salad and fruit (if I haven´t already turned them into soups or jams) and the dogs get bones and scraps of meat.  Anything else should go onto the compost heap, but there never seems to be enough left!

Croquettes can be made from any filling, but I really recommend searching through your fridge and using up any little scraps of leftovers.  I had a small bowl of cubed jamon which hadn´t gone into the soup and a few leaves of chard which were looking a bit floppy, so my decision was made.  Other suggestions could be cold veg, tuna, leftover chicken, cheese, hard boiled eggs…ooh, I could go on, but I´ll just get on with telling you how they were made.

Not a lot of photos today as my hands were getting mucky (despite wearing latex gloves) when making the croquettes and Big Man wasn´t around to take snaps for me.

Ingredients used were:

  • About 2 cups of cold béchamel which had gone quite solid.  If you need to make it from scratch, use about 250-300ml of milk for your béchamel and then leave it in the fridge to get really cold.
  • About a cup and a half of filling – I had a cup of very finely chopped Spanish jamon and a cup of shredded chard which, when cooked, reduced to half its volume
  • A tablespoon of plain flour
  • Salt and pepper
  • A beaten egg
  • Dried breadcrumbs for coating the croquettes
  • Oil for deep frying
  • A pair of latex gloves if you don´t want to get too mucky and a couple of tablespoons
Mix it all up


Start by mixing your filling into the béchamel and season to taste. Add the flour to bind together slightly.

Beat your egg in a shallow bowl and prepare another bowl with some breadcrumbs.

Take heaped spoonfuls of the mixture and shape either by hand or with the spoons into croquettes.  I went for the traditional cylinder shape but this is really up to you.  As soon as you start to work with the béchamel it will soften (hence my recommendation of using gloves!) but persevere as things will get easier once you get to the breadcrumb stage.

Roll your croquette in the beaten egg mixture.  Using a spoon to lift it in and out and spoon the egg over seems to help here, then drop it into the breadcrumb mix.  Roll it around and then put onto a plate. 

When all your croquettes are ready, and I got eight pretty big ones from the above mixture, pop them back into the fridge for at least an hour or until you are ready to cook them.

Get your oil nice and hot, once it starts to smoke, turn it down a little and gently drop the croquettes in.  They probably take less than a minute to cook – just enough time for the outside to turn a golden brown and the centre to warm up.  Lift them out with a slotted spoon onto some greaseproof paper and then to a serving plate.  You can make them in advance and then gently warm them up for a few minutes in the oven if you are not serving straight away.

Pour yourself a nice cold glass of white wine or dry Spanish sherry and imagine a hot Andalucían summer´s evening in a noisy tapas bar while you enjoy your Croquetas de Jamon!