It’s been a full and busy February, the time seems to have flown by. We’ve had crazy weather in the UK with gloriously sunny days, biting winds and now a little snow with more predicted.
Days have been filled with beautiful beach walks, even on the windiest of days…everything looks so much more dramatic and exciting.
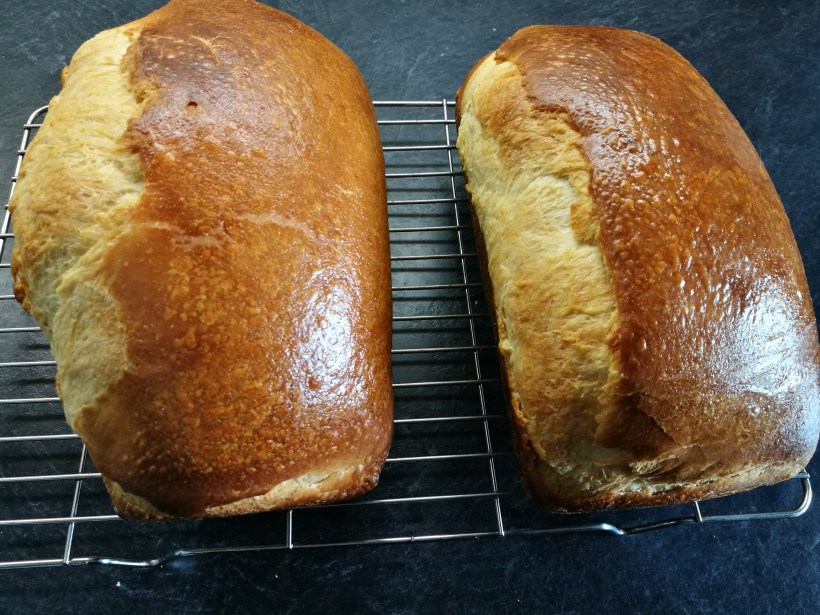
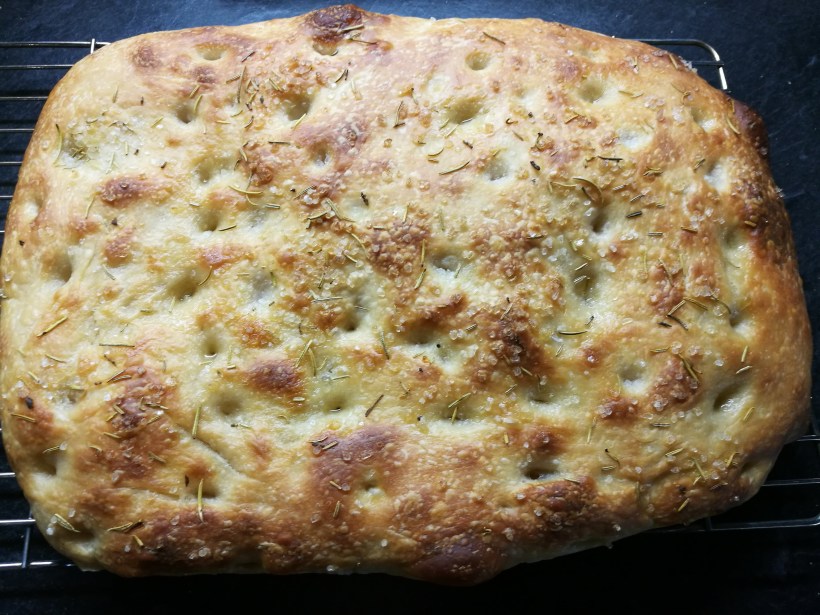
I took delivery of a wonderful new book, Artisan Sourdough Made Simple, written by a fellow blogger, Emilie Rafa who blogs over at The Clever Carrot. I’ve loved reading it and beginning to experiment with her wonderful recipes, starting with a brioche loaf which we loved and a fabulous sourdough focaccia .
I’ve also been making my regular sourdough loaf which is our “daily bread”. For my mum I bake a rye and caraway loaf which she enjoys and Big Man is in charge of thinly slicing it for her once it has cooled.
Food has been comforting and warming with old favourites making regular appearances with a few new dishes being tried too. I made a sweet potato and kale curry…it was ok, but rather too sweet and not quite spicy enough for us. More work needed on that one!
One particularly spectacular day Big Man and I hopped on a train heading West along the coast for an hour and spent the day in Brighton. We went on the i360, an enormous pod which holds about 200 people which rises up a 162m tower to give incredible views at a height of 138m across the channel, the city of Brighton and across the South Downs…and of course the panorama is a 360° one. Absolutely fantastic and we had a cheeky glass of champagne to make the experience extra special.
Today the cold weather is moving in, people are panic buying (ridiculous) in the supermarkets and I’m getting ready for Big Man to come back from a couple of weeks in Spain. In our house, this means making food…warming chicken and chickpea soup, pork and beans and maybe even a fish pie. Well…he says he’s missed my cooking!
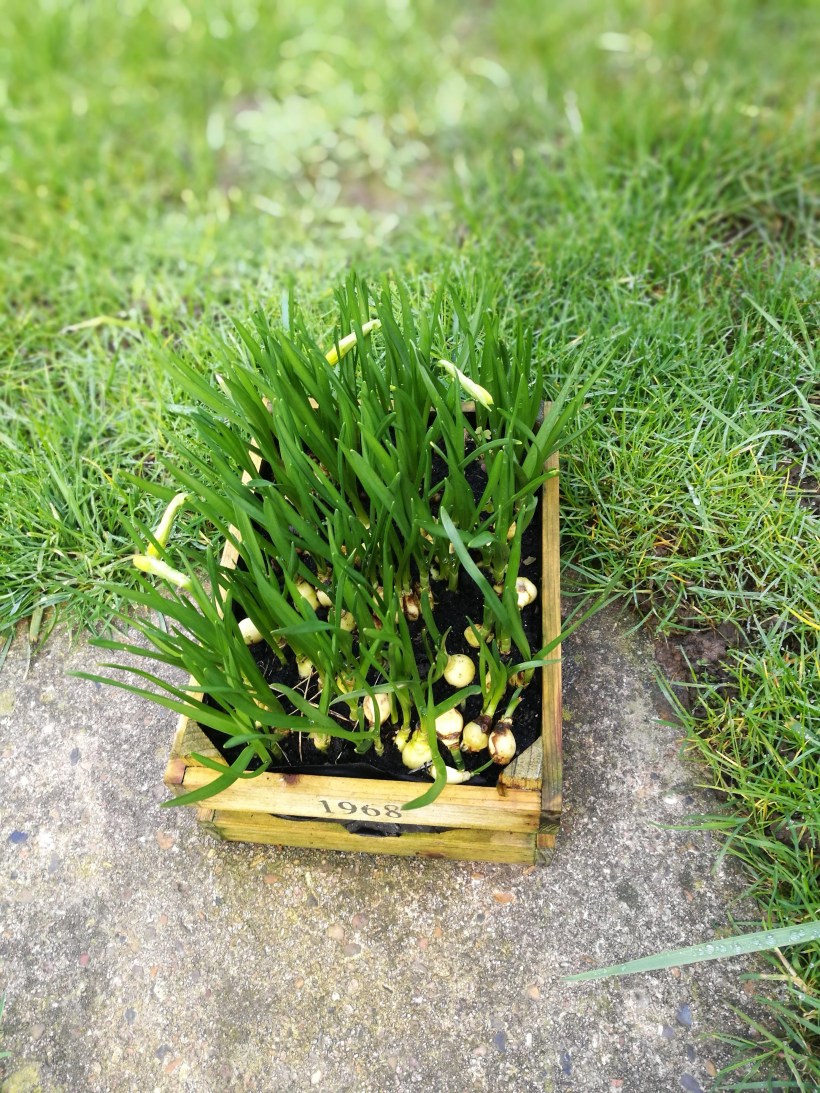
Despite the cold, there are little signs that spring is on its way with the bravest of bulbs pushing up through the ground, defying the cold and reminding us that after the dark days of winter there is always sunshine and new life to look forward to.
I make our bread several times a week. I enjoy the process and now that I’m using my starter Hercules, Son of Priscilla (thanks Celia!), my loaves are going from strength to strength. I confess that most of the time I make my usual sourdough loaf, starting the process the night before and baking early evening of the next day.
Other times I use Celia’s overnight sourdough recipe which gives fantastic results and I took on board her tip of dusting the loaf in semolina flour for a crunchy crust. Clearly, as she’s my bread making heroine/guru and I am her keen student/bread making stalker, I also made some teeny tiny loaves (like she did) using some small loaf tins I had bought to make cakes in but had never used. They turned out wonderfully and were the perfect size for a hugely filling lunch roll.
The last few weeks have given me time too to do a little experimenting and for Easter Sunday my father requested a loaf with whole eggs baked into the top of the dough, as this is what his mother used to make when he was a boy. I Googled Calabrian Easter bread and most of the recipes led me to make a slightly sweet bread, gently flavoured with anis and made using eggs and milk. The least said about the egg dyeing the better, but everyone enjoyed it. We all felt that it was like milk bread or pan de leche as it’s called in Spain and would probably prefer to eat it as a breakfast or tea time bread. I’m going to experiment making it again in small rolls so once I’ve perfected it, I’ll post the recipe.
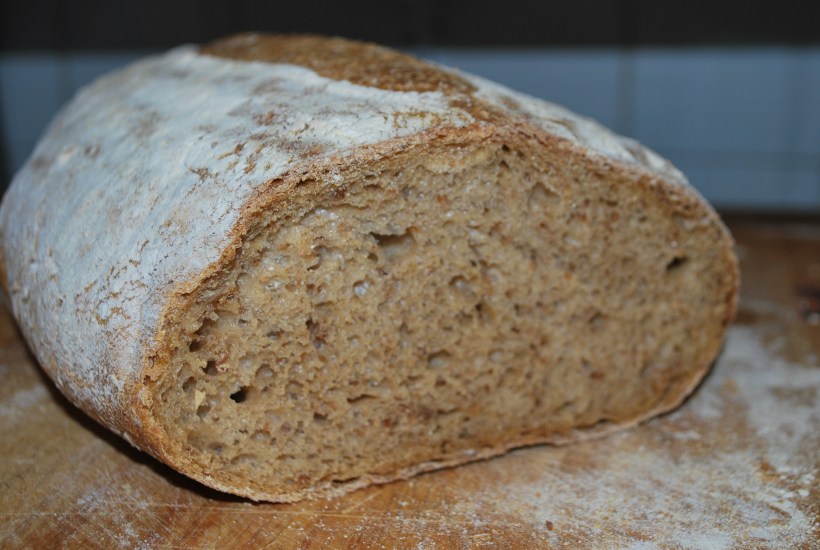
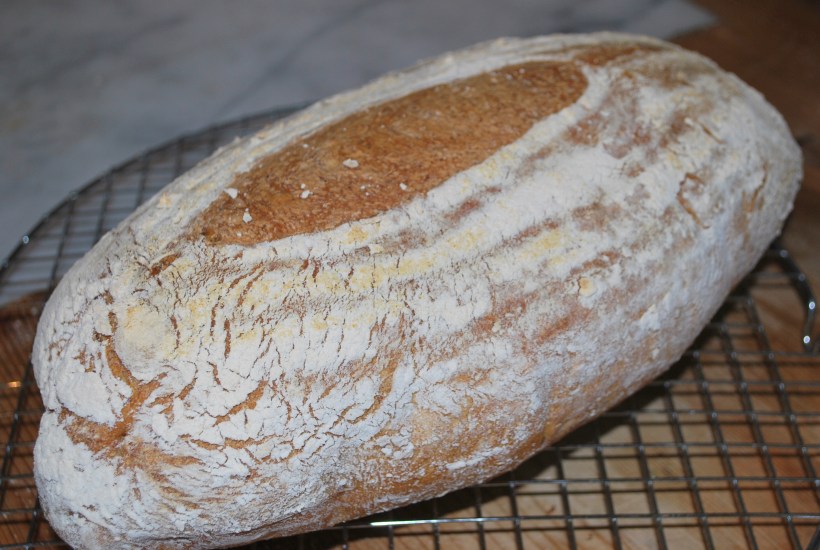
The most recent experiment was to use my sourdough starter to make a whole grain loaf. I wasn’t really sure what sort of results I’d get as wholemeal flour tends to rise more slowly than white flour and give a heavier bread. Combined with a slow rising, heavy sourdough loaf I was a little concerned I’d end up baking the cornerstone of our next building project, but using a mix of a flour which contained wholemeal, wheat flakes and bran with a strong white bread flour, I got fantastic results. The bread was malty, tangy and chewy and delicious spread with butter or drizzled with olive oil. I followed the same process as my usual loaf, but didn’t add olive oil. I added an extra knead and a slightly longer bake.
Ingredients
For the sponge
100ml of unfed sourdough starter (mine is fed with the same volume of flour and water)
250g wholemeal flour with flakes and grains
300ml water
For the dough
300g strong white bread flour
10g salt
The night before you want to bake (or fit this into your usual baking routine), mix the ingredients for the sponge, cover and leave overnight or for about 8 hours. Don’t forget to feed your original starter to replace what you took out!
The next day, add the remaining flour and salt and in a mixer with a dough hook (this is quite a wet dough) knead for 10-12 minutes until the dough looks stretchy and elastic.
Turn it into a large, oiled bowl and cover with oiled cling film. Leave it to double in size, mine took about 5 hours, but it will be different for everyone. Turn out of the bowl onto an oiled surface, knock it back, form it into a ball and put it back into the oiled bowl and cover again. Leave to rise again, this should only take a couple of hours, and turn out onto a lightly floured surface. I didn’t use semolina but feel free to use whatever you like best.
Knock back and shape either onto a round or put into a floured banneton (which is what I did). Cover with a tea towel and leave to double in size.
Just before you are about to bake, turn your oven on to heat at top “volume” with an oven tray inside if you are going to turn out from a banneton. Once the oven has reached its temperature, carefully take the tray out and turn your loaf onto it. Slash with a very sharp or serrated knife, put it in the oven and turn the temperature down to 150C (Fan) and bake for about 55 minutes until nicely browned and it sounds hollow when tapped on it’s lovely wholemeal bottom.
Drive yourself crazy for a few hours while it cools with the wonderful smell of your freshly baked loaf and enjoy whichever way you most enjoy bread!
I’ve recently been experimenting with other types of bread, but the staple at home is my sourdough loaf, which I bake about every third day. It’s a large loaf, but hey, we eat a lot bread.
A few people were asking about it, some wondered if it was a bit of a palaver to make it. At first, I agree, it seemed all a bit complex, but you get yourself into a little routine, you plan ahead and it really isn’t all that much work if you find your rhythm.
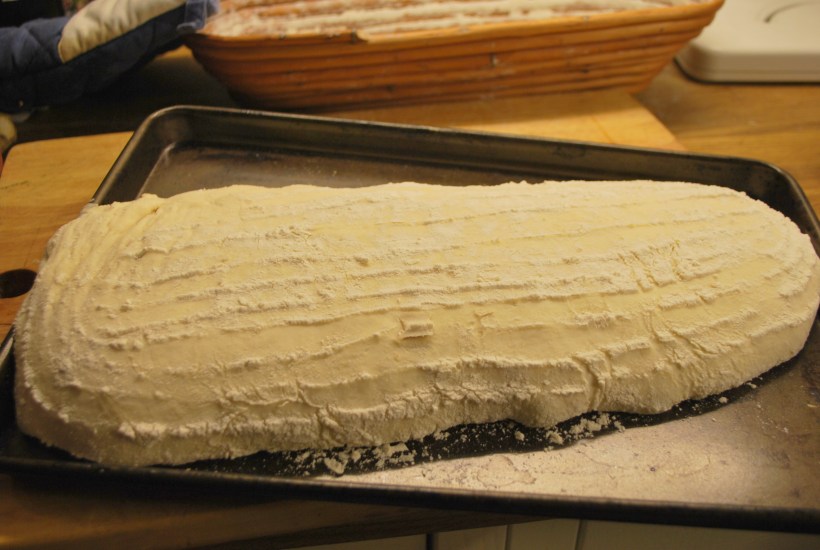
Here’s a little step by step to how I make my bread….hope it helps any of you who are planning to take the first steps in sourdough baking. This particular loaf was left to rise too long and fell “splat” onto the baking tin – it still turned out fine, it’s so forgiving! For a starter, head over to Sawsan’s blog
I feed my starter (kept in the kitchen in a cool spot) each time I make my bread, so approx. every 3 days. If it’s any longer between bakes I’ll just feed it anyhow – ¼ cup of flour and ¼ cup of water to replace the half cup of starter I remove. Apologies for the photos but it was dark at most stages of making the bread….real life cooking!
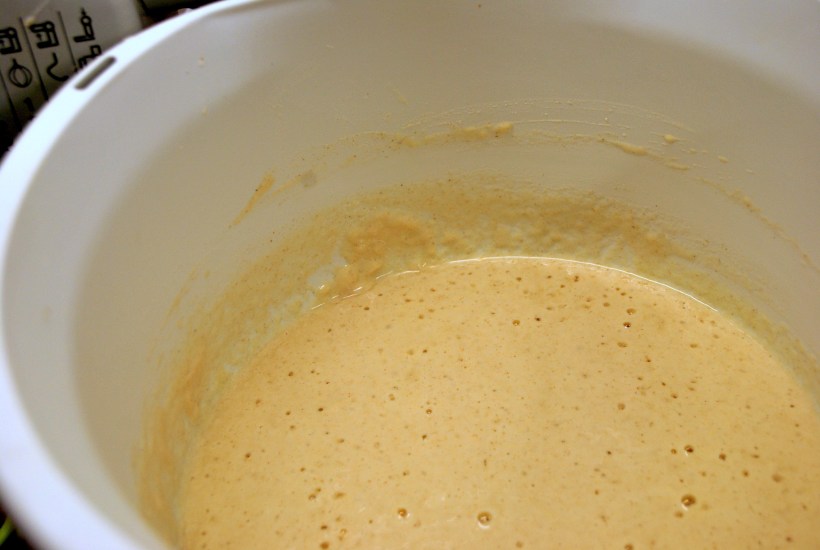
So, the night before I want to bake my bread I put half a cup of starter into a bowl with 250g of strong flour and 300ml of water. This is what it (the sponge) looks like a minute or two after mixing it up with a fork. Don’t forget to feed your starter to replace what you have removed.
This is my sponge 15 minutes later.
About 9 hours later, next morning, my sponge looks like this.
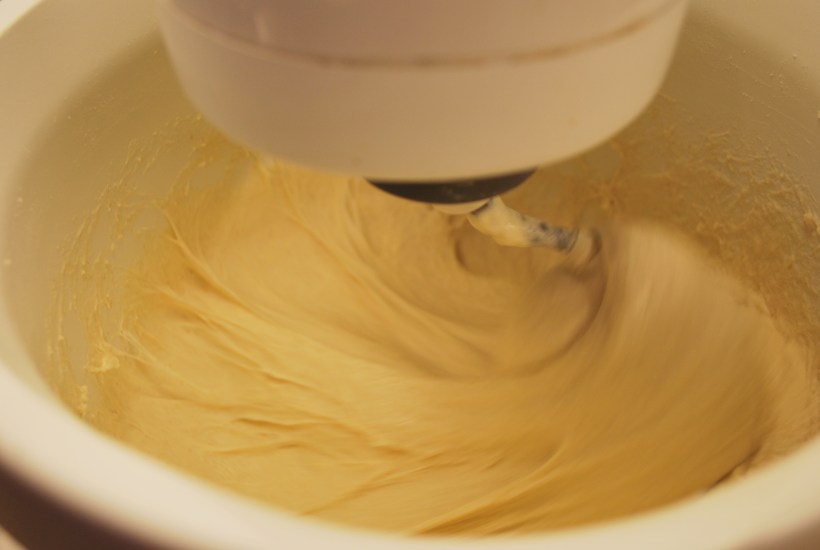
Then I add a further 300g of strong flour, a teaspoon of salt and a tablespoon of olive oil (optional) and start to knead in my mixer with a dough hook. It looks lumpy and heavy at first.
After 10 minutes on slow speed it looks glossy and comes away from the sides of the bowl and is ready.
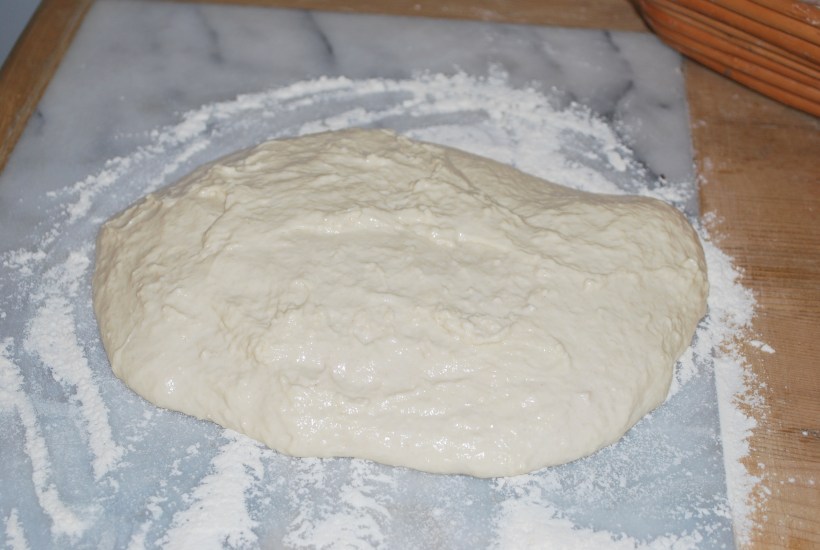
I tip it onto a lightly floured surface then sprinkle a little flour on top, it’s a wet dough but don’t worry, it comes together easily.
Shape it into a round and place it into an oiled bowl then cover with cling film.
Leave until doubled in size (or come back from work about 9 hours later to find this…don’t worry).
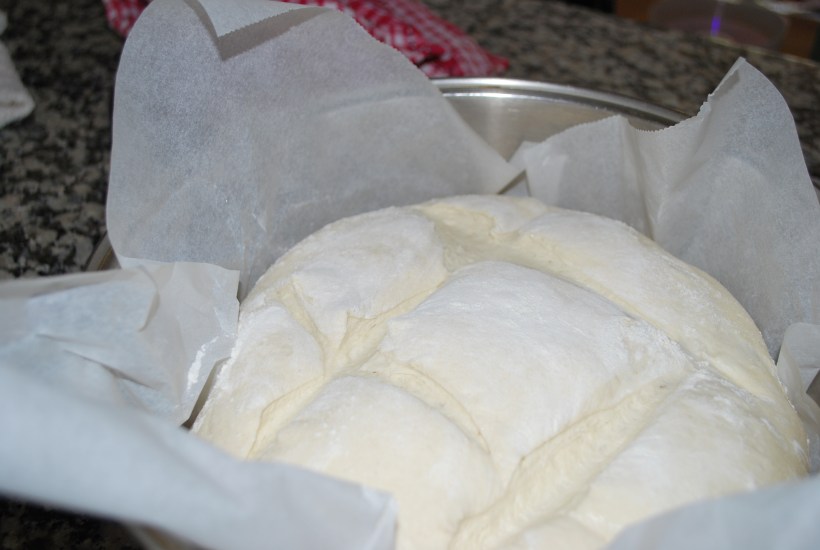
Turn it out of the bowl onto a floured surface, flour the top gently and shape into a long sausage if you are using a floured banneton or put it into a bowl lined with greaseproof paper and cover with a tea towel.
After an hour it will have almost doubled again in size.
Flip out onto a hot baking tray (pop the tray into your oven as it heats up) or if you don’t have a banneton put your dough and greaseproof paper directly onto the baking tray or into a heated oven dish.
Bake for about 40 minutes until golden brown at 180 degrees (fan) or 200 degrees regular oven.
Cool on a rack before slicing.
Yes, you have to wait almost 24 hours for your loaf from starting the process, but good things, in this case, really are worth waiting for!
We all know that one of the great pleasures of blogging comes from sharing, being inspired by fellow bloggers and getting excited by new recipe ideas.
I baked the loaves late at night, sorry about the dark photo…
I’m a regular bread baker now. My sourdough bread is made every 3 days or so, but sometimes I feel the need to shake it up and try a new recipe. A little while ago I saw a recipe over at Fig Jam and Lime Cordial. Celia is the Queen of Sourdough and her recipe for a bread called Pan Cubano really called to me. The fact that it used Lard was probably the part which called loudest! In Southern Spain the pig is King and lard is used in many recipes. I’m in England right now but I felt nostalgic.
I didn’t use rendered pig fat in the recipe, I turned to my massive supply of goose fat which came from cooking the Christmas goose. You only need about a heaped teaspoon though, so I still have plenty leftover for delicious roast potatoes.
The bread turned out fabulously, although I didn’t get the characteristic slit in the loaf as I had no leek or palm leaves to lay down the centre of the loaf. Slitting them didn’t seem to make any difference but the flavour and texture of the bread was incredible. Celia advised me to freeze some of the loaves if we weren’t planning on eating them all at once. Great advice as I made four loaves, each of which gave me 2 massive, builder-sized sandwiches. The sandwiches were filled with thin slices of smoked gruyere and cold twice cooked pork – amazing!
Thanks Celia – for the inspiration and the amazing lunch…Go on, Be Inspired!
Yes, the sourdough madness continues. I hate to throw food away and whilst I can’t always use my sourdough starter, especially when I have to remove half to feed it, I am now finding ways to bring it into other recipes.
We’ve had bread, and pizza, so now it’s time for something sweet. I’ve noticed too that there’s not too much fat used in these recipes, and I tend to use olive oil rather than butter, so I’m finding lower fat alternatives which has been a bonus.
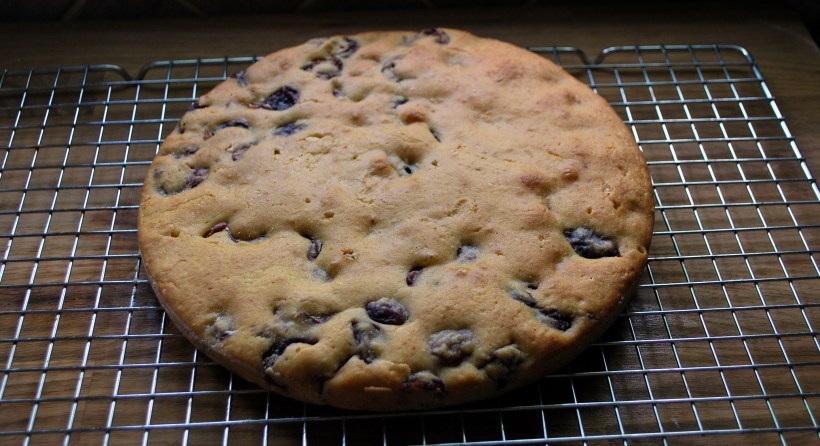
As I was playing around with my cake recipe, the lovely Teleri at Olives & Artichokes, very kindly weighed, measured, baked and posted a gorgeous almond cherry cake made with olive oil (I’d asked her about her baking!). Thanks Teleri, this one is being baked today Up the Mountain!
I found several recipes for cakes on line and decided to be brave and adapt, mix and match. What was the worst that could happen? The chickies would have had cake for breakfast. Luckily for us, and unluckily for them, my first attempt worked well, so no Cherry Chickie Cake this time.
The texture of the finished cake was somewhere between a sponge cake and a scone (US biscuit). We ate it cold and it was lovely, not dry at all and not heavy (which I was concerned about). I think this would also be good warmed slightly and served with cream or ice cream. Or both.
Ingredients (cake serves 8-10 slices)
1 cup of sourdough starter
1/3 cup oil (I used olive oil)
1 egg, lightly beaten
1 cup of plain flour
¾ cup sugar
½ teaspoon salt
1 teaspoon baking powder
1 teaspoon vanilla essence
1 cup of chopped, stoned cherries
Mix together the starter, the oil and the egg. Add the dry ingredients and mix in well and then add the cherries.
Put into a greased and floured cake time and bake for about 45 minutes at 180 degrees (until a skewer poked into the centre of the cake comes out clean and the cake is lightly browned).
This cake doesn’t rise much, but my next experiment will be to make the batter with self raising flour and then leave it to rise to see how the texture of the cake varies. Oh the things I do for you….
I confess, I have been gripped by sourdough fever, and am now searching the internet for ways to use my starter.
A logical place for me to veer off to was a pizza base. We do enjoy homemade pizza here Up the Mountain on a fairly regular basis, and toppings usually involve a fridge clear out with half the pizza (I always make a big rectangular one, the same size as my oven tray) topped with meat and the other half vegetables. You all know I’m not a veggie, but one of my little quirks is that I’m not crazy about meat or fish on my pizza. So there!
When are the other 8 guests arriving?!
Ingredients (dough)
1 ½ cups of starter
1 ½ cups of plain flour
2 tablespoons of olive oil
1 teaspoon of salt
Mix all ingredients together and knead for a few minutes (I used my mixer with the dough hook). No need to leave to rise but if you don’t want to use it immediately, put into an oiled bowl and cover with oiled cling film. When you are ready to make the pizza, knock back the dough and roll out as thinly or thickly as you like.
This amount would make 2 large pizzas, I think I could have made less (using a cup each of flour and starter) as my pizza was thicker than I normally make it. Instead of being sensible (and healthy) and using less of the dough, I just left it more thickly rolled out than usual and made it fit my oven tray (heated) before spreading with home made tomato sauce, peppers and mushrooms on one side and jamon on the other and sprinkling with cheese before backing for about 25 minutes in a very hot oven.
Yes, my sourdough starter is now up and running and ready to make bread with. Apologies for the length of this post, it’s hard to explain what I did in just a few words, so if you’re not interested in the process, have a look at the photos and come back again soon for some quicker recipes – you’re always welcome here!
Third TIme Lucky Loaf!
First up I tried a recipe from the very good River Cottage Bread handbook, but it involved proving the bread 4 times (yes, 4 times!) which felt rather too much like a chore to me. The gas oven did not behave well and the recipe also involved trays of water and spraying the bread.
I did get a lovely tasting loaf, but the process was amazingly labour intensive. A recipe from the lovely Moro Cookbook involved very little work but my brain told me as I did it that it wasn’t going to work for me. And it didn’t. Flat as a very thick pancake bread.
I would have liked more holes in it, but it tasted wonderful…
I also struggled with proving and baking trays and came across a few folk who had used oven dishes with lids (or casserole dishes or Dutch ovens). Some dusted them with oatmeal to stop the bread from sticking and one person used greaseproof paper. I wish I could track her recipe down to acknowledge properly, but I can’t find it again…..apologies to the person who had this great idea.
So, with no further ado, I used a recipe from the River Cottage website, with a few tweaks of my own and the oven dish/greaseproof paper method of baking. Result? A beautiful looking and tasting loaf of sourdough bread. Now, if someone can advise me on how to make the bread denser and more sour tasting I’ll be a very happy bread baker!
For the sponge
•About 100ml active starter
•250g strong bread flour (white, wholemeal or a mixture)
•300ml warm water
For each loaf
•300g strong bread flour (white, wholemeal or a mixture)
•1 tbsp olive or rapeseed oil (optional)
•10g salt
The night before you want to bake your loaf, create the sponge: take about 100ml of your active starter, and combine it with 250g fresh flour and 300ml warm water in a large bowl. Mix well with your hands, or very thoroughly with the handle of a wooden spoon, then cover with clingfilm and leave overnight. In the morning, it should be clearly fermenting – thick, sticky and bubbly.
Moby Dick – a beast of a sourdough starter
Now make your loaf: add a fresh 300g flour to the sponge, along with 1 tbsp oil, if you like (it will make the bread a touch softer and more silky, but is not essential), and 10g salt (which is essential). Squidge it all together with your hands. You should have a fairly sticky dough. If it seems tight and firm, add a dash more warm water. If it’s unmanageably loose, add more flour (but do leave it as wet as you dare – you’ll get better bread that way). I did this and the next stage in my mixer with the dough hook.
Turn out the dough on to a lightly floured surface and knead until smooth and silky. This takes in the region of 10 minutes, but it can vary depending on your own style and level of confidence. Put the dough in a lightly oiled bowl and turn it so it gets a light coating of oil. Cover with lightly oiled clingfilm, or put the bowl inside a plastic bag, and leave to rise. Don’t expect it to whoosh up to twice its original size in an hour, as a conventional loaf does. Sourdough rises slowly and sedately. The best thing is to knead it in the morning then simply leave it all day (or knead in the evening and leave overnight) in a fairly cool, but draught-free, place, until it is more or less doubled in size and feels springy when you push your finger gently into it. Knock it back (deflate it) on a lightly floured surface.
The dough has risen – hallelujah!
You now need to prove the dough (i.e. give it a second rising). You are also going to be forming it into the shape it will be for baking. If you have a proper baker’s proving basket, use this, first dusting it generously with flour. I lined a bowl (which was roughly the same size as my oven dish) with greaseproof paper and sprinkled it with a little flour). When the dough had doubled in size (it only took a couple of hours as it was a warm day) I lifted the bread out with the paper and placed both the paper and bread into the oven dish (which I had heated for about 20 minutes) slashed the bread with a sharp knife, sprinkled it with a little flour and put the lid on the pot.
I cooked it on the high temperature the entire time for about an hour and removed the lid for the last 20 minutes of cooking. Leave to cool completely (it’s hard to resist, but your bread really will have a better texture if you allow it to cool), enjoy!
So in 2016 I turned 50. I was in Italy for my 21st, 30th and 40th. To keep this birthday tradition going I always knew I'd be in Italy for my 50! This blog starts with my 5 week adventure in Puglia but my love affair with Italy continues.....