Waving Goodbye for a While…

Tomorrow Big Man and I move home in Bexhill on Sea. We go from a little Edwardian flat to a little (but bigger) Victorian house. It’s not quite such a disaster zone as the projects we usually take on so we’ll be able to live in it and do it up and restore it slowly.

Because we seem to thrive on doing more than one thing at once, we’re heading back to Spain 5 days later by car for a short visit to the family and then heading back to England to finish off a current project before taking a breather, helping my parents move into their new home in Bexhill and then starting work on ours. And hopefully another longer trip back to Spain to enjoy some time Up the Mountain.

DSCF4304

Just to complicate matters further we found out today that we’re going to be without an internet connection for a few weeks so I’ve resigned myself to the fact that I will have to have a little break from the world of blogging for a short while. Don’t go away though…I’ll be back!

So…please excuse me if I can’t pop by and say hello very often this month. I’ll miss you all…

Advertisement

Rosewater Biscuits

Some days are just meant for baking biscuits. This was one of those days and I had just made summer fruits ice cream, using a mix of berries in place of coffee from my coffee ice cream recipe. I thought biscuits lightly scented with rosewater might work well with it. They did, but they also went perfectly with a little cup of very strong coffee.

Rosewater Biscuits (1)

Ingredients

  • 125 g plain flour, sifted
  • 15 g cornflour
  • 100 g diced butter
  • 50 g icing sugar, plus extra for rolling out and dusting
  • 20 ml rose water

Put the flour, cornflour and butter into a food processor. Blend until combined.

If making by hand, rub the butter into the flour and cornflour with your fingertips until it resembles breadcrumbs.

Add the icing sugar and rosewater and blend briefly (or mix gently with a palette knife).  Knead the dough gently into a sausage, (dust your worktop with icing sugar if necessary) wrap in cling film and chill for half an hour.

Preheat the oven to 200°C/180 Fan/gas 6. Cut the dough into discs the thickness of a £1 Coin (that’s about the same as a Euro!) Place the biscuits on a baking sheet lined with greaseproof paper.

Bake in the oven for about 8 minutes until pale gold. Remove, allow to firm slightly, cool on a wire rack. Store in an airtight container. Or you could just dust them with icing sugar and enjoy them as soon as possible!

Summer Seafood Salad

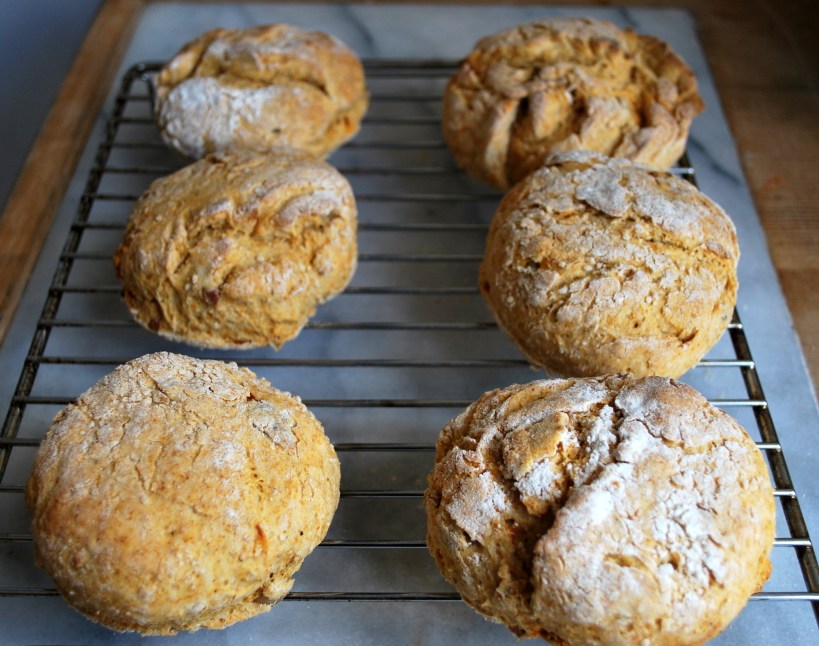
As a child celebrations were always marked with great big meals for friends and family. Starters were a giant “antipasto” – the dish before the main meal. This became more elaborate the bigger the crowd and the grander the celebration.

Of course, the temptation was to fill up on the antipasti and then bemoan the fact that we were too full to enjoy the pasta, the meat, the fish, the cheese and salad and the desserts that followed. A lucky predicament to be in.

Seafood Salad (1)

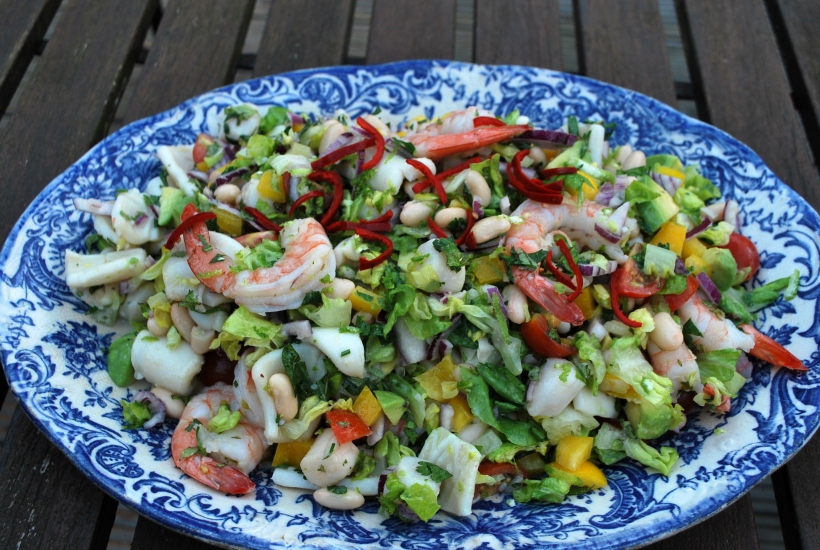
My mum was great at pickling and grilling vegetables, a mainstay on the Italian table. But for me the highlight was always her seafood salad. Back in the day it wasn’t as easy to buy affordable, fresh seafood as it is nowadays. And to be honest, even now it’s still a luxury and for many people, living far from the coast, it’s not always available. This great thing about this dish is that, as you’re packing it full of so many fresh and zingy flavours, frozen seafood is fine. Yes, you heard it here, don’t be ashamed of making your seafood salad with frozen seafood – just be sure you defrost and cook with care and store chilled until serving. No one will be any the wiser!

Another great thing about this dish is that quantities are not important. If you can’t get squid, add octopus, if you can’t find mussels, leave them out or add a few more prawns. It’s up to you, so this is not really a recipe, just an inspiration for you to mix it up your way. What is important is to make it ahead, at least a few hours, or even overnight to allow the dressing to soak into the seafood and the flavours to develop.

Ingredients

  • For the seafood mix, use peeled king prawns, small prawns, sliced squid or baby squid and mussels. Ensure all the fish is cleaned and defrosted and well drained if necessary. Chop up a couple of cloves of garlic and reserve.
  • For the dressing make up a vinaigrette with two thirds extra virgin olive oil, one third acid (I use part lemon juice and part white wine vinegar), a sprinkle of sugar, half a teaspoon of made up mustard (or ¼ teaspoon of dried mustard powder) and salt and pepper. Put it all into a jar and shake it up well.
  • As a main course for 2 people, one tin of drained cannellini beans and two sticks of celery finely chopped.
  • For the salad a mix of finely chopped lettuce, tomatoes, peppers, red onions, and flat leaf parsley. For garnish and flavour at the end, some finely sliced hot chilli pepper and the zest of a lemon.

Keep the seafood separated out (each item takes a slightly different time to cook). In a wok or large frying pan add some olive oil and the garlic. Heat the oil gently and add the king prawns. Cook until the prawns have turned pink and the garlic is just starting to turn brown. Spoon out the prawns and garlic into a large bowl. Add more oil if necessary (no more garlic) and stir fry each of the seafood ingredients and add to the bowl. Mix the seafood together and allow to cool. Don’t worry if you are left with some lovely fish flavoured juices at the bottom of the bowl, these will add flavour to the dressing. If you are using pre cooked seafood, just mix it all together and move onto the next stage.

Seafood Salad (3)

After the seafood has cooled down, add the celery and beans and pour over the dressing. Mix well and chill for a few hours or overnight.

When you are ready to eat, bring the seafood and beans back to almost room temperature and add your salad ingredients. Mix, taste and adjust the seasoning. Plate up and garnish with the chilli and lemon zest.

Perfect as a filling main course, a special starter or as part of a celebration antipasto. Buon appetito!

Chorizo and Green Olive Scones (made with Goose Fat)

I’m a person who moves house often. I don’t know why it’s been that way – sometimes work, sometimes love, sometimes just for the heck of it. I’ve lost track of how many times I’ve moved (well, I suppose I could work it out if I sat down for long enough) and my pals are forever crossing out my details and adding new ones in their address books. Heck, Big Man and I are selling the little flat we bought in Bexhill (well, it was only ever meant to be a temporary arrangement whilst we did the house renovations) and are buying a little house nearby for ourselves. It’s only temporary though you understand.

Chorizo & Olive Scones 009

If we were to up sticks and move, say, to Sydney, we’d zoom in on Celia from Fig Jam & Lime Cordial’s neighbourhood. That’s a lie, we’d stalk her and move in next door so that we could enjoy all her cooking, baking and garden experiments. She’d be rewarded with the fact that we’d probably not stay long and she could get back to normal again when Big Man and Chica relocated to the Cook Islands…

For the moment, it’s mainly Bexhill-on-Sea with the occasional trip back to our Mountain Top Home. Home is wherever the heart is and luckily for us we both feel the same.

As we can’t actually move in next door to Celia, we’ll do the next best thing and join in her invitation to celebrate International Scone Week. Yay! Love an excuse for a Food Fiesta. I do have to confess right here that my very favourite scones are from another Celia, she of The Kitchen’s Garden, and I’ve been making them ever since she told us about them. Smothered with butter, jam AND cream – sigh, they’re the best. But in the spirit of adventure and because Celia (of FJ&LC) and I have been exchanging messages about cooking with lard and pimentón, I give you my savoury scones, based on Celia of TKG recipe. They are actually made with goose fat as this is what I had in the fridge, and not lard, but let’s not quibble or I might buy a house next door to you.

Ingredients

  • 2 cups of self raising flour (or use plain flour and 2 teaspoons of baking powder)
  • 2 heaped tablespoons of cornflour
  • 75g goose fat (or lard)
  • 2 level teaspoons of smoked pimentón
  • A pinch of salt and about 10 good grinds of black pepper
  • A piece of cured chorizo about 10cm long cut into tiny dice
  • 10 green (or black) olives, stoned and cut into tiny dice
  • 1/3 cup of milk mixed with a 1/3 cup of iced water

Heat the oven to the highest setting and put a baking tray inside to heat up.

Mix the flour with the cornflour, pimentón and salt and pepper. Mix the fat in lightly with your fingertips until it looks like small breadcrumbs then stir in the pimentón and olives. Gradually add the liquid until the dough comes together. It shouldn’t be too wet or dry and try not to overwork it.

Chorizo & Olive Scones 001

Pat the dough into a round on a floured surface and cut out rounds. Mine made 6 very rustic looking (for “rustic”, read “not perfectly smooth”) large scones but it would be great for mini cocktail sized scones.

Put the scones onto the heated baking tray and bake for 6-10 minutes depending on their size until lightly browned. Serve warm (not hot) or cold, delicious on their own or with cheese.

Happy International Scone Week my Blogging Friends and next time you see a “For Sale” sign go up in your neighbourhood…be very afraid…..

Honey, Ginger and Soy Glazed Salmon

It’s summer and some days the weather turns warmer, hurrah!  Lighter, quicker to prepare dishes are firmly on the menu.

This is not an unusual dish, I am sure we all have variations of something similar in our repertoire, but sometimes it’s good to be reminded of ways of preparing dishes that we’ve loved and then forgotten.

Sticky Soy Salmon (3)

Ingredients (per person)

  • 1 salmon fillet (sustainably farmed if you can find it)
  • ½ teaspoon runny honey
  • 1 teaspoon of light soy sauce
  • 1 teaspoon dark soy sauce
  • 2 teaspoons of rice vinegar
  • ¼ teaspoon finely chopped ginger (or grated)
  • ½ clove of crushed garlic

Mix all the marinade ingredients together and leave the salmon in it for at least 15 minutes but up to a few hours if you have time (remember to turn it over occasionally).

Drain then fry the fillets in a non stick pan (you won’t need any oil) for a couple of minutes each side until lightly browned. Remove from the pan and pour in any remaining marinade and cook quickly until it bubbles, pour this over the fish. I served this over a green salad packed full of gorgeous things like rocket and asparagus. A cheeky glass of white wine is most definitely recommended!


Vaguely Vietnamese Summer Rolls

I know, I know…late for the train again. I seem to be a few steps behind at the moment when it comes to food fashion, but I get there in the end. And then, like the woman who still thinks shoulder pads should come with t-shirts (what…me with the sloping shoulders?!) I’ll keep trotting out my “new food discovery” for years to come!

Vietnamese Summer Rolls 005

Summer, even in England this year, makes us want lighter more refreshing foods and a trip round the local Caribbean/Asian store rummaging for new foodstuffs resulted in the purchase of some rice paper wrappers. Summer Rolls – enjoyed from time to time in restaurants but never made – it seemed like an obvious choice.

When I decide to make something, I behave in the same way as I do if I have made the purchase of a new gadget or a pair of shoes. I have to use/wear them straight away. All the recipes for Vietnamese Summer rolls seemed to call for minced pork or prawns. Which would have been lovely if I’d had them, but I had avocado so I went for an (almost) vegetarian/vegan version. They would have been properly veggie/vegan if I’d left out the fish sauce.

Most of the recipes did seem to agree that you can pretty much do what you like and were rather loose on quantities. I just boiled up some fine rice noodles, finely sliced an avocado and made up a batch of finely sliced vegetables then kept rolling until I ran out – 9 rolls later.

Ingredients

  • Rice paper wrappers
  • Finely sliced vegetables (I used a piece of red pepper, half a large carrot, one spring onion, 2 leaves of Chinese cabbage and about a third of a courgette) mixed with some finely chopped mint, coriander and basil and a splash of fish sauce and the juice of half a lime
  • Rice noodles soaked in hot water until soft (I used one block which gave me about a cup and a half)

For the peanut dipping sauce

  • 2 heaped teaspoons of smooth peanut butter
  • 2 teaspoons of warm water
  • 1 teaspoon of soy sauce
  • 1 teaspoon of fish sauce
  • The juice of half a lime
  • A pinch of sugar

Get a little production line ready with a bowl of warm water big enough to hold your rice wrappers, a plate with a folded tea towel on top, your various filling ingredients, a clean plate to put the finished rolls onto and a few pieces of wet kitchen paper (or a damp cloth) to cover the rolls with to stop them drying out.

Dip a wrapper in the water and gently rub until it is transparent and soft (mine took less than 30 seconds). They are fragile but not overly so. Lay the wrapper on the plate with the clean tea towel.

Vietnamese Summer Rolls 001

Place your various fillings in the centre of the wrapper, piled on top of each other) then roll the top of the wrapper over the fillings, fold in the sides to seal and then roll the bottom half of the wrapper up. As the wrapper is still wet it will seal and keep the filling in. Place the completed roll on the serving plate and cover with a damp cloth or kitchen paper.

To make the dipping sauce, simply mix all the ingredients together. I also served the rolls with some sweet chilli dipping sauce.

Fiddly, but not too challenging, and fun to make. Healthy, delicious and surprisingly filling. Result all round!