A recent discovery is that our local “Big” supermarket sells packs of thin beef steaks. Ok, it may not be a patch on what we can get in England, but for dishes that require quick cooking, it’s tender and surprisingly tasty.
You may recall I recently made the “acquaintance” of Mr Gok Wan and his cooking and his book travelled back with me to Spain. Sudden temperature highs of around 30 degrees mean it’s time for food that is quickly prepared and cooked.
I served this beautifully fragrant beef dish with pak choi (or bok choy), but more of that another day. If you invest a few minutes (or ten) in getting everything ready, the cooking is quick and ready to serve in just a few minutes. I had to make some adaptations, as ever, and Big Man asked if this was “Cocina Ibero-Chino” (Spanish-Chinese Cooking). I am sure that if had used sesame oil and carrot (which were the things I had to substitute) it would have been even more delicious, but as we didn’t have a scrap left over, I think it was a success!
To serve 2
About 4 tablespoons of cornflour
Salt and pepper (the recipe calls for white, I used black
About 300g steak (the recipe calls for sirloin, I think mine is called “flash fry)
Oil for frying (original recipe says groundnut, I used olive oil)
4cm piece of fresh ginger, peeled and finely chopped
3 spring onions, chopped
1 medium carrot peeled and cut into matchsticks (I used a small courgette)
2 tablespoons light soy sauce
1 teaspoon caster sugar
1 teaspoon sesame oil (I used olive oil)
1-2 teaspoons rice or cider vinegar
Coat the meat strips in the cornflour and seasoning and fry in a hot wok or frying pan until browned. I did this in batches. Remove and place on kitchen paper.
Wipe the pan and add a little more oil then add the ginger, garlic, spring onions and carrot. Fry on high for a minute or two until the edges of the onions start to brown a little. Add the soy sauce, sugar, sesame oil, vinegar, a pinch of pepper and about 3 tablespoons of water and cook until the sugar has dissolved. Taste and adjust the flavours to your liking (I added a little more vinegar as I found it quite sweet).
Add the beef into the pan and gently mix into the sauce. Remove from the heat and (optional) garnish with chili flakes.
A beautiful dish, aromatic and quick to prepare.
For another beautiful Chinese Beef dish, check out Mandy’s Shanghai Steak over at The Complete Cookbook.
I have to confess, I’m not a fan of cooking different meals to accommodate different tastes. Maybe I’d have been a horrible mum if I’d had children. I can imagine them all demanding their favourite meals and me refusing point blank and screaming something along the lines of “this is not an a la carte restaurant you know”. But sometimes, just sometimes, I go all contrary and make something different for me and Big Man. As long as it doesn’t involve anything too stressful in terms of extra work.
Asian Style…
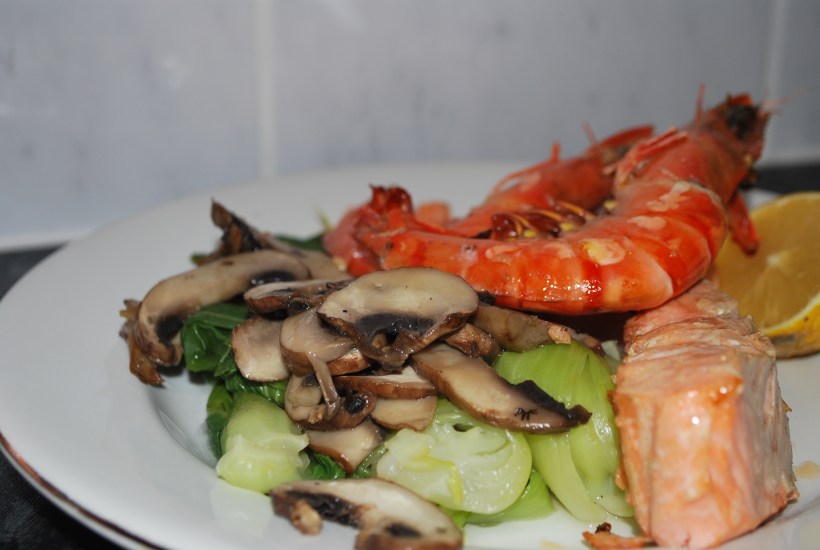
We were in the mood for fish and I had bought some gorgeous trout steaks and langoustines from the fishmonger. Having made a recent trip to a wonderful Chinese Supermarket I had been dreaming all day of oriental flavours. Big Man was coming down with a cold and feeling in need of a taste of home. No problem – this was an easy fix and we would both be happy.
Asian Style Dish
1 trout steak and 2 large langoustines marinated for 30 minutes in a little freshly grated ginger, a large clove of crushed garlic, a tablespoon of soy sauce, a teaspoon of sesame oil and a splash of fish sauce
Mediterranean Style Dish
1 trout steak and 2 large tiger prawns/langoustines marinated for 30 minutes in the grated zest of half a lemon, the juice of half a lemon and a tablespoon of olive oil
Both dishes
Steamed pak choi and sautéed sliced mushrooms
Griddle or grill the trout and langoustines on a high heat until the trout is almost cooked through (I like it a little pink in the middle but cook for longer if you like) and the langoustines turn from black to pink.
Mediterranean Style…
To serve the Asian Style Dish
Drizzle a little chili oil over the fish and prawns and some oyster sauce over the vegetables and top with finely shredded spring onion.
To serve the Mediterranean Style Dish
Drizzle a little olive oil and lemon juice over the fish, prawns and vegetables.
Easy, healthy, fairly quick to prepare and cook, and everyone is happy!
I do love alliteration don´t you?! Even more I enjoy a speedy supper dish which tastes amazing and looks pretty too.
If you don´t eat pork, this would be delicious too with chicken. It just wouldn´t be so alliterative.
Ingredients (to serve 2)
1 pork fillet cut into small strips (or use a small piece of pork loin)
1 pepper, sliced (I used an orange one)
1 medium onion, halved and sliced quite thickly
About 6 chestnut mushrooms, sliced
2 crushed cloves of garlic
1 heaped teaspoon of smoked pimentón
A small glass of white wine
2 tablespoons of crème fraiche (or use full fat yogurt)
Salt & Pepper
Olive oil
Start by browning the little strips of meat in a tablespoon or so of olive oil. When they are browned, remove from the pan and set aside. Now add the onions, garlic, peppers and mushrooms into the same pan and cook gently until softened then turn up the heat slightly to give some colour to the onions.
Add the meat back into the pan and sprinkle over the pimentón and season. Fry gently for a minute then add the wine. Turn the heat down and continue to cook for a further 2-3 minutes then turn the heat up for a minute or so just to reduce a little of the liquid.
Check to taste the seasoning, turn off the heat and stir in the crème fraiche. Delicious served with plain boiled rice and some green vegetables.
Easy, nourishing dishes that are quick to prepare are still very much the order of the day here. To make a change from sandwiches, I decided to make fajitas this week. I did have to buy my tortillas, but for a fabulous recipe for home made ones (I can vouch for it, I made them in Spain) take a look at Tandy´s recipe.
Quantities are flexible, and use your favourite veggies or whatever you have to hand. We ate 2 tortillas each for lunch.
Ingredients
Finely chopped savoy cabbage
Finely shredded carrots, red peppers, onion
Finely Sliced Mushrooms
A handful of fresh beansprouts
Olive oil for stir frying
1 teaspoon of tamarind sauce per person (pinched from my mum´s store cupboard – thanks Mamma!)
Pinch of dried chili flakes (optional)
¼ teaspoon of ground cumin per person
Salt & Pepper
1 small log of soft goat´s cheese
Creamy Natural Yogurt
Tortillas for wrapping
Simply stir fry all the vegetables until they start to soften. Add the cumin, chili (if using) and tamarind and cover the pan. Continue to cook until the vegetables are cooked to your liking. Remove the lid if you prefer no juice.
Spoon the vegetables over warmed tortillas which you can spread with yogurt, place a few slices of creamy goat´s cheese on top, roll up and enjoy!
And finally, a totally gratuitous dog shot…at least someone can enjoy the rare bursts of sunshine this week…
The Spanish love sweet things. I don´t think I´m making too much of a generalization with that statement. Not that they´re greedy, but a little cake or biscuit is always most welcomed with a strong cup of coffee at the end of a meal, or a big bowl of milky coffee if it´s the start of the day.
Dealing with preparations for our unexpected lunch for 12, I was lucky that I had already made some of Spree´s gorgeous Mexican Wedding Cookies for an earlier family meal. The recipe makes plenty, and they were hugely popular. The only change I made to these, as I was in a rush, was to grind all the nuts (I used almonds and walnuts) and not chop half of them. Lovely, lovely little biscuits and I´ll definitely be making them again.
Another quick recipe which came to mind was for Chocolate Refrigerator cake. I made this the night before our lunch party and cut the cake into small squares the next morning. These went down well too, and it´s a good recipe to make with little children as you only need a (supervised) heat source for melting.
Here´s the way I made it, although you can chop and change (or even omit) the fruit/nut filling.
250g crushed digestive biscuits (graham crackers)
100g butter
2 tablespoons of golden syrup or honey
3 level tablespoons of cocoa powder
About half a cup of “filling” – I used the last of my drained boozy fruits and added the grated zest of one lemon and one orange
Melt the butter with the golden syrup and cocoa then add to the crushed biscuits and filling. Mix well until everything is well coated. If you leave some large chunks of biscuit/cracker, you will have some pretty speckles in the finished “cake”.
Pour into a tin lined with cling film, flatten and press it with your finger tips then cover and refrigerate for a few hours or overnight until firm.
Cut into squares – it´s very rich so I tend to do “bite sized”. And that´s it. Doesn´t get much quicker or easier does it?!
Now, I´m not laying claim to this being the most authentic of Spanish tortillas. For a start, the most famous is the potato one, sometimes with onions added. Secondly, the potato is cooked from raw in a fairly significant amount of olive oil, very slowly until tender. It´s wonderful, but when I´m at home I try to cut out a few calories and this is how I make my tortilla. To be honest, no one seems to have noticed the lack of oil!
For a Spanish tortilla to be successful, i.e. to be able to turn it over half way through cooking without ending up with an eggy mess all over the kitchen floor there are a couple of things which I have found help in the process:
A large quantity of filling in relation to egg – the egg just binds the ingredients together
A deep high sided pan (you´ll see from the photos that mine is very old and battered but it´s perfect for making a one person/two egg tortilla and I won´t throw it away!)
A very, very low heat
A lid to put over the tortilla in the first stage of cooking
Slow cooking, it takes patience, this is not a speedy French omelette
So, for one person, this is what I use, just multiply the ingredients for more people and of course, use a bigger pan! This makes a tortilla large enough for a decent supper or light lunch, served with salad, bread and of course a glass of wine.
Two eggs
Cold cooked, peeled potatoes
Any other vegetable, cooked, that you want to use in your tortilla
Salt and Pepper
About a tablespoon of olive oil
A tablespoon of milk
Start by putting the oil into the frying pan and then chopping your potato into small chunks. Also add the vegetables if using. You want the potatoes and vegetables to fill the pan almost to the top.
Warm them through turning them over gently so that they are all covered in the oil for a few minutes.
This slideshow requires JavaScript.
In a bowl beat the eggs, seasoning and milk with a fork then add the potato mix to the eggs and mix it all in gently with a spoon.
You should have a little oil left in the pan, but if not a tiny splash extra will be sufficient.
Pour the egg and potato mixture into the pan, turn the heat down to the lowest setting, put the lid on the pan and then leave the bottom half to cook slowly. Depending on how large your tortilla is, this could take a while. The two egg tortilla takes about 10 minutes.
Every so often, press gently on the sides with a wooden spoon or spatula to see if it is browning underneath. When it is a lovely golden brown and the top is set, it´s time to flip it over!
You can use a plate, or two plates (tip out onto one plate, invert onto another and then back into the pan). I have a plastic tortilla “flipper” which has a small handle underneath. You turn the tortilla onto it then slide it back into the pan. A flat saucepan lid would work just as well.
Now turn the heat up a little, leave the lid off and cook for about another 4-5 minutes until the bottom has turned the same lovely golden brown. Leave it to stand for a minute or two once it is cooked, then turn it out onto your plate and enjoy.
Thanks go out to JamieAnne at A Dash of Domestic for her wonderful tutorial on how to insert a slide show!
This one is so quick and simple, it doesn´t even need a recipe! Perhaps just a quick explanation, though. This is served in Andalucía as a pre meal appetiser in the summer or when unexpected guests pop round and it´s drink time. Add a plate of slice Spanish cheese, some jamon or salchichon (salami), a cool drink of your choice and you´ve served a super speedy tapas selection without even really trying!
Wash and cut a lettuce heart into eighths, open a tin of anchovies (in olive oil if possible) and lay an anchovy over each slice, pour the oil from the tin over, add a squeeze of lemon or white wine vinegar and serve. These are picked up with the fingers, or little cocktail forks if you´re feeling refined, then just munched and crunched.
If you can´t stomach anchovies, replace with a strip of roasted red pepper.
A visit to Málaga a few days ago to sort out some paperwork also led us through the backstreets to the old market, which has been beautifully restored. Sadly, I didn´t have my camera with me to show you the stalls beautifully laid out with fruit, vegetables, fish and meat.
Sadly too, some of the fruit, when we got home, was not as lovely as it had promised to be. I think the best stuff was “up front” and the bags of non regular shoppers were filled with the less than top quality produce from the back.
Hey ho, squashed and not so fruity tasting fruit lends itself to jam making, and making it in small quantities is also fun. It´s quick, you don´t feel obliged to give away most of what you made to friends and family, and you get to have a wide selection of different flavoured jams in the despensa (that´s the larder to you and me)!
After tasting a few apricots and deciding that they weren´t up to that much, I stoned the rest and chopped them roughly and was left with 500g of fruit in weight. I added 300g of sugar and the juice of one lemon and put into a deep pan.
Start the jam off at a low temperature until the sugar has dissolved. The turn the heat up and get it bubbling, but making sure that it doesn´t boil over. Cleaning cold, set jam off your cooker is no fun at all.
Bubbling Away
Keep it bubbling away for about 10 minutes. Don´t get distracted or walk away! If you have a jam thermometer, do use it, it saves having to reboil the jam later if it doesn´t set. Otherwise you can drop a spoonful of jam onto a saucer which you have previously placed in the freezer. When the jam cools on the saucer you push it slightly – if it wrinkles, it´s at setting point. If not, boil a little longer then repeat.
Sometimes you can just go with instinct, and even if it doesn´t set, runny jam tastes just as good.
Now you need to leave the jam to cool down a little for 5-10 minutes so that when you pour it into still warm, sterilized jars (I run mine through the dishwasher to do this), the fruit will not float to the top.
Seal the jars while they are still hot and this will keep (although I doubt you´ll be able to resist!) for at least a year. Now, where´s that loaf of bread?
Well, it´s been a while since I posted anything at all, let alone a recipe. It´s been a hectic 5 or 6 weeks with 3 lots of visitors, which was wonderful. Also, a fall down the patio steps (am still feeling rather delicate in the nether regions) and a broken camera which meant that I couldn´t take any pictures. All very frustrating but the derrière is now on the mend and we´ve bought a new camera. Hurrah!
Fish Man came by this morning, and I decided to see what he had tucked in the back of his little van. I´d been fancying a warming soup as we´ve had the worst (and wettest) Easter here in Andalucía for 80 years, and the rain and storms are set to last for a few days more. Combine this with the most dreadful hay fever and I feel like I have a bad dose of flu with a serious hangover on top. I don´t actually have a hangover, although it might have been fun putting in the work to achieve it, just the pain! Fortunately Fish Man had some beautiful mussels, not of the bicep kind you understand, so I bought a kilo.
I was torn between doing them in a creamy, oniony, white wine base or a garlicky, tomatoey one. The tomato won – I felt that my nose needed a good assault of powerful smells! This is a very easy and quick to cook dish that looks as though you spent hours in the kitchen creating something “gourmet”.
The serving I made would feed two as a main course or four as a starter.
Ingredients used were:
A kilo of mussels
3 fat cloves of garlic, crushed
Half a medium onion finely chopped
About a cup or half a tin of chopped peeled tomatoes
Olive oil for frying
Small glass of white wine
About 2 tablespoons of finely chopped parsley
Salt and pepper
Water (optional)
Rinse the Mussels Several Times
Start by cleaning the mussels. Not as tricky as it may seem. I usually rinse them three or four times in cold running water. Throw away any that are cracked or open. You then need to remove the “beard” which is the small strand of seaweed looking stuff which usually just pokes out of the straighter side of the mussel. Hold the mussel in one hand with the point facing down and the curved part into the palm of your hand. Grab the seaweedy strand with your thumb and forefinger of the other hand and pull it upwards – it will slide out and you´re done!
Cleaned and De-Barnacled!
If your mussels have any barnacles attached, you can pop these off with the blade of a flat (butter) knife. Finally a quick scrub (I use a metallic pan scrubber for this) and a final rinse and they´re done.
Put the mussels to one side and start on the base. In a deep saucepan which has a lid, heat some olive oil (enough to sweat the onion and garlic). On a low heat, sweat them off for a few minutes until soft and transparent. I used a red onion today as it was what I had, but it´s just as good, if not better, with a stronger tasting white onion.
Gently sweat the onion and garlic
Now add your tomato (you can also add a teaspoon of tomato puree if your tomatoes are a bit pale or lacking in flavour). Keep on a low heat and put the lid on and leave to simmer for about 5 minutes. Remove the lid, add your wine and seasoning and bring to a bubble then reduce to a simmer and leave to cook gently for 5 minutes.
Make the tomato base for the soup
The base is now ready and you can stop here until you´re ready to eat – the final stages will only take you about another 5 minutes, so this is a good “prepare ahead when you´ve got guests” dish.
Finally...add the mussels and parsley
When you´re ready to eat, warm the tomato sauce, add the mussels and the chopped parsley and put the lid on. I usually do this on a medium heat and after about 2 minutes check and see how the mussels are doing. You may need to put the lid on and give the pan a shake to move the mussels around a little.
Once they´re all open they´re ready to eat. The mussels will release their juices so see how much you have in the pot. If you feel you´d like a little more liquid, add a glass of water (or fish stock or wine), if not, they´re fine as they are. I don´t usually add more liquid, these measurements give two large bowls of mussels and enough stock for two good bowls of soup.
Enjoy - but don´t forget the wine!
You can serve with a salad and plenty of crusty bread to mop up the juices. I recommend serving with a spoon and fork. The fork is for getting those mussels out of their shells for those guests who don´t want to use an empty shell to do this, and the spoon is for the soup part. They´re also nice, particularly if you serve them with less liquid, with crispy chips and garlicky mayonnaise. Don´t forget to put an empty bowl on the table to chuck the shells into and a bottle of chilled white, rosé or red wine. Yes, I do mean chilled red, believe me, it works! It´s one of those dishes that works with any wine. A bit like me really…
So in 2016 I turned 50. I was in Italy for my 21st, 30th and 40th. To keep this birthday tradition going I always knew I'd be in Italy for my 50! This blog starts with my 5 week adventure in Puglia but my love affair with Italy continues.....


")
")


