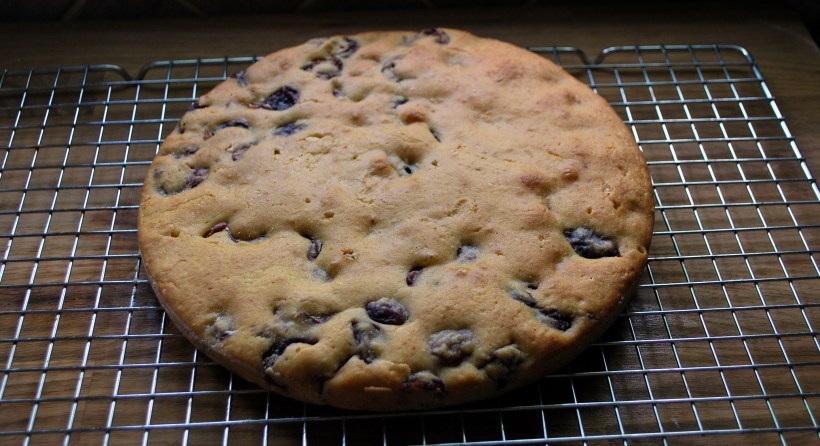
Yes, the sourdough madness continues. I hate to throw food away and whilst I can’t always use my sourdough starter, especially when I have to remove half to feed it, I am now finding ways to bring it into other recipes.
We’ve had bread, and pizza, so now it’s time for something sweet. I’ve noticed too that there’s not too much fat used in these recipes, and I tend to use olive oil rather than butter, so I’m finding lower fat alternatives which has been a bonus.
As I was playing around with my cake recipe, the lovely Teleri at Olives & Artichokes, very kindly weighed, measured, baked and posted a gorgeous almond cherry cake made with olive oil (I’d asked her about her baking!). Thanks Teleri, this one is being baked today Up the Mountain!
I found several recipes for cakes on line and decided to be brave and adapt, mix and match. What was the worst that could happen? The chickies would have had cake for breakfast. Luckily for us, and unluckily for them, my first attempt worked well, so no Cherry Chickie Cake this time.
The texture of the finished cake was somewhere between a sponge cake and a scone (US biscuit). We ate it cold and it was lovely, not dry at all and not heavy (which I was concerned about). I think this would also be good warmed slightly and served with cream or ice cream. Or both.
Ingredients (cake serves 8-10 slices)
1 cup of sourdough starter
1/3 cup oil (I used olive oil)
1 egg, lightly beaten
1 cup of plain flour
¾ cup sugar
½ teaspoon salt
1 teaspoon baking powder
1 teaspoon vanilla essence
1 cup of chopped, stoned cherries
Mix together the starter, the oil and the egg. Add the dry ingredients and mix in well and then add the cherries.
Put into a greased and floured cake time and bake for about 45 minutes at 180 degrees (until a skewer poked into the centre of the cake comes out clean and the cake is lightly browned).
This cake doesn’t rise much, but my next experiment will be to make the batter with self raising flour and then leave it to rise to see how the texture of the cake varies. Oh the things I do for you….
I confess, I have been gripped by sourdough fever, and am now searching the internet for ways to use my starter.
A logical place for me to veer off to was a pizza base. We do enjoy homemade pizza here Up the Mountain on a fairly regular basis, and toppings usually involve a fridge clear out with half the pizza (I always make a big rectangular one, the same size as my oven tray) topped with meat and the other half vegetables. You all know I’m not a veggie, but one of my little quirks is that I’m not crazy about meat or fish on my pizza. So there!
When are the other 8 guests arriving?!
Ingredients (dough)
1 ½ cups of starter
1 ½ cups of plain flour
2 tablespoons of olive oil
1 teaspoon of salt
Mix all ingredients together and knead for a few minutes (I used my mixer with the dough hook). No need to leave to rise but if you don’t want to use it immediately, put into an oiled bowl and cover with oiled cling film. When you are ready to make the pizza, knock back the dough and roll out as thinly or thickly as you like.
This amount would make 2 large pizzas, I think I could have made less (using a cup each of flour and starter) as my pizza was thicker than I normally make it. Instead of being sensible (and healthy) and using less of the dough, I just left it more thickly rolled out than usual and made it fit my oven tray (heated) before spreading with home made tomato sauce, peppers and mushrooms on one side and jamon on the other and sprinkling with cheese before backing for about 25 minutes in a very hot oven.
It sounds so exotic doesn’t it…Cuban Style Rice? Well, sorry to disappoint, but it’s not at all! Arroz a la Cubana is a store cupboard, go-to dish. Often served in restaurants as part of the mid day “menu” and eaten by impoverished students all over Spain. What is it? Simply rice with tomato sauce and a fried egg on top.
As with many simple dishes, they can be comforting and filling. And they can be dressed up too, if this is what takes your fancy.
I almost always have some home made tomato sauce in the fridge. In the summer our little huerto provides me with tomatoes to see me through most of the year, and even though we missed the end of the summer in Spain, I managed to freeze plenty of tomatoes which will keep me going for a month or so until this season’s vegetables are available to me.
There may be a different way of making Arroz a la Cubana, this is my method which gives you a slightly soupy textured rice, almost like a risotto.
Ingredients (for two as a main course)
1 cup Spanish paella rice
1 ½ cups of water
1 cup of tomato sauce (sofrito) Recipe below
Salt and pepper
Start by bringing the rice and (salted) water to the boil, reduce the heat and continue to cook slowly until most of the water has evaporated. Now add the tomato sauce, check for seasoning and continue to cook for a few minutes more until the rice is almost done. Turn off the heat, cover the rice and leave to stand for 5 minutes, by which time the rice will be done.
Typically served with a fried egg on top, a great veggie meal, I added some cooked green beans and topped the rice with griddled loin of pork. Delicious with a drizzle of extra virgin olive oil and a squeeze of lemon juice.
Fresh basil or oregano (stalks and leaves, not chopped)
A glass of red wine
About half a teaspoon of sugar
Put the garlic into a few tablespoons of olive oil (do not heat the oil first, we don’t want the garlic to brown) and cook slowly for a few minutes until it starts to soften. Now add the tomatoes, the tomato purée, the wine and the herbs. Season lightly and simmer for about 30 minutes until thickened. Check for seasoning and if it is a little sharp, add the sugar (this is not always necessary). Cook for a few minutes more, remove the herbs and you’re done.
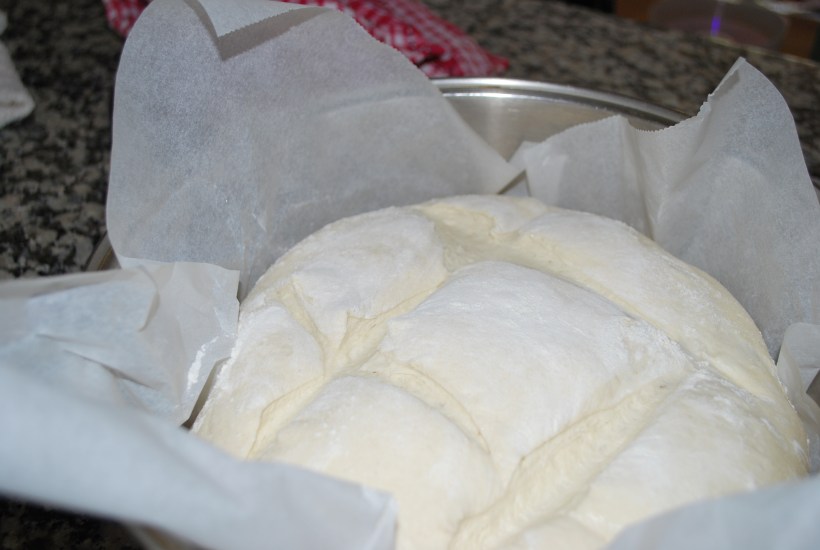
Yes, my sourdough starter is now up and running and ready to make bread with. Apologies for the length of this post, it’s hard to explain what I did in just a few words, so if you’re not interested in the process, have a look at the photos and come back again soon for some quicker recipes – you’re always welcome here!
Third TIme Lucky Loaf!
First up I tried a recipe from the very good River Cottage Bread handbook, but it involved proving the bread 4 times (yes, 4 times!) which felt rather too much like a chore to me. The gas oven did not behave well and the recipe also involved trays of water and spraying the bread.
I did get a lovely tasting loaf, but the process was amazingly labour intensive. A recipe from the lovely Moro Cookbook involved very little work but my brain told me as I did it that it wasn’t going to work for me. And it didn’t. Flat as a very thick pancake bread.
I would have liked more holes in it, but it tasted wonderful…
I also struggled with proving and baking trays and came across a few folk who had used oven dishes with lids (or casserole dishes or Dutch ovens). Some dusted them with oatmeal to stop the bread from sticking and one person used greaseproof paper. I wish I could track her recipe down to acknowledge properly, but I can’t find it again…..apologies to the person who had this great idea.
So, with no further ado, I used a recipe from the River Cottage website, with a few tweaks of my own and the oven dish/greaseproof paper method of baking. Result? A beautiful looking and tasting loaf of sourdough bread. Now, if someone can advise me on how to make the bread denser and more sour tasting I’ll be a very happy bread baker!
For the sponge
•About 100ml active starter
•250g strong bread flour (white, wholemeal or a mixture)
•300ml warm water
For each loaf
•300g strong bread flour (white, wholemeal or a mixture)
•1 tbsp olive or rapeseed oil (optional)
•10g salt
The night before you want to bake your loaf, create the sponge: take about 100ml of your active starter, and combine it with 250g fresh flour and 300ml warm water in a large bowl. Mix well with your hands, or very thoroughly with the handle of a wooden spoon, then cover with clingfilm and leave overnight. In the morning, it should be clearly fermenting – thick, sticky and bubbly.
Moby Dick – a beast of a sourdough starter
Now make your loaf: add a fresh 300g flour to the sponge, along with 1 tbsp oil, if you like (it will make the bread a touch softer and more silky, but is not essential), and 10g salt (which is essential). Squidge it all together with your hands. You should have a fairly sticky dough. If it seems tight and firm, add a dash more warm water. If it’s unmanageably loose, add more flour (but do leave it as wet as you dare – you’ll get better bread that way). I did this and the next stage in my mixer with the dough hook.
Turn out the dough on to a lightly floured surface and knead until smooth and silky. This takes in the region of 10 minutes, but it can vary depending on your own style and level of confidence. Put the dough in a lightly oiled bowl and turn it so it gets a light coating of oil. Cover with lightly oiled clingfilm, or put the bowl inside a plastic bag, and leave to rise. Don’t expect it to whoosh up to twice its original size in an hour, as a conventional loaf does. Sourdough rises slowly and sedately. The best thing is to knead it in the morning then simply leave it all day (or knead in the evening and leave overnight) in a fairly cool, but draught-free, place, until it is more or less doubled in size and feels springy when you push your finger gently into it. Knock it back (deflate it) on a lightly floured surface.
The dough has risen – hallelujah!
You now need to prove the dough (i.e. give it a second rising). You are also going to be forming it into the shape it will be for baking. If you have a proper baker’s proving basket, use this, first dusting it generously with flour. I lined a bowl (which was roughly the same size as my oven dish) with greaseproof paper and sprinkled it with a little flour). When the dough had doubled in size (it only took a couple of hours as it was a warm day) I lifted the bread out with the paper and placed both the paper and bread into the oven dish (which I had heated for about 20 minutes) slashed the bread with a sharp knife, sprinkled it with a little flour and put the lid on the pot.
I cooked it on the high temperature the entire time for about an hour and removed the lid for the last 20 minutes of cooking. Leave to cool completely (it’s hard to resist, but your bread really will have a better texture if you allow it to cool), enjoy!
I love pastry but am mostly too lazy to make it. Except at Christmas, when I make Clara’s Shortcrust Pastry. And sometimes I use it to make quiche.
Perhaps I don’t make it that often because
In Spain, getting hold of butter and keeping it fresh before it reaches my fridge is a saga in itself
In England, I’m either too busy ripping out nasty bathrooms or it’s easier to pop to the supermarket and buy it ready made (oops, did I just admit that in public?!)
Enough of this nonsensical pastry avoidance, Chica. Pull yourself together and make it with olive oil! So of course, I did. And you know what? It’s so easy, and so tasty, and so silky and forgiving should you break it (what, me?!) that I suspect we’ll be eating a lot more of it in the next few months. And also, with only 2 tablespoons of oil in a 4 person serving, it really can’t be bad for you, can it?
Ingredients to line a 24cm (9.2 inch) flan tin with enough left over to make a few cheese and marmite nibbles (my grandmother always used to make these as a treat with the leftover scraps of pastry), this is what you need:
150g plain flour
2 tbs olive oil (30ml)
Up to 4 tbs iced water (60ml)
½ teaspoon of salt
I made mine in my food processor, but if making by hand, follow the same steps, it will only take you a couple of minutes longer.
Blend the flour and salt together then add the olive oil and blitz (or rub with your fingers) for a few seconds. Slowly add the water with the motor running but stop as soon as the mixture clumps together.
Press the mixture into a ball and chill (optional) for half an hour wrapped in cling film.
You can roll this pastry out really thinly if you like, it behaves well. Use it to make your favourite quiches and pies. I made a vegetable pie with a filling of sautéed peppers, onions, tomatoes and blanched runner beans which sat on top of a mix of 2 tablespoons of cream cheese with one beaten egg, and topped wth sliced tomato.
And because pastry is rather dull to look at (never start a sentence with the word “and” Chica), I thought I’d show you a lovely photo from New Zealand, taken way too many years ago!
Summer keeps taunting us here Up the Mountain. And then the grey and dismal part of Spring rears its head again. A bit like me, the weather has been neither here nor there.
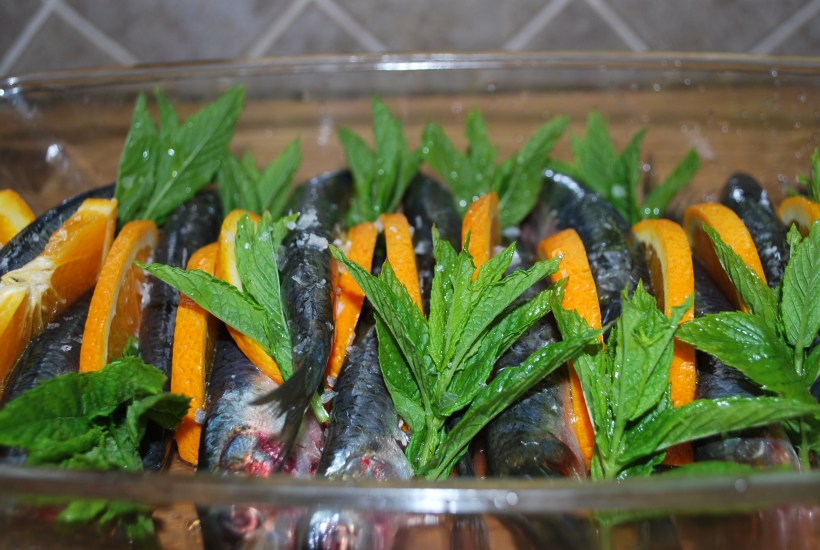
Time for some summer cooking, we dragged out the barbecue ready to grill some sardines and pretend we were on the beach. Of course, in typical English weather fashion, the wind whipped up, the grey clouds sailed overhead and it all went pear shaped. Oh well, we turned on the oven which also took the chill off the house and all was well.
Ingredients to serve 2 as a main course or 4 as a starter
About half a kilo of sardines, descaled and gutted
One orange halved and thinly sliced
Sprigs of mint
Salt
Olive oil
Smoked Pimentón
Simply place your sardines (or you could use herring or mackerel) in an ovenproof dish and place slices of orange and sprigs of mint between them. You could stuff them if you prefer. Sprinkle with salt and pimentón, drizzle a little oil over and any juices from the orange.
Bake on high for about 15 minutes until the juices from the sardines run clear. And at least you won’t have to worry about sand in your shoes….
When we were in England, people asked us what we missed about Spain. Mostly it was the light, which sounds odd, I think people expected us to say “the sun”. We missed family and friends of course, we missed the gatherings and fiestas. But we knew we’d be back and we were having fun too.
I missed being able to cook “properly”, I didn’t have all my gadgets with me, so being back in my fully equipped kitchen with my hand blender, my food processor and my terracotta bowls has allowed me to make some old favourites.
Salmorejo (do click on the link for the recipe and a “how to) is a summer favourite, and now that I can buy tomatoes without taking out a mortgage to do so, this will be made every few days.
Of course, I was able to make pil pil while in England, but it does taste so much better when cooked in the traditional terracotta bowl. And just to prove that you can “pil pil” so many different things, this week I did clams.
And sewing…oh sewing. How I missed my sewing machine. We’ve only been back a week but that wasn’t going to stop me getting my hands on some fabric gifted to me, and a beautiful pattern from the very talented Steph over at 3 Hours Past and making up her wonderful Tiramisu dress pattern. If you fancy making the wonderful dessert instead of the dress, do head over to Karen’s fabulous post which tells you how!
Steph designs and makes patterns for real women – curvy ones, slim ones, straight up and down ones.
The designs and patterns are beautiful with excellent instructions and I’m thrilled with my new summer dress.
My sourdough starter, courtesy of Sawsan’s “how to”, is bubbling away nicely, so at the weekend the mixer with the dough hook will be put to work and I think I’ll really feel like I’ve settled back in again properly.
A week, so it is said, is a long time in politics and an extended absence from the mountain is a long time in terms of what arrives at our doorstep. Bread Man was a bit all over the place for the first few days, but we seem to have settled back into a routine. I’m also getting going with my sourdough starter, using Sawsan’s brilliant tutorial, so I’ll let you know how my adventures in sourdough bread making go once I’m ready.
Fish deliveries continue but Fish Man has been replaced by a very jolly young lady who hails from Big Man’s home town, so she can clearly be trusted to bring us nothing but the best (according to Big Man). Yesterday she had some beautiful mussels, and for once they didn’t need too much scrubbing to get them ready for the pot.
A simple, hearty lunch of mussels with chorizo was made in minutes, and thanks to Bread Man, we were able to mop up any juices that had escaped our slurping.
Ingredients (for 2 as a main course or 4 as a starter)
1kg cleaned mussels (discard any broken or open shells)
4 cloves of garlic peeled and thinly sliced
2 fresh chorizo sausages (or about 30cm of dried chorizo) sliced
A small glass of white wine
Freshly chopped parsley and lemon wedges to serve
Simply sauté the chorizo until it starts to brown (no olive oil needed usually as chorizo is quite fatty) then add the garlic. Stir into the oil for a minute or so until it starts to soften then add the mussels and wine (or a glass of water if you don’t like to cook with alcohol). Cover with a lid and continue to cook for a few more minutes until all the shells are open.
Serve with all the juices poured over, sprinkle over the parsley and let each person add lemon juice to taste. ¡Buen provecho!
Our lovely friend Miss C from The Kitchen’s Garden set us a challenge yesterday. She asked her Fellowship of the Farmy Friends to share their views from their back porches, or windows, or balconies.
Celia, you don’t know how good this has been for me. arriving back from the UK at the weekend and facing yet more DIY due to damp and winter damage, really dragged me down. It’s being dealt with right now, but for a moment I lost sight of what being back Up Our Mountain is all about. Blogging (and real life) Pal Claire from Promenade Plantings nudged me today to join in. Thank you ladies.
I stepped outside my back door just a few minutes ago, away from the mayhem in the house, and snapped. I didn’t set up the camera properly, I just snapped. And then I took the camera away from my eyes and really looked. And then I cried. Happy tears, not sad ones.
This is what it’s all about…now I remember how blessed we really are.
If you haven’t seen the film Groundhog Day, you won’t know what I’m talking about. In summary, it’s about a man who wakes up each morning and experiences the same day over and over and over again. Of course, he learns from his experiences and it all ends well.
When we got back Up the Mountain we were dreaming of months of rest and long lazy days which did not involve DIY, house repairs or anything to do with a paintbrush. There was a slightly damp smell in the house which we put down to the very wet winter which Andalucía has experienced and the fact that our house has been unheated and unlived in for quite some time.
Alas, we were deluding ourselves and some damage caused a few years back by a leak in the roof plus the wet winter has caused a significant amount of damp, particularly in my beloved “despensa” or larder. Today we had to remove everything, including the shelving, from the despensa.
The house is in chaos and we are climbing over things to get from one place to another. It will all be put right soon, I know, but I think we both had a moment or two today of wanting to run away and hide from it all.
Salvation lay in the freezer and with the arrival of Fish Man with fresh calamares. Last summer’s produce was tucked into the freezer and there it awaits us. I cooked a quick peperonata (for which there are quite possibly as many recipes as there are Italian Mammas) and served it with calamares cooked on the griddle pan and drizzled with our olive oil and some sweet balsamic vinegar.
Ingredients for the Peperonata (serves 4) Serve hot or cold
About 500g of crushed tomatoes
1 large onion finely sliced
About 4-6 large peppers (use a mix of colours if you can) cut into bite sized chunks
2-3 large clove of garlic, crushed
A small glass of red wine (optional)
Fresh herbs (I used oregano but basil is also good)
Olive oil
Seasoning
Simmer the garlic and onions in a little oil until soft, then add the peppers. Turn up the heat and fry until the edges of the peppers start to turn brown. Add the tomatoes, herbs and wine (if using) season lightly and simmer for about 30 minutes until reduced and the sauce thick and the peppers starting to melt.
Taste and adjust the seasoning and remove any large pieces of herbs. Great too stirred into pasta but I love it best eaten cold with a little squeeze of lemon juice and plenty of crusty bread.
For a quick lesson on how to clean squid (calamares) if you can’t find it ready prepared, take a look here.
So in 2016 I turned 50. I was in Italy for my 21st, 30th and 40th. To keep this birthday tradition going I always knew I'd be in Italy for my 50! This blog starts with my 5 week adventure in Puglia but my love affair with Italy continues.....