Aubergine and Vegetable Sauce – for people who don’t like aubergine

We’re on a countdown to our next mammoth England trip. If all goes well this week, we’ll leave on Friday in the early hours and get there on Saturday night. This time we won’t pretend to ourselves that we’re going to be there for three weeks and end up staying for nearly ten months! Oh no…this time we are going to do even more of the renovation work ourselves and will take it slowly. We’re planning on three or four months, so we’ll be enjoying the Rye Bay Scallop Season, Bonfires and Fireworks and Christmas too…along with plenty of hard work.

Preparation for the trip, apart from sorting out our house and garden here for the winter, means buying plenty of Spanish goodies to enjoy and share, booking the vet to sort out the paperwork for the pups and digging out our winter and work clothes. Last year we left with mixed emotions, this year it has not been a great summer for us in Spain due to family illness and loss…it’s going to be good for us to have a change of scene and the distraction of hard work.

Aubergine Sauce (4)

One of the things we’re also doing is eating as much of our lovely garden produce as possible and eating what we have put buy in the fridge and freezer without buying too much food before we go. Big Man planted aubergines for me, an act of true love which ranks almost as highly as his first ever gift to me of a cauliflower. The man knows how to “woo” me. He’s not crazy about aubergines but will eat them as he knows I adore them. I finally figured out that the skin and the texture of aubergines are what put some people off. Personally, for an aubergine lover, I feel it’s probably a great part of the attraction. Time to figure out how to get round that issue so everyone is happy. Bring on the aubergine and vegetable sauce…

Aubergine Sauce (3)

For a portion to serve four people

  • 4 cloves of crushed garlic
  • 1 large aubergine
  • 1 large green or red pepper (sliced)
  • 2-3 cups of crushed tomatoes
  • 1 heaped tablespoon of tomato purée (concentrate)
  • 1 small glass of red wine
  • A level teaspoon of sweet or smoked pimentón (paprika)
  • Salt and pepper
  • A pinch of sugar (optional)
  • Olive oil for frying

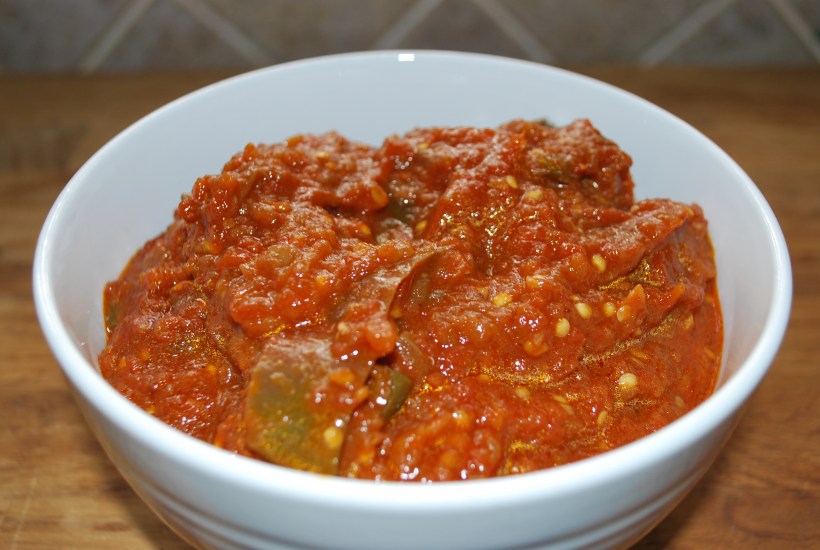
This is pretty much a traditional tomato sauce, apart from the way you deal with the aubergine. Start by cutting the top off the aubergine and slice it lengthways into quarters. Placing the white flesh against a grater, keep grating until you get to the skin and then stop. Repeat with the remaining quarters. You could also do this in a food processor, but you’d need to peel the aubergine first, and it’ so quick to do it’s hardly worth bothering. Discard the purple skin or feed it to some friendly local chickens.

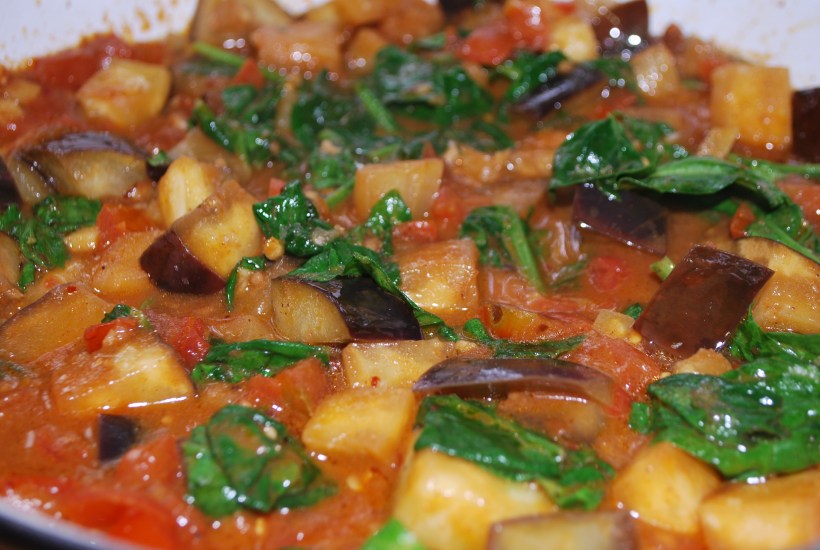
Slowly braise the garlic in a little oil until soft, then add the aubergine and peppers and cook slowly (covered) until the vegetables are softened (about 10 minutes). Now add the tomato, the concentrate, the wine and the pimentón and season lightly. Bring to a bubble and then reduce the heat and cook very slowly (covered) for about an hour. Stir every so often and you may need to add a splash of water if it’s getting too thick. The aubergine melts into the sauce and gives it a slightly meaty texture.

I think you'll find I look great from any angle...
I think you’ll find I look great from any angle…

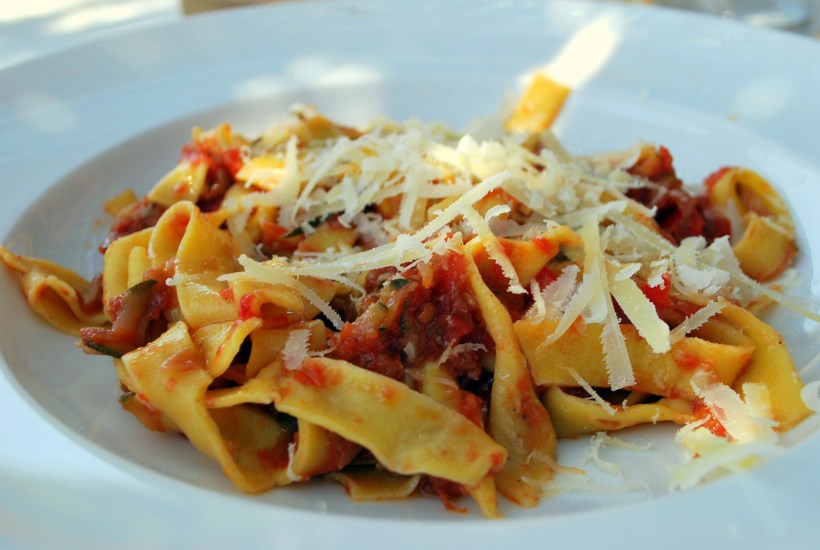
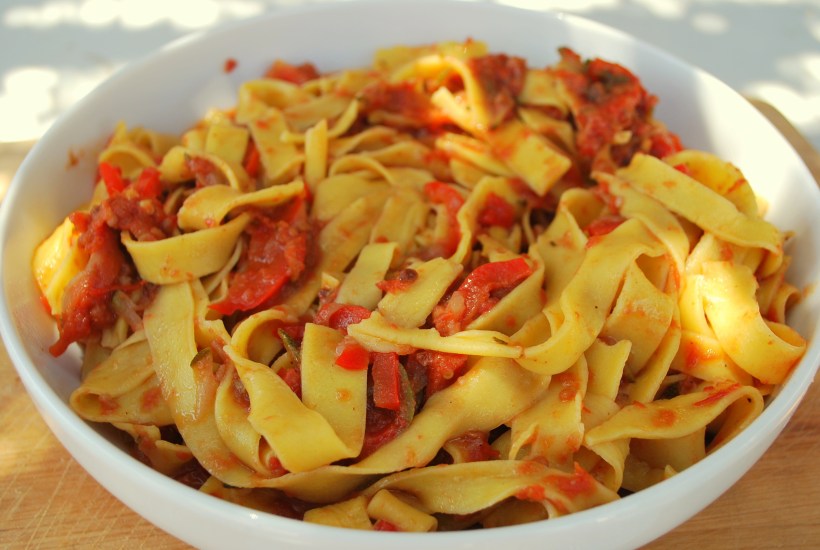
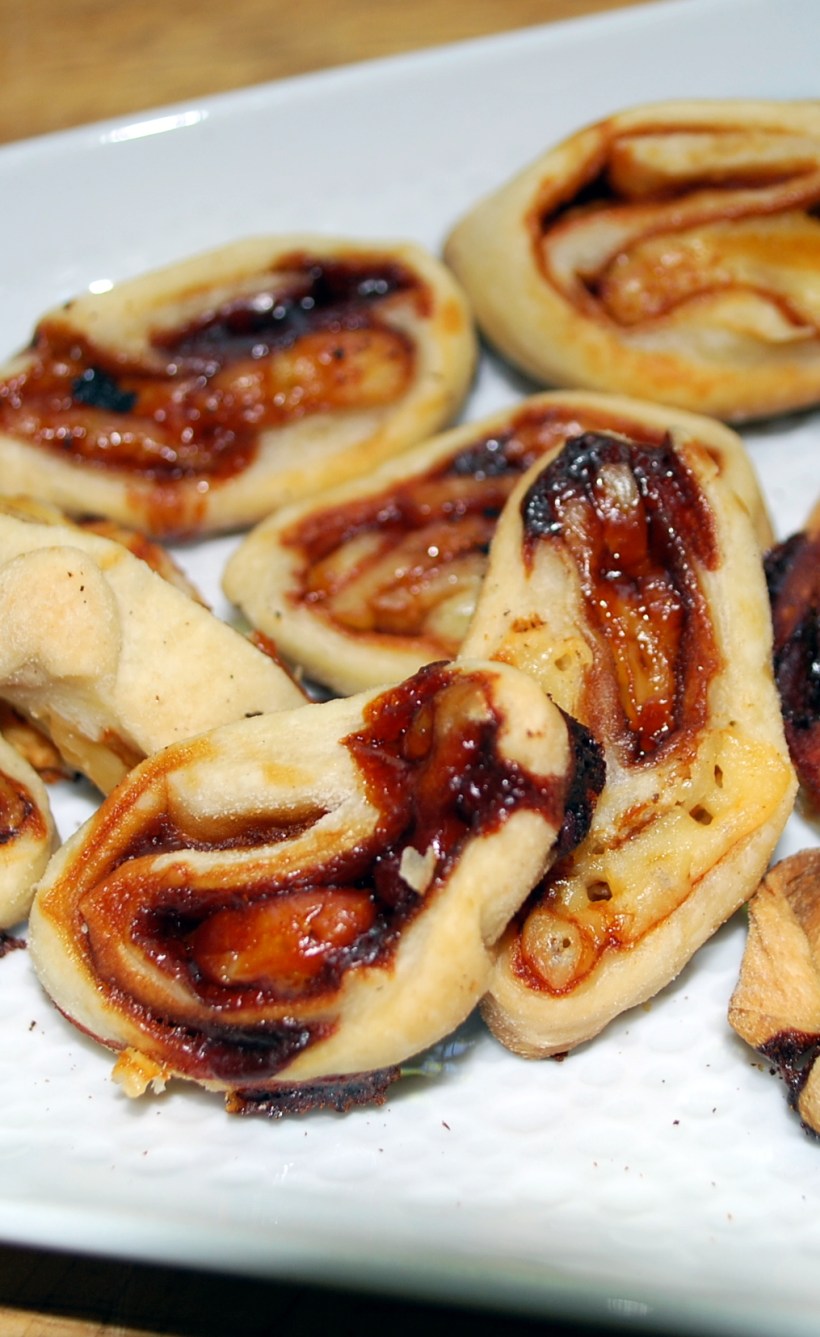
Taste and adjust the seasoning if necessary (I didn’t need to add sugar as I used mature tomatoes from the veggie garden, but sometimes you need just a little pinch). Cook for a few minutes uncovered and enjoy with pasta, pizza, over meat or fish or as a bruschetta topping. If you don’t tell an aubergine hater what’s in there, they probably wouldn’t even know as the seeds look like tomato seeds when cooked and the taste is a wonderful mixture of slow cooked vegetables.

Luna starts her acclimatisation training for the colder English weather...
Luna starts her acclimatisation training for the colder English weather…

And because tomato sauce is not desperately exciting to look at, I’ve also given you a few gratuitous Alfi and Luna photos…

Tamarind Spiced Aubergines and Spinach

The Veggie Garden, although planted sparsely and late this year, continues to reward us with a bounty of aubergines. Always on the lookout for new ways to prepare old favourites, and in the midst of spring autumn cleaning, I came across a packet of tamarind paste from one of my UK trips. Perfect!

Tamarind Spiced Abergine (9)

Internet searches came up with curry recipes, so thinking of a curry type base as inspiration, I made it up as a I went along, and oh my goodness…what beautiful flavours emerged from a few very simple ingredients.

Ingredients (to serve two as a main course with rice or four as a side dish)

  • 1 large aubergine cut into small dice
  • 1 large tomato, diced
  • 1 medium onion, finely chopped
  • About 1 heaped tablespoon of fresh garlic and ginger paste (make this by finely chopping or mincing equal quantities of garlic and ginger, it can be stored in the freezer, and you can scrape off what you need)
  • About 2 cups of chopped fresh spinach
  • 2 teaspoons of tamarind paste soaked in a little hot water
  • 1 teaspoon of brown sugar
  • Salt to season
  • Water or vegetable stock
  • Half a teaspoon of hot chili powder (or to taste)
  • 1 teaspoon of garam masala
  • Oil for shallow frying

Fry the aubergines until lightly browned and remove from pan. You can omit this step if you like but will need to cook the dish when all the ingredients have been added for about 10 minutes longer. Both methods are good.  Add a little more oil if necessary and fry the garlic and ginger paste and onions until the onions are soft but not browned.

Add the tomatoes and cook until softened then add the chili powder and garam masala. After a further minute, add the aubergines, sugar and tamarind, season and pour over enough water or stock to cover the vegetables.

Tamarind Spiced Abergine (4)

Simmer gently until the aubergines are completely tender (about 15 minutes) and just before serving add the spinach and cook until wilted.

Serve with a little chopped coriander and some plain boiled rice. Observant readers will note, however, that in the first photo I picked parsley by mistake!

Chargrilled Aubergines in Tomato Sauce

Our little veggie garden is reduced this year, we planted only peppers, aubergines and tomatoes as we were too late back from England to plant much more and we will head off to the cooler shores of the English South Coast again before all the vegetables have been harvested.

Chargrilled Aubergines in Tomato (7)

Never mind, we are still trading with neighbours and this year we have an impressive crop of aubergines (eggplants). Interesting for me as a cook as Big Man has never been a huge fan, but he knows I love them. It makes me think about different ways of serving them to see if I can convert him. I don’t think he’ll be signing up for Aubergine Weekly yet (if such a magazine existed), but he’s eaten everything I’ve made so far without that look on his face. You know, the one children do when they are about to put a sprout/piece of liver/most hated food into their mouth!

Today’s dish was a quick one as it was so hot. We ate it with Socca, but more of that another day.

Ingredients (to serve 2 as a main dish)

  • One large aubergine thickly sliced and cooked on the griddle or barbecue on both sides until lightly charred (no need to salt and don’t brush with oil if doing on the bbq as you’ll only end up setting fire to them)
  • About two cups of tomato sauce (this was prepared in advance) Soften 3 crushed cloves of garlic in olive oil, then add 1 kilo of crushed peeled tomatoes, 2 tablespoons of tomato purée, half a teaspoon of salt, a few good grinds of black pepper, half a teaspoon of sugar (if required), a glass of red wine and a few stalks of basil leaves. Simmer for about an hour, remove the basil and it’s ready. This will give you about 6-8 cups of sauce

Chargrilled Aubergines in Tomato (4)

Cut the grilled aubergines into bite sized pieces and simmer in the sauce for about 10 minutes and you’re done! This is also wonderful cold and great over pasta.

Ravioli Making – Fun on a Hot Summer’s Evening

Some things are more fun when done with pals. Ravioli making is one of them. Just ask Chgo John.  Luckily my lovely neighbour Denise was willing to give up a few hours of her time and we had an evening of ravioli making and eating in the garden.

Ravioli (1)

We made four kinds of fillings.

Ravioli (5)

Potato with caramelised onion and parmesan, mixed mushrooms with spinach and nutmeg, ricotta with lemon zest and coriander and mascarpone with rocket and sun-dried tomatoes.

Ravioli (22)

No quantities except to say we made pasta with 500g of flour and 5 eggs. This made about 70 ravioli (with some leftover dough too), although we didn’t manage to eat them all. We did give it our best shot though!

Ravioli (23)

We were well lubricated with wine as I believe it is actually illegal to make ravioli without a glass or two to hand.

Ravioli (11)

We served some with tomato sauce and others more simply with olive oil and parmesan.

Ravioli (31)

Summer cooking, summer eating. Everything tastes better eaten outdoors on a hot summer’s night don’t you think?!

Ravioli (32)

(I know they’re not the best shots in the world but they were “working” snaps and it got darker and darker as the evening went on – naturally – I hope you enjoy the atmosphere of the evening as much as we did despite this!)

Take One Bag of Flour

I don’t know who discovered that by grinding grains, flour could be produced. And whoever then went on to figure out that by adding simple ingredients like water and air, you could end up with a delicious loaf of sourdough bread. As for pasta, whoever had that great idea of adding an egg and a pinch of salt to make a beautiful silky dough….well, I raise my glass of wine to them.

Not really much of a recipe today, more an acknowledgement that good food doesn’t need to be complicated or sophisticated. Ingredients, as long as they are fresh and good can produce the most incredible tasting meals with just a little effort and time invested. Oh yes, and love. Good food needs to be made with love.

Pasta with Tomato and anchovy sauce (4)

Lunch the other day was a homage to simple ingredients. Home made pappardelle (thick pasta as opposed to thin as the pasta cutting attachment on my machine has died, so I had to cut by hand) served with a (home grown vegetables) tomato and vegetable sauce with anchovies. Home made bread, dipped in our own olive oil and a glass of not home made wine. I’ll leave that to the experts!

Slow Cooked Vegetable Sauce with Anchovies (serves 2-4)

  • 3 cloves of crushed garlic
  • Half a courgette (zucchini) coarsely grated
  • One carrot peeled and coarsely grated
  • One stick of celery, finely chopped
  • Half a red pepper thinly sliced
  • 1 heaped tablespoon of tomato purée
  • 1 cup (or can) or chopped tomatoes
  • Olive oil
  • Seasoning
  • Herbs (I used basil)
  • A small glass of red wine
  • About 4-6 fillets of salted anchovies

Hand Cut Pasta

Start by slowly braising the garlic, courgette, celery, carrot and pepper (but don’t brown them) until they start to soften. Add the tomatoes, the purée, the wine and the herbs and bring to a gentle simmer. Season lightly and cook slowly for about an hour (or longer). If the sauce becomes too thick, add a splash of water. When nearly ready, remove the herbs if you have kept them whole and stir in the anchovies (leave these out if you want a vegetarian dish). Check for seasoning (you probably won’t need more salt) and serve.

Pasta with Tomato and anchovy sauce (3)

Home Made Pasta

I use (per person as a main course) 100g strong plain flour, 1 egg, a tiny splash of olive oil and a tiny pinch of salt. Mix together by hand or in a machine and knead for a few minutes until the dough becomes soft and silky. Leave to rest for 30 minutes. Check out Chgo John’s excellent recipe for more tips and help.

Cherry Sourdough Cake

Yes, the sourdough madness continues. I hate to throw food away and whilst I can’t always use my sourdough starter, especially when I have to remove half to feed it, I am now finding ways to bring it into other recipes.

We’ve had bread, and pizza, so now it’s time for something sweet. I’ve noticed too that there’s not too much fat used in these recipes, and I tend to use olive oil rather than butter, so I’m finding lower fat alternatives which has been a bonus.

As I was playing around with my cake recipe, the lovely Teleri at Olives & Artichokes, very kindly weighed, measured, baked and posted a gorgeous almond cherry cake made with olive oil (I’d asked her about her baking!). Thanks Teleri, this one is being baked today Up the Mountain!

Cherry Sourdough Cake (2)

I found several recipes for cakes on line and decided to be brave and adapt, mix and match. What was the worst that could happen? The chickies would have had cake for breakfast. Luckily for us, and unluckily for them, my first attempt worked well, so no Cherry Chickie Cake this time.

The texture of the finished cake was somewhere between a sponge cake and a scone (US biscuit). We ate it cold and it was lovely, not dry at all and not heavy (which I was concerned about). I think this would also be good warmed slightly and served with cream or ice cream. Or both.

Ingredients (cake serves 8-10 slices)

  • 1 cup of sourdough starter
  • 1/3 cup oil (I used olive oil)
  • 1 egg, lightly beaten
  • 1 cup of plain flour
  • ¾ cup sugar                          
  • ½ teaspoon salt
  • 1 teaspoon baking powder
  • 1 teaspoon vanilla essence
  • 1 cup of chopped, stoned cherries

Mix together the starter, the oil and the egg. Add the dry ingredients and mix in well and then add the cherries.

Put into a greased and floured cake time and bake for about 45 minutes at 180 degrees (until a skewer poked into the centre of the cake comes out clean and the cake is lightly browned).

Cherry Sourdough Cake (3)

This cake doesn’t rise much, but my next experiment will be to make the batter with self raising flour and then leave it to rise to see how the texture of the cake varies. Oh the things I do for you….

For more cherry recipes, click here or here.

Sourdough Pizza Base

I confess, I have been gripped by sourdough fever, and am now searching the internet for ways to use my starter.

A logical place for me to veer off to was a pizza base. We do enjoy homemade pizza here Up the Mountain on a fairly regular basis, and toppings usually involve a fridge clear out with half the pizza (I always make a big rectangular one, the same size as my oven tray) topped with meat and the other half vegetables. You all know I’m not a veggie, but one of my little quirks is that I’m not crazy about meat or fish on my pizza. So there!

When are the other 8 guests arriving?!

Ingredients (dough)

  • 1 ½ cups of starter
  • 1 ½ cups of plain flour
  • 2 tablespoons of olive oil
  • 1 teaspoon of salt

Mix all ingredients together and knead for a few minutes (I used my mixer with the dough hook). No need to leave to rise but if you don’t want to use it immediately, put into an oiled bowl and cover with oiled cling film. When you are ready to make the pizza, knock back the dough and roll out as thinly or thickly as you like.

This amount would make 2 large pizzas, I think I could have made less (using a cup each of flour and starter) as my pizza was thicker than I normally make it. Instead of being sensible (and healthy) and using less of the dough, I just left it more thickly rolled out than usual and made it fit my oven tray (heated) before spreading with home made tomato sauce, peppers and mushrooms on one side and jamon on the other and sprinkling with cheese before backing for about 25 minutes in a very hot oven.

Almost Arroz a a Cubana

It sounds so exotic doesn’t it…Cuban Style Rice? Well, sorry to disappoint, but it’s not at all! Arroz a la Cubana is a store cupboard, go-to dish. Often served in restaurants as part of the mid day “menu” and eaten by impoverished students all over Spain. What is it? Simply rice with tomato sauce and a fried egg on top.

As with many simple dishes, they can be comforting and filling. And they can be dressed up too, if this is what takes your fancy.

I almost always have some home made tomato sauce in the fridge. In the summer our little huerto provides me with tomatoes to see me through most of the year, and even though we missed the end of the summer in Spain, I managed to freeze plenty of tomatoes which will keep me going for a month or so until this season’s vegetables are available to me.

Solomillo con arroz a la cubana (5)

There may be a different way of making Arroz a la Cubana, this is my method which gives you a slightly soupy textured rice, almost like a risotto.

Ingredients (for two as a main course)

  • 1 cup Spanish paella rice
  • 1 ½ cups of water
  • 1 cup of tomato sauce (sofrito) Recipe below
  • Salt and pepper

Start by bringing the rice and (salted) water to the boil, reduce the heat and continue to cook slowly until most of the water has evaporated. Now add the tomato sauce, check for seasoning and continue to cook for a few minutes more until the rice is almost done. Turn off the heat, cover the rice and leave to stand for 5 minutes, by which time the rice will be done.

Typically served with a fried egg on top, a great veggie meal, I added some cooked green beans and topped the rice with griddled loin of pork. Delicious with a drizzle of extra virgin olive oil and a squeeze of lemon juice.

Chica’s Quick Tomato Sauce

  • About 5 fat cloves of crushed garlic
  • 500g of crushed tomatoes
  • A tablespoon of tomato purée
  • Salt and Pepper
  • Olive oil
  • Fresh basil or oregano (stalks and leaves, not chopped)
  • A glass of red wine
  • About half a teaspoon of sugar

Put the garlic into a few tablespoons of olive oil (do not heat the oil first, we don’t want the garlic to brown) and cook slowly for a few minutes until it starts to soften. Now add the tomatoes, the tomato purée, the wine and the herbs. Season lightly and simmer for about 30 minutes until thickened. Check for seasoning and if it is a little sharp, add the sugar (this is not always necessary). Cook for a few minutes more, remove the herbs and you’re done.

Olive Oil Pastry – So simple, even I couldn’t mess it up….

I love pastry but am mostly too lazy to make it. Except at Christmas, when I make Clara’s Shortcrust Pastry. And sometimes I use it to make quiche.

Perhaps I don’t make it that often because

  1. In Spain, getting hold of butter and keeping it fresh before it reaches my fridge is a saga in itself
  2. In England, I’m either too busy ripping out nasty bathrooms or it’s easier to pop to the supermarket and buy it ready made (oops, did I just admit that in public?!)

Enough of this nonsensical pastry avoidance, Chica. Pull yourself together and make it with olive oil! So of course, I did. And you know what? It’s so easy, and so tasty, and so silky and forgiving should you break it (what, me?!) that I suspect we’ll be eating a lot more of it in the next few months. And also, with only 2 tablespoons of oil in a 4 person serving, it really can’t be bad for you, can it?

Veggie Garden Pie with Olive Oil Pastry

Ingredients to line a 24cm (9.2 inch) flan tin with enough left over to make a few cheese and marmite nibbles (my grandmother always used to make these as a treat with the leftover scraps of pastry), this is what you need:

  • 150g plain flour
  • 2 tbs olive oil (30ml)
  • Up to 4 tbs iced water (60ml)
  • ½ teaspoon of salt

I made mine in my food processor, but if making by hand, follow the same steps, it will only take you a couple of minutes longer.

Blend the flour and salt together then add the olive oil and blitz (or rub with your fingers) for a few seconds. Slowly add the water with the motor running but stop as soon as the mixture clumps together.

Press the mixture into a ball and chill (optional) for half an hour wrapped in cling film.

Cheese & Marmite Nibbles

You can roll this pastry out really thinly if you like, it behaves well. Use it to make your favourite quiches and pies. I made a vegetable pie with a filling of sautéed peppers, onions, tomatoes and blanched runner beans which sat on top of a mix of 2 tablespoons of cream cheese with one beaten egg, and topped wth sliced tomato.

And because pastry is rather dull to look at (never start a sentence with the word “and” Chica), I thought I’d show you a lovely photo from New Zealand, taken way too many years ago!

OLYMPUS DIGITAL CAMERA

Old Favourites and Favourite Gadgets

When we were in England, people asked us what we missed about Spain. Mostly it was the light, which sounds odd, I think people expected us to say “the sun”.  We missed family and friends of course, we missed the gatherings and fiestas. But we knew we’d be back and we were having fun too.

I missed being able to cook “properly”, I didn’t have all my gadgets with me, so being back in my fully equipped kitchen with my hand blender, my food processor and my terracotta bowls has allowed me to make some old favourites.

Salmorejo (do click on the link for the recipe and a “how to) is a summer favourite, and now that I can buy tomatoes without taking out a mortgage to do so, this will be made every few days.

Salmorejo (2)

Of course, I was able to make pil pil while in England, but it does taste so much better when cooked in the traditional terracotta bowl. And just to prove that you can “pil pil” so many different things, this week I did clams.

Almejas al Pil Pil (3)

And sewing…oh sewing. How I missed my sewing machine. We’ve only been back a week but that wasn’t going to stop me getting my hands on some fabric gifted to me, and a beautiful pattern from the very talented Steph over at 3 Hours Past and making up her wonderful Tiramisu dress pattern. If you fancy making the wonderful dessert instead of the dress, do head over to Karen’s fabulous post which tells you how!

Flowers (2)

Steph designs and makes patterns for real women – curvy ones, slim ones, straight up and down ones.

Flowers (3)

The designs and patterns are beautiful with excellent instructions and I’m thrilled with my new summer dress.

Flowers (4)

My sourdough starter, courtesy of Sawsan’s “how to”, is bubbling away nicely, so at the weekend the mixer with the dough hook will be put to work and I think I’ll really feel like I’ve settled back in again properly.