Yes, the sourdough madness continues. I hate to throw food away and whilst I can’t always use my sourdough starter, especially when I have to remove half to feed it, I am now finding ways to bring it into other recipes.
We’ve had bread, and pizza, so now it’s time for something sweet. I’ve noticed too that there’s not too much fat used in these recipes, and I tend to use olive oil rather than butter, so I’m finding lower fat alternatives which has been a bonus.
As I was playing around with my cake recipe, the lovely Teleri at Olives & Artichokes, very kindly weighed, measured, baked and posted a gorgeous almond cherry cake made with olive oil (I’d asked her about her baking!). Thanks Teleri, this one is being baked today Up the Mountain!
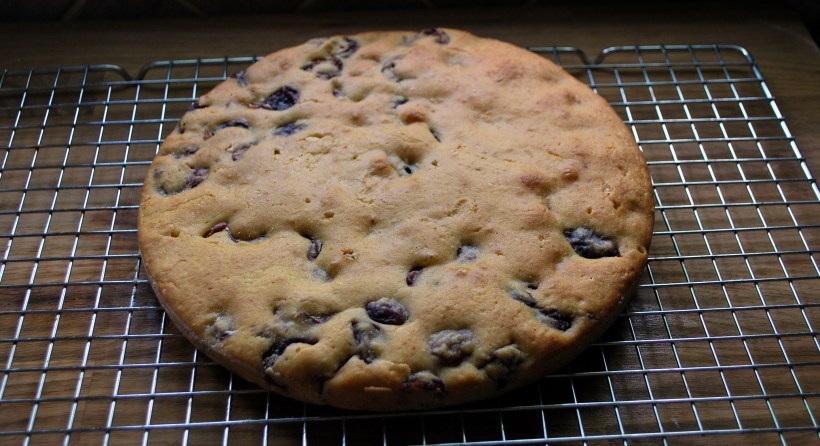
I found several recipes for cakes on line and decided to be brave and adapt, mix and match. What was the worst that could happen? The chickies would have had cake for breakfast. Luckily for us, and unluckily for them, my first attempt worked well, so no Cherry Chickie Cake this time.
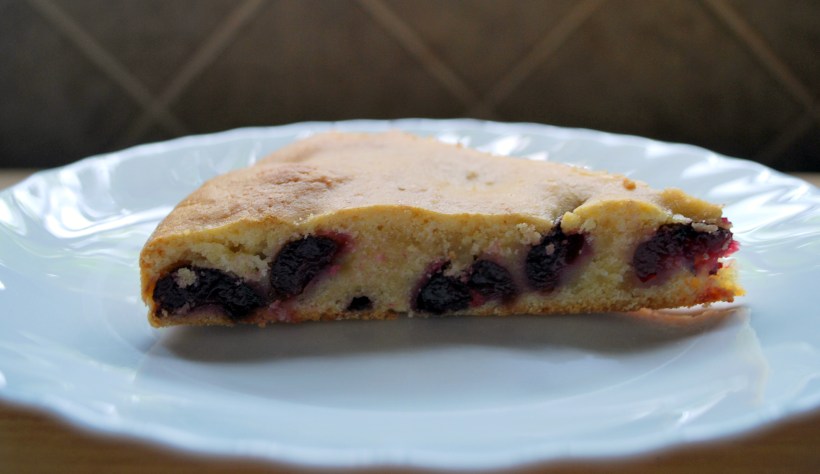
The texture of the finished cake was somewhere between a sponge cake and a scone (US biscuit). We ate it cold and it was lovely, not dry at all and not heavy (which I was concerned about). I think this would also be good warmed slightly and served with cream or ice cream. Or both.
Ingredients (cake serves 8-10 slices)
1 cup of sourdough starter
1/3 cup oil (I used olive oil)
1 egg, lightly beaten
1 cup of plain flour
¾ cup sugar
½ teaspoon salt
1 teaspoon baking powder
1 teaspoon vanilla essence
1 cup of chopped, stoned cherries
Mix together the starter, the oil and the egg. Add the dry ingredients and mix in well and then add the cherries.
Put into a greased and floured cake time and bake for about 45 minutes at 180 degrees (until a skewer poked into the centre of the cake comes out clean and the cake is lightly browned).
This cake doesn’t rise much, but my next experiment will be to make the batter with self raising flour and then leave it to rise to see how the texture of the cake varies. Oh the things I do for you….
I confess, I have been gripped by sourdough fever, and am now searching the internet for ways to use my starter.
A logical place for me to veer off to was a pizza base. We do enjoy homemade pizza here Up the Mountain on a fairly regular basis, and toppings usually involve a fridge clear out with half the pizza (I always make a big rectangular one, the same size as my oven tray) topped with meat and the other half vegetables. You all know I’m not a veggie, but one of my little quirks is that I’m not crazy about meat or fish on my pizza. So there!
When are the other 8 guests arriving?!
Ingredients (dough)
1 ½ cups of starter
1 ½ cups of plain flour
2 tablespoons of olive oil
1 teaspoon of salt
Mix all ingredients together and knead for a few minutes (I used my mixer with the dough hook). No need to leave to rise but if you don’t want to use it immediately, put into an oiled bowl and cover with oiled cling film. When you are ready to make the pizza, knock back the dough and roll out as thinly or thickly as you like.
This amount would make 2 large pizzas, I think I could have made less (using a cup each of flour and starter) as my pizza was thicker than I normally make it. Instead of being sensible (and healthy) and using less of the dough, I just left it more thickly rolled out than usual and made it fit my oven tray (heated) before spreading with home made tomato sauce, peppers and mushrooms on one side and jamon on the other and sprinkling with cheese before backing for about 25 minutes in a very hot oven.
Yes, my sourdough starter is now up and running and ready to make bread with. Apologies for the length of this post, it’s hard to explain what I did in just a few words, so if you’re not interested in the process, have a look at the photos and come back again soon for some quicker recipes – you’re always welcome here!
Third TIme Lucky Loaf!
First up I tried a recipe from the very good River Cottage Bread handbook, but it involved proving the bread 4 times (yes, 4 times!) which felt rather too much like a chore to me. The gas oven did not behave well and the recipe also involved trays of water and spraying the bread.
I did get a lovely tasting loaf, but the process was amazingly labour intensive. A recipe from the lovely Moro Cookbook involved very little work but my brain told me as I did it that it wasn’t going to work for me. And it didn’t. Flat as a very thick pancake bread.
I would have liked more holes in it, but it tasted wonderful…
I also struggled with proving and baking trays and came across a few folk who had used oven dishes with lids (or casserole dishes or Dutch ovens). Some dusted them with oatmeal to stop the bread from sticking and one person used greaseproof paper. I wish I could track her recipe down to acknowledge properly, but I can’t find it again…..apologies to the person who had this great idea.
So, with no further ado, I used a recipe from the River Cottage website, with a few tweaks of my own and the oven dish/greaseproof paper method of baking. Result? A beautiful looking and tasting loaf of sourdough bread. Now, if someone can advise me on how to make the bread denser and more sour tasting I’ll be a very happy bread baker!
For the sponge
•About 100ml active starter
•250g strong bread flour (white, wholemeal or a mixture)
•300ml warm water
For each loaf
•300g strong bread flour (white, wholemeal or a mixture)
•1 tbsp olive or rapeseed oil (optional)
•10g salt
The night before you want to bake your loaf, create the sponge: take about 100ml of your active starter, and combine it with 250g fresh flour and 300ml warm water in a large bowl. Mix well with your hands, or very thoroughly with the handle of a wooden spoon, then cover with clingfilm and leave overnight. In the morning, it should be clearly fermenting – thick, sticky and bubbly.
Moby Dick – a beast of a sourdough starter
Now make your loaf: add a fresh 300g flour to the sponge, along with 1 tbsp oil, if you like (it will make the bread a touch softer and more silky, but is not essential), and 10g salt (which is essential). Squidge it all together with your hands. You should have a fairly sticky dough. If it seems tight and firm, add a dash more warm water. If it’s unmanageably loose, add more flour (but do leave it as wet as you dare – you’ll get better bread that way). I did this and the next stage in my mixer with the dough hook.
Turn out the dough on to a lightly floured surface and knead until smooth and silky. This takes in the region of 10 minutes, but it can vary depending on your own style and level of confidence. Put the dough in a lightly oiled bowl and turn it so it gets a light coating of oil. Cover with lightly oiled clingfilm, or put the bowl inside a plastic bag, and leave to rise. Don’t expect it to whoosh up to twice its original size in an hour, as a conventional loaf does. Sourdough rises slowly and sedately. The best thing is to knead it in the morning then simply leave it all day (or knead in the evening and leave overnight) in a fairly cool, but draught-free, place, until it is more or less doubled in size and feels springy when you push your finger gently into it. Knock it back (deflate it) on a lightly floured surface.
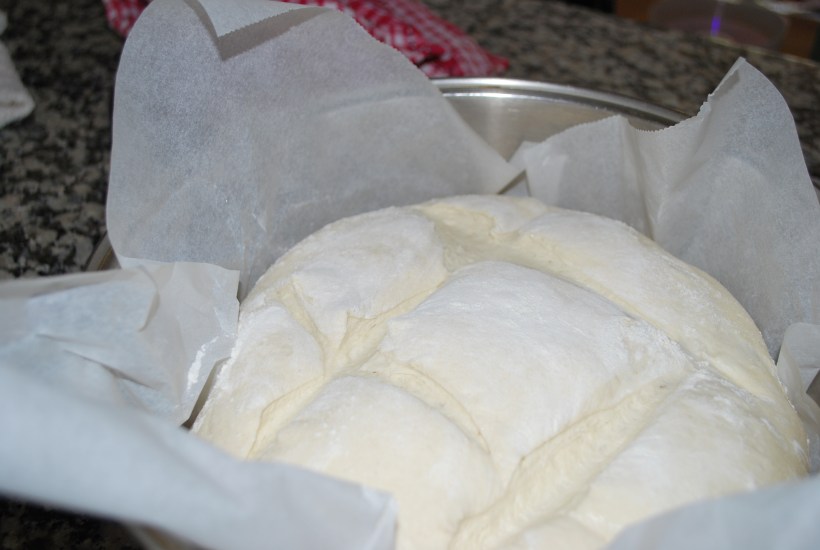
The dough has risen – hallelujah!
You now need to prove the dough (i.e. give it a second rising). You are also going to be forming it into the shape it will be for baking. If you have a proper baker’s proving basket, use this, first dusting it generously with flour. I lined a bowl (which was roughly the same size as my oven dish) with greaseproof paper and sprinkled it with a little flour). When the dough had doubled in size (it only took a couple of hours as it was a warm day) I lifted the bread out with the paper and placed both the paper and bread into the oven dish (which I had heated for about 20 minutes) slashed the bread with a sharp knife, sprinkled it with a little flour and put the lid on the pot.
I cooked it on the high temperature the entire time for about an hour and removed the lid for the last 20 minutes of cooking. Leave to cool completely (it’s hard to resist, but your bread really will have a better texture if you allow it to cool), enjoy!
I love pastry but am mostly too lazy to make it. Except at Christmas, when I make Clara’s Shortcrust Pastry. And sometimes I use it to make quiche.
Perhaps I don’t make it that often because
In Spain, getting hold of butter and keeping it fresh before it reaches my fridge is a saga in itself
In England, I’m either too busy ripping out nasty bathrooms or it’s easier to pop to the supermarket and buy it ready made (oops, did I just admit that in public?!)
Enough of this nonsensical pastry avoidance, Chica. Pull yourself together and make it with olive oil! So of course, I did. And you know what? It’s so easy, and so tasty, and so silky and forgiving should you break it (what, me?!) that I suspect we’ll be eating a lot more of it in the next few months. And also, with only 2 tablespoons of oil in a 4 person serving, it really can’t be bad for you, can it?
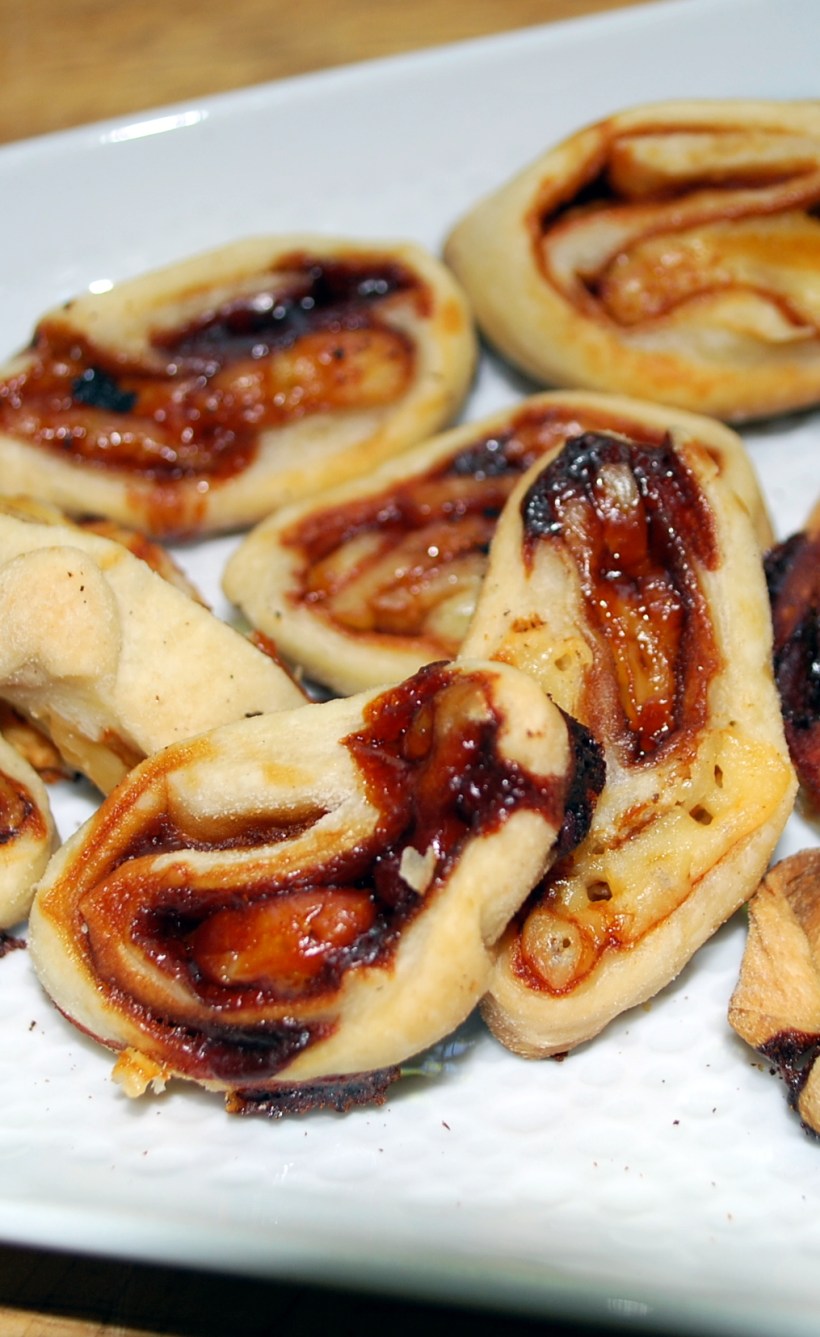
Ingredients to line a 24cm (9.2 inch) flan tin with enough left over to make a few cheese and marmite nibbles (my grandmother always used to make these as a treat with the leftover scraps of pastry), this is what you need:
150g plain flour
2 tbs olive oil (30ml)
Up to 4 tbs iced water (60ml)
½ teaspoon of salt
I made mine in my food processor, but if making by hand, follow the same steps, it will only take you a couple of minutes longer.
Blend the flour and salt together then add the olive oil and blitz (or rub with your fingers) for a few seconds. Slowly add the water with the motor running but stop as soon as the mixture clumps together.
Press the mixture into a ball and chill (optional) for half an hour wrapped in cling film.
You can roll this pastry out really thinly if you like, it behaves well. Use it to make your favourite quiches and pies. I made a vegetable pie with a filling of sautéed peppers, onions, tomatoes and blanched runner beans which sat on top of a mix of 2 tablespoons of cream cheese with one beaten egg, and topped wth sliced tomato.
And because pastry is rather dull to look at (never start a sentence with the word “and” Chica), I thought I’d show you a lovely photo from New Zealand, taken way too many years ago!
Well, not just for Big Man, but for some dear friends who came to visit recently. Time for desserts, sitting around after a meal chatting until the candles burn down, sipping coffee and eating “just one more little piece” even though the waistband is straining a little.
To be honest, most of my girlfriends are not big dessert eaters. Not for any health or diet reasons, we’re just more fans of all things savoury. A good compromise was found once more in the pages of Jerusalem, the cookbook by Yotam Ottolenghi and Sami Tamimi. I decided to make Muttabaq, a delicious dessert made with layers of buttery filo pastry and filled with creamy cheese.
100g melted butter (the original recipe calls for about 50g more but I found I didn’t need it all)
2 x 250g packs of ricotta (Check out Chgo John’s method if you want to make you own)
1 x 250g pack of mascarpone (the original recipe calls for goat’s cheese but I have a goat’s cheese hating pal)
A large handful of chopped pistachios
Then my additions
About a dozen fresh dates, finely chopped
About half a cup of chopped walnuts
The grated rind of an orange
A tablespoon of icing or caster sugar
2 teaspoons of ground cinnamon
Using half the packet of filo, place layers of pastry in a deep baking dish brushing with melted butter between layers. Cut off any edges that curl up the side of the dish. Mix together the cheese, orange rind and sugar and spread over the pastry. Sprinkle over the dates and walnuts and then place the remaining pastry over the top in layers, brushing again with butter as you go. Tuck the outside edges of the top pastry section under the bottom half, brush the top with melted butter and sprinkle over the pistachios. Cut into squares, without cutting right through to the bottom
Bake for25 mins approx. at 225 degrees (or a hot oven) until golden brown. Meanwhile make up a lemon sugar syrup using 250g sugar, 90mls of water and the 3 tablespoons of lemon juice.
When the pastry comes out of the oven, pour over the sugar syrup (it seems like a lot but just keep going). Serve just warm but it’s also good cold.
To accompany the Muttabaq I made a Moroccan inspired dish of sliced oranges sprinkled with chopped mint, pomegranate seeds, rosewater, sugar and cinnamon. Very pretty and fresh.
We talked for hours, we reminisced, we laughed…now that’s what I call a perfect evening. And now I wish all of you and your loved ones peace and joy over Easter and I hope you all get to enjoy some wonderful food, time and laughter together.
Regular readers of this blog may well know that at home Up our Mountain or in our (now soon to be) second home Down by the Sea (well, I’m working on that phrase…give me more time) we have a passionate love for eating fish. Fish Man provides for us Up the Mountain and Fishmonger does the job Down by the Sea.
Skate is also a regular favourite and it’s usually pan fried in my biggest pan possible. The other day I was busy glossing paintwork but wanted to get dinner on the go. Not wanting to stand over a pan for all of ten minutes, I decided to turn on the oven and get cooking.
Ingredients for 2 people
1 skate wing cut into two pieces
1 large lemon thinly sliced
A selection of vegetables for roasting (I used courgettes, peppers, onions, tomatoes and garlic)
Olive oil
Salt and pepper
Set the oven to about 180C degrees or medium. Start by coating your vegetables (cut into chunks or strips) in a little olive oil and season them. Put into a deep baking tray. Add a favourite herb if you like – I used thyme. Roast for 20 minutes then lay the skate on top, season it and then drizzle a little more oil over and lay the lemon slices over the fish. Cover with foil and continue to cook for another 20 minutes.
Check that it is cooked by prodding with a sharp knife in the centre (the flesh should be cooked all the way through in the thicket part). If it’s still a little raw (this will depend on the thickness of your fish) put it back in for another 5 minutes and check again.
You will have a lot of delicious juices in the pan which you can drizzle over but you will have extra which can be saved (freeze if not using within 2 days) and used another day for cooking with rice to make a delicious paella or as a stock for a fish soup.
Healthy, low fat, delicious. And plenty of time to jump under the shower and wash that paint out of your hair.
Oh dear, where have the last 10 days or so gone to? It´s busy, busy, busy here and while we are still (of course) working, cooking and eating, there has been very little activity on the blog. I do miss you all, and I am sorry that I haven´t had time to get over and comment. House Number One is finished. Yes, you read that right! Well, apart from 6 door handles that need to be put on. We even have a lovely tenant waiting to move in as soon as we move out.
So you can imagine that things have moved on apace in House Number 2 (I am sitting in a bare room while the kitchen floor is being grouted and windows are being replaced upstairs and the plumbers are doing things with copper pipes).
Photos to come, but in the meantime, back to the food. Best pal Ria sent me the recipe for her oven baked risotto which is given below. Believe me, if you ever thought you fancied risotto but didn´t have time to stand over the pot and stir, this is a fantastic way to do it. I made extra (of course) and turned the remains into something else the next day and I would strongly suggest you do the same. I have given Maria´s version and then afterwards my adaptation according to what I had available in my fridge. Perfect comfort food.
Maria’s world famous baked haddock & cabbage risotto
Serves 4 (easily halved or doubled – it’s very forgiving)
Prep 5 mins, Cooks in 35 mins
Dead easy and delicious!
Ingredients
1 tbsp olive oil
1 onion chopped
300g/10oz risotto rice
1 litre vegetable stock (you can use vegetable bouillon powder)
280g wedge savoy cabbage, thickly sliced (Tanya – I used about a dozen thinly sliced mushrooms and half a dozen rashers of finely chopped smoked streaky bacon instead of the cabbage and haddock)
400g/14oz skinless smoked haddock (preferably go for the undyed sort and ask the nice fishmonger to skin it for you – but if you can only get with skin on it’s very easy to slip off after it’s been cooked, before you flake it)
3 tbsp crème fraiche
50g freshly grated parmesan
Heat oven to 200C/fan 180C/gas 6.
Heat oil in a 2 litre casserole dish, then soften the onion over a medium heat for about 5 mins.
Tip in the rice and cook for 2 mins, stirring well.
Pour in the stock, bring to the boil, then add the cabbage.
Cover and bake in oven for 20 mins
Remove the dish from the oven and give the rice a stir. Place the fish on top of the rice, replace the lid, then bake for 5 mins.
Flake the fish into large chunks and stir into the rice with the crème fraiche and half the parmesan. Season with freshly ground pepper, then sprinkle with the remaining parmesan to serve.
Eat and enjoy.
Don’t forget to pretend it was really difficult to make!
So, there it is, the secret is out…you can make a great risotto in the oven and have time to nip upstairs for a shower, pour yourself a glass of wine and take a deep breath before dinner.
Now, I know quiche isn´t remotely Spanish, but just think of it as a tortilla in a pastry case! I have introduced Big Man to quiche over the last few years and it has become a big favourite.
It´s also an easy dish for me to prepare right now with just a few pots and pans at my disposal and (yes, I confess) I used ready made pastry this time.
Remember Clara´s Pastry for my mince pies? Well, here it is again, it´s a very versatile and tasty pastry. And when I´m not being so lazy or covered in dust, I´ll make my own again!
Ingredients for the pastry
200g plain flour
Pinch of Salt
50g each of cold butter and lard
One egg, beaten
Milk
Rub the fat into the flour and salt until it resembles fine breadcrumbs or pulse in a food processor. Using a broad knife, work the egg into the flour. Start to gently bring the pastry together with your hands. You will probably need to add a very little milk but add drops rather than slugs. Do not knead or overwork the pastry.
Now wrap in plastic and leave to rest in the fridge until you are ready to use it, but bring it up to room temperature first.
Roll it out on a well floured surface and place into your tin, prick the base with a fork and then fill with baking beans or pulses placed on top of greaseproof paper. Trim off any excess and bake at 180ºC for 15 minutes, or until it just starts to brown.
For the filling
5 eggs and 100 ml of single cream beaten together
A cup of peeled cooked prawns
A cup of thinly sliced mushrooms (lightly sautéed first)
Seasoning
Mix all the ingredients together, if your tin is particularly large, add a drop more cream or milk. Pour into the pastry base and bake for about 25 minutes at 180ºC or until the centre is set.
And your dogs are moved from pillar to post in a bed that gets dustier by the day…
You buy minced beef. Well, of course you do. For a start it´s hard to buy in Andalucía, and then the beef tastes soooo good in England it would be a crime not to. I have discovered a lovely “proper” butcher in Bexhill, and have already made friends with him. He has free range eggs too which are nearly as good as ours. But not quite.
I bought half a kilo (or a pound as my new butcher friend said…he can´t forget those imperial measurements) and turned it into two “cook ahead” meals for us. First up, a simple pasty (but it´s not a Cornish Pasty as it contains carrot and no potato) or empanada (but not really) which I made ahead then warmed up for lunch. I also made another dish for supper later in the week, but more of that later.
Apologies for the photos, my “good” camera is sitting safely in its little rucksack as it doesn´t much like the huge quantities of dust we are currently dealing with on a daily basis.
½ wine glass of beef stock (I used a cube…I´m Cooking Under Fire you know!)
½ wine glass of red wine (please make sure to drink the other half if you are using wine)
Salt and Pepper
500g of minced beef (you will only use about 200g of it, so use less if you don´t want to make another dish, or you could make 4 thingies instead)
Olive oil
One beaten egg
Start by slowly frying the onions, garlic and leek until softened then add the carrots and peppers. Cover the pan with a lid and continue cooking gently until the vegetables are all softened. Add the minced (ground) beef, the paprika and cumin and cook on a medium heat until the mince is cooked. Add the beef stock and wine, reduce the heat and cook until most of the liquid has evaporated, taste and season.
Leave to cool slightly while you roll out the pastry. Cut it into two halves and if you´re feeling fancy you can cut out circles. Lay some minced meat filling down the centre of each piece (you´ll probably use less than half of what you have cooked if you used 500g of meat), fold the pastry over to make a parcel and brush with the beaten egg (I had to miss this step out as I had no eggs and I´m Cooking Under Fire you know!) Or have I mentioned that already?
Bake in a medium oven for about 25 minutes until golden brown or as near to golden brown as you can get your pastry without burning it because you didn´t have an egg in the house to brush on top even though you new butcher friend sells them. Phew, lunch (that isn´t a sandwich)…sorted!
The vegetable garden is now delivering well and we are trying to make the most of it before we have to walk away from it for at least a month. We´re both really sad about this, and I don´t imagine I´ll get too much bottled or frozen this year.
However, some lovely neighbours will be coming in and keeping an eye on things and looking after our chickies. They don´t have a veggie patch of their own, so they are going to enjoy what we´ve planted, so we´re very happy that it won´t go to waste.
In the meantime though, we´re enjoying what we have and last night we enjoyed a pizza with a difference. No tomato sauce!
It´s a sort of Pizza Bianca, in that it´s white, with some lovely fresh vegetables and herbs from the garden – red onion, courgette and rosemary. I seem finally to have cracked making a thinner, crispier dough, so if you fancy a change, give this one a go. It serves two hungry people or 3-4 regular folk if you have a salad with it.
For the dough
250g strong white flour
1 teaspoon of easy blend yeast
1 teaspoon of salt
3 tablespoons of olive oil
125ml of water
For the topping
125g cream cheese blended with 3 tablespoons of milk to make a thick paste
75g blue cheese (I used gorgonzola) crumbled or chopped
1 medium red onion halved and finely sliced
Half a large courgette very thinly sliced
About 4 sprigs of fresh rosemary (pull the leaves from the centre stems)
Freshly ground black pepper
To make the dough mix all the ingredients together either in a bread maker or by hand and knead for about 10 minutes then set aside to rest for about 45 minutes. Roll out thinly and place onto a sheet of greaseproof paper placed on a baking tray or flat board. Leave for about 30 minutes.
When you are ready to make the pizza, turn the oven to high and leave to warm for at least 10 minutes and make sure you place the baking tray you will use for the pizza (not the one it´s sitting on right now) in there to heat up. If you have a pizza stone, all the better!
Spread the cream cheese over the dough, then add the courgettes and onions and sprinkle over the blue cheese and rosemary. Finish with a good grind of black pepper and then remove the hot baking tray from the oven.
Slide the pizza (you can leave it on the greaseproof paper) onto the hot baking tray and pop it back into the oven for about 10 minutes or until the dough is starting to brown.
Cut yourself a big slice of pizza and enjoy…
PS. If you fancy a thicker based pizza, take a look at this recipe.
So in 2016 I turned 50. I was in Italy for my 21st, 30th and 40th. To keep this birthday tradition going I always knew I'd be in Italy for my 50! This blog starts with my 5 week adventure in Puglia but my love affair with Italy continues.....


")


")
")
